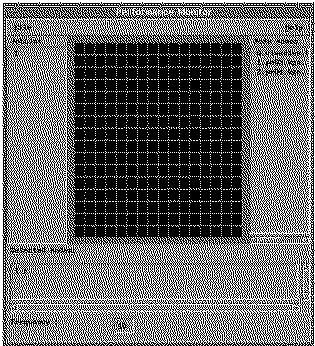
Figure 27. VT Window for Performance Monitoring
 View figure.

This chapter describes the Parallel Environment's Visualization Tool (VT). VT is a group of displays, or views, which show unique performance characteristics of an application program and your system. Each view presents specific, often complex, information in some familiar and easily-interpretable form. For example, a view could be a bar chart, a strip graph, a pie chart, or a grid. Since there are many different views, you open the ones most appropriate to your needs and the information you wish to see visualized.
You can use the VT views for trace visualization and online performance monitoring.
Figure 27. VT Window for Performance Monitoring
View figure.
The VT views enable you to visualize:
Often, a number of views take the same information and present it in different ways. For example, one might use a bar chart, and another a strip graph. This allows you to select not only the information you wish to visualize, but also the form. "Opening and Closing Views" contains a general description of views and their use. "View Descriptions" contains a more detailed description of the views, the information each presents, and how to interpret them.
Table 10 is designed for those who wish to start using VT immediately for either trace visualization or performance monitoring. While the remainder of this chapter takes a slower, more detailed, approach to describing the steps involved in generating and playing a trace file and monitoring system activity, this table does not. It is designed to get you started as quickly as possible, and so little detail or explanation is given for each step. Many readers may prefer the more detailed approach to VT, which begins with "Starting the Visualization Tool".
| Note: | For additional information on VT, refer to IBM Parallel Environment for AIX: Hitchhiker's Guide |
| For Trace Visualization: | For Performance Monitoring: | ||
|---|---|---|---|
|
|
The following table describes how to start VT for either trace visualization
or performance monitoring.
| To start VT for trace visualization: | To start VT for performance monitoring when the Resource Manager is available: | To start VT for performance monitoring when the Resource Manager is not available: |
|---|---|---|
After reading the following description of the vt command-line
flags and the next section on how to open and use views, go to "Using VT for Trace Visualization".
|
After reading the following description of vt command-line flags
and the next section on how to open and use views, go to "Using VT for Performance Monitoring".
|
After reading the following description of vt command-line flags
and the next section on how to open and use views, go to "Using VT for Performance Monitoring".
|
There are also a number of optional command-line flags you can use on the
vt command. These are summarized in the following
table:
Table 12. VT Command-line Flags
| Use this command-line flag: | To: | For example: | For more information, see: |
|---|---|---|---|
-tracefile or -tfile | Automatically load a specified trace file for playback when starting VT. |
vt -tracefile tracefile or vt -tfile tracefile | page (SAT) |
| "Step 1: Load a Trace File for Playback" |
|
|
|
| -go | Start playing back the trace file immediately upon starting VT. When you use this flag, you must also specify a configuration file using the -configfile (or -cfile) flags. | vt-cfile config -go | page *** |
| "Step 2: Start Playback of a Trace File" |
|
|
|
-configfile or -cfile | Load a configuration file. These files contain previously saved arrangements of VT windows, as well as input field specifications. |
vt -configfile config or vt -cfile config | page *** |
| "Saving and Loading a VT Configuration File" |
|
|
|
| -cmap | Request a private color map. When you use this flag, VT's color allocation is independent of other X-Windows applications. | vt -cmap | page *** |
| "Adjusting a View's Time Resolution and Colors" |
|
|
|
| -norm | Indicate that you are not using the Resource Manager. If you are using an RS/6000 network cluster, you must use this option. | vt -norm | table Table 11 |
| -spath | Indicate a search path to a program's source code. Like the AIX PATH environment variable, this is a series of colon-delimited directory names to search. Unless the program's source is in the current directory, the search path is needed to display it in the Source Code view. You can also indicate a search path to a program's source code using the Source Code view. | vt -spath /u/files/source:/u/hink/source | page "Adding and Deleting Paths to the Source" |
| "Adding and Deleting Paths to the Source" |
|
|
|
| -log_file | Specify the file name where the results of the trace file post-processing will be written. The default name is $HOME/tracefilename.pplog. | vt -log_file logfile | page "Trace File Post-Processing" |
-h -? or -help | Get help. |
vt -h vt -? or vt -help | page "Step 11: Getting Help" |
-mp_source | Specify which task's source code is displayed in the Source Code view. |
vt -mp_source 2 | page "Source Code" |
Whether you are using VT for trace visualization or performance monitoring, it provides a set of displays called views. You can open and close these views from the View Selector window. These views show, or visualize, specific information about your program or system in forms such as bar charts and strip graphs. Using mouse clicks, you can display details of the displayed information or change a view's appearance or configuration. Some VT views are for trace visualization only, and some are for both trace visualization and performance monitoring.
There are two types of views - instantaneous and streaming. Instantaneous views present information for a specific point in time, while streaming views represent a range of time. On a streaming view, a vertical line drawn towards the right of the display shows the current point of trace playback. If doing performance monitoring, this line represents the current point in time.
VT arranges the views into the following view categories:
| The view(s) in this category: | Visualize: |
|---|---|
| Communication/Program | information regarding message passing events between processor nodes while running a particular program. Also shows the source code of a program whose trace records are being played back. These views are for trace visualization only. |
| Computation | information regarding the utilization of the processor nodes running a particular program. These views can be used for performance monitoring or trace visualization. |
| Disk | information regarding the number of disk reads, disk writes, and disk transfers. These views can be used for trace visualization or performance monitoring. |
| Network | information regarding the number of TCP/IP packets sent or received by processor nodes. These views can be used for trace visualization or performance monitoring. |
| System | information regarding system activities and events such as page faults and context switches. These views can be used for performance monitoring or trace visualization. |
Whether you are using VT for trace visualization or performance monitoring, you want to open the views most appropriate to the events or statistics you wish to examine.
If you are doing trace visualization, for example, and are interested in studying the message passing events that occurred between processor nodes as your program ran, you would open the Interprocessor Communication and Message Status Matrix views. If you want to see the actual lines of source code associated with the message passing events, you would also open the Source Code view.
You can open and close these views as you see fit during a VT session. For example, as you play a particular trace file, you might initially be interested only in the processor load balance as shown in the User Load Balance view. If the load balance is particularly skewed, however, you might want to then look at some system views.
| Note: | Those views displaying cumulative information are only valid from the point at which the display was opened. Opening views after playback has started will result in incorrect cumulative information. See "View Descriptions" for more information on cumulative views. |
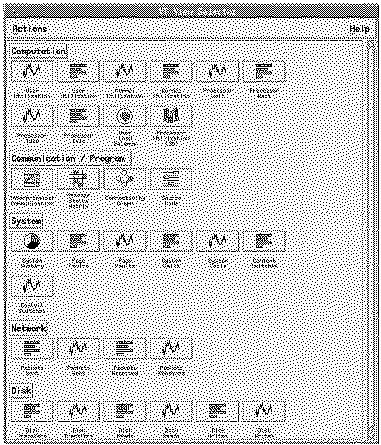
You can open and close views by selecting their icons in the View Selector window. The icons in this window are labeled by view name and grouped by view category. Each view category has a labeled push button.
Figure 28. View Selector Window
 View figure.
To select a single view from the View Selector window.
* The view opens. If already open, it closes.
To select all the views in a particular view category from the View Selector window.
* If there are any unopened views in the category, they are opened. Otherwise, all the views in the category are closed.
| Note: | "View Descriptions" contains a description of each of the views in the five view categories. Refer to this section to decide on the view(s) most appropriate for your purposes. |
Trace visualization enables you to play back statistical and event records generated during a program's execution. These statistical and event records are called trace records and are stored in a trace file. By playing a trace file and opening views to visualize its trace records, you can perform algorithm characterization and study your program's performance. This section discusses:
There are four types of trace records. They are:
The following sections describe each type of trace record in more detail. In addition, the header file VT_trc.h and VT_mpi.h in the directory /usr/lpp/ppe.poe/include defines the structure of trace records. Refer to this header file if you want to write your own program to read, manipulate, or interpret trace records independent of VT. A sample program is provided in /usr/lpp/ppe.vt/util/rtrc.c which displays the contents of a trace file in ASCII format. This program can be used as an example for creating your own program to extract information from the trace file. Refer to "Trace File Post-Processing" for more details on post-processing, and refer to the appropriate VT README file for more details on the format and structure of the individual trace records.
Message passing trace records contain information regarding point-to-point message passing events such as blocking sends and receives among tasks of your program. Each of these events is the result of a call to a message passing subroutine. Message passing subroutines are described in greater detail in IBM Parallel Environment for AIX: MPI Programming and Subroutine Reference and IBM Parallel Environment for AIX: MPL Programming and Subroutine Reference
Collective communication trace records contain information about communication events involving groups of tasks. Broadcasts and combines are examples of collective communication trace records. Each of these events is the result of a call to a collective communication subroutine, for example: mpc_bcast or MPI_Bcast. Collective communication subroutines are described in greater detail in IBM Parallel Environment for AIX: MPI Programming and Subroutine Reference
AIX kernel statistics trace records contain a sampling of statistics from the kernel. These include the:
This type of trace record contains marker information created for application calls. You may code markers using the Parallel Utility Function mpc_marker (for C programs) or MP_MARKER (for Fortran programs). When you run a program, you can display these markers online using the Program Marker Array as described in IBM Parallel Environment for AIX: Operation and Use, Volume 1, Using the Parallel Operating Environment When you later play back a trace file of the program's run using VT, the marker information can again be displayed - this time in the Source Code view. See the description of the Source Code view on page "Source Code". The mpc_marker and MP_MARKER Parallel Utility Function calls are described in IBM Parallel Environment for AIX: MPI Programming and Subroutine Reference
If the High-Performance Communication Adapter is configured, the trace records are timestamped with the switch clock value, regardless of whether the adapter is used for communication. If the adapter is not present, the system clock is used. When the tracing process completes, the trace records are ordered by timestamp and the switch clock values are converted to a time of day timestamp.
The tracing routines use the synchronized counter on the communication adapter. When tracing is initialized, VT_trc_init() synchronizes the trace file timestamp of all tasks to the time of task 0. During the run, trace records will only use the register as a timestamp. When the application on a single node is complete, VT_trc_done() is called, which merges the communication and kernel statistics records into a single file. It also maps the counter timestamp to the time of day using the synchronized timestamp from VT_trc_init().
When no communication adapter is present (for example when running on a cluster of RS/6000 workstations), the Time of Day (TOD) clock provides the timestamp information. The TOD clock should be synchronized across all nodes so that the timestamp information can be properly correlated, otherwise the system times may produce misleading results. For example, a receive may appear to complete before the matching send. This is obviously not possible, yet if the system clock of the sender is behind the clock of the receiver, the trace record will be timestamped, and therefore visualized as if it occurred later in time. The TOD can be set on multiple nodes using a standard synchronization tool like Network Time Protocol (NTP).
VT uses its own routines to create trace records and does not utilize the AIX
trace facility. Some of these can be called from your application
program, allowing you to generate trace files containing just the type(s) of
trace records you are interested in visualizing. To turn tracing off or
on, use the following prototypes:
| For Fortran programs | For C programs |
|---|---|
CALL VT_TRC_STOP ( INTEGER RETURN_CODE ) CALL VT_TRC_START ( INTEGER FLAGS, INTEGER RETURN_CODE ) |
int VT_trc_stop_c() int VT_trc_start_c( int flags ) |
The variable flags is an integer flag that specifies one, some,
or all trace record types. The following table shows the possible
values of flags and the trace record type(s) indicated by
each.
Table 13. Trace Record Integer Flags
| Flag Value | Message Passing | Collective Communication | AIX Kernel Statistic | Application Markers |
|---|---|---|---|---|
| 0 |
|
|
|
|
| 1 |
|
|
| X |
| 2 |
|
| X | X |
| 3 | X | X |
| X |
| 9 | X | X | X | X |
Let us say you wanted trace records to be generated for only the second half of a program, and that you felt only AIX Kernel Statistics and Application Markers trace records were necessary for your purposes.
| For Fortran Programs | For C Programs |
|---|---|
CALL VT_TRC_STOP ( RC ) |
VT_trc_stop_c() |
This stops the generation of all trace record types for the first half of the program.
| For Fortran Programs | For C Programs |
|---|---|
CALL VT_TRC_START ( 3, RC ) |
VT_trc_start_c(3) |
| Note: | During normal trace file playback, VT attempts to simulate actual time. If you have turned trace record generation off for, say, five minutes of a program's run, VT does not automatically skip over that area of the trace file. During normal playback, you will have to wait the five minutes before any of the views are updated. You can get around this by advancing playback over the next trace record as described in "Step 5: Stepping Playback". |
In order to take advantage of all VT features, you need to use the -g option as shown below when compiling your program with the mpcc, mpCC, or mpxlf command. These compiler commands are actually shell scripts that call the regular cc, xlC, or xlf compilers. The -g option produces an object file with symbol table references needed to take advantage of the Source Code view. This view lets you see the actual lines of code associated with the trace record events you are visualizing. The -g flag is not required if you do not wish to use the Source Code view.
Notes:
To generate a trace file, you need to run your program with tracing turned on. You can turn tracing on by setting the environment variable MP_TRACELEVEL, or using the -tracelevel or -tlevel flag when invoking the program. By default the trace level is 0, meaning that tracing is off. As with most POE command-line flags, -tracelevel and -tlevel override their associated environment variable.
Whether you set the MP_TRACELEVEL environment variable or use one of the command-line flags, you use an integer to indicate the trace record type(s) you wish to generate.
The integer you use with the MP_TRACELEVEL environment variable
and its associated flags are the same ones you use on the
VT_trc_start statement within your programs, and are detailed in Table 13. For example, to generate a trace file for all
trace record types you could:
| Set the MP_TRACELEVEL environment variable: | Use the -tracelevel or -tlevel flag when invoking the program: |
|---|---|
|
|
Notes:
By default, trace files are named the same as the program name with the suffix .trc added. There are times when you do not want to use the default name and want to specify your own. To specify a trace file name, you can set the environment variable MP_TRACEFILE or use the -tracefile or -tfile flag to temporarily override their associated environment variable.
For example, say you generate a trace file for program.
If you do not specify a name, it is named program.trc by
default. You play back the trace records in
program.trc, and based on the information visualized decide
to modify program so it runs more efficiently. You make the
modifications and now want to process program to generate a second
trace file. You do not want to overlay program.trc,
however, so you need to give this one a new name. To name the trace
file tracefile2.trc, you could:
| Set the MP_TRACEFILE environment variable: | Use the -tracefile or -tfile flag when invoking the program: |
|---|---|
|
|
If you are generating trace records for AIX Kernel Statistics, VT gets a sampling of those statistics at set intervals. By default, the set interval is every twenty milliseconds. You can change the sampling interval by setting the environment variable MP_SAMPLEFREQ, or using the -samplefreq or -sfreq flag when invoking the program. As with most POE command-line flags, -samplefreq and -sfreq temporarily override their associated environment variable.
If you sample the AIX Kernel Statistics more frequently, your resulting
trace file will be more detailed, but will also require more storage.
If storage is a consideration, you might want to sample AIX Kernel Statistics
less frequently. For example, say you want to get a sampling of AIX
Kernel Statistics every 50 milliseconds. You could:
| Set the MP_SAMPLEFREQ environment variable: | Use the -samplefreq or -sfreq flag when invoking the program: |
|---|---|
|
|
| Note: | You can also set the sampling interval from within your application program. To do this, use the routine VT_trc_set_params (for Fortran programs) or the routine VT_trc_set_params_c (for C programs). See IBM Parallel Environment for AIX: MPI Programming and Subroutine Reference for more information. |
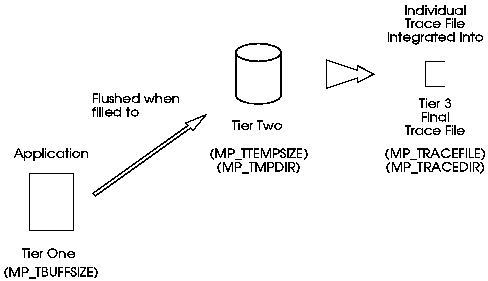
The system uses the following three-tiered approach to manage the storage of trace files:
Communication event records and system statistics trace records are written independently to files with generated temporary names. Communication trace records are written by instrumentation in the communication library. System statistics are written by a spawned process which samples the kernel at a specified interval.
To reduce its impact on an application's performance characteristics, the tracing process makes efficient use of memory, disk I/O, and network traffic during execution and defers formatting, synchronization, and derivation operations until the application is complete. The three-tier tracing architecture passes large data blocks to the disk at less frequent intervals rather than passing small data blocks continuously. In addition, the format of the trace records generated on the local nodes while the job is running is more compact than the format of the records read during trace playback so that it can be generated more quickly.
Integration of the trace data from the individual nodes into the final trace file on the home nodes is deferred until the application completes. VT uses an internal communications channel provided by POE to distribute clock synchronization information and collect trace data. Figure 29 illustrates the three-tiered approach used to manage the storage of trace files.
Figure 29. Three-Tiered Trace File Storage Approach
 View figure.
You have several options regarding the storage of trace files. You can specify:
By default, VT writes the memory buffer to a file in /tmp. You can have it write the temporary trace file to a different directory by setting the MP_TMPDIR environment variable or using the -tmpdir flag when invoking the program. If this directory is a local file system, it will minimize the network traffic. As with most POE command-line flags, the -tmpdir flag temporarily overrides its associate environment variable.
For example, to use a samples directory under your home
directory for temporary trace files, you could:
| Set the MP_TMPDIR environment variable: | Use the -tmpdir flag when invoking the program: |
|---|---|
|
|
By default, VT writes the final trace file to the your current
directory. You can use the environment variable MP_TRACEDIR
to specify a different directory. The directory specified by
MP_TRACEDIR must be accessible to all the nodes of a
partition. If a partition consists of more than one node, the trace
file must not reside in a local directory. You can also temporarily
override the value of MP_TRACEDIR using one of its associated
command-line flags - either -tracedir or
-tdir. To specify that VT should build the final trace file
in the directory /u/salat/cris, you could:
| Use the MP_TRACEDIR environment variable: | Use the -tracedir or -tdir flag when invoking the program: |
|---|---|
|
|
There are times when you will want to increase the size of the buffer, the temp file, or the trace file. For example, each time the system flushes the contents of your buffer or temp file, some of its resources are not available to run your program. By increasing the size of the buffer and temp file, you could decrease the number of times this happens. Also, the amount of trace files generated from a run can be quite large and may exceed the default 10 MB limit. For these reasons, you can specify:
| Note: | You can also manage storage for trace files from within your application program. To do this, use the routine VT_trc_set_params (for Fortran programs) or the routine VT_trc_set_params_c (for C programs). See IBM Parallel Environment for AIX: MPI Programming and Subroutine Reference for more information. |
Say you wanted to increase the size of the buffer to 5 MB, and the size of
the temp files to 20 MB. To do this, you could:
| Set the three environment variables: | Use the command-line flags: |
|---|---|
|
|
| Note: | Remember that specifying a larger buffer size decreases the amount of free memory available to the application. |
You can change to a wraparound storage approach instead of the default
three-tiered approach by setting the MP_TBUFFWRAP environment
variable or using the -tbuffwrap or -tbwrap command-line
flag when invoking a parallel program. With a wraparound storage
approach, the system overwrites the buffer instead of flushing it to a temp
file. As with most POE command-line flags, -tbuffwrap and
-tbwrap temporarily override their associated environment
variable. To specify a wraparound storage approach, you could:
| Set the MP_TBUFFWRAP environment variable: | Use the -tbuffwrap or -tbwrap flag when invoking the program: |
|---|---|
|
|
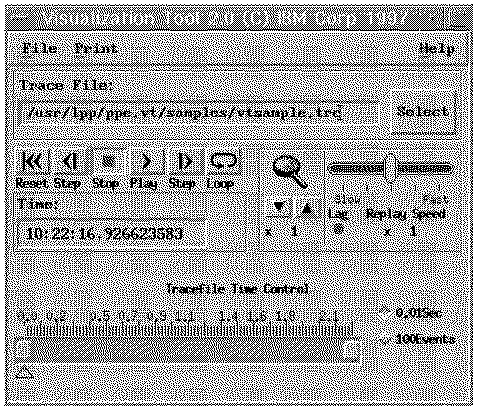
The Trace Visualization window automatically opens at the start of a VT session.
Figure 30. Trace Visualization Window
 View figure.
You use this window to monitor and control the playback of trace files. It consists of:
These menus may also be posted to a separate window ("torn off") by selecting the dashed line below the menu title when the menu is first posted.
The Application Time Display is an editable field. You can click on the time field and manually enter a time. This allows you to pinpoint a time in the trace file for a particular view. See "Step 9: Going to a Specific Time" for more information.
The Trace File Time Control also contains two range markers. The one to the left is the start-of-range marker and the one to the right is the end-of-range marker. You use these markers in conjunction with the Reset and Loop Control Buttons.
The following steps demonstrate how to play back trace files by leading you through all the controls on the Trace Visualization window. By following these steps, you can quickly master the simple controls and so be able to play and interpret your own trace files.
The intention of these steps is to touch on all the pertinent controls you can use when playing back a trace file. These steps do not indicate a specific order that must be followed when playing your own trace files. There are some obvious exceptions. For example, you must load a trace file before you can begin playback of it.
If you do not want to work through these steps because you are already
familiar with VT, but do need to refresh your memory regarding some specific
control, refer to the following table.
| To: | Refer to: |
|---|---|
| load a trace file for playback | "Step 1: Load a Trace File for Playback" |
| start trace file playback | "Step 2: Start Playback of a Trace File" |
| return playback to the start (or an earlier point) in a trace file | "Step 3: Return to an Earlier Point in the Trace File" |
| cycle playback through a trace file or a portion of a trace file | "Step 4: Cycle Playback Through a Trace File" |
| reverse or advance stepping by a single trace record | "Step 5: Stepping Playback" |
| adjust the speed of playback | "Step 6: Adjust Playing Speed" |
| scroll back over view history buffers | "Step 7: Scrolling Over History Buffers" |
| adjust the level of detail shown in certain views | "Step 8: Adjust View Magnification" |
| move to a place in the trace file by entering a time directly | "Step 9: Going to a Specific Time" |
| print a view | "Step 10: Printing a View" |
| get help | "Step 11: Getting Help" |
Notes:
Before you can play back a trace file, you need to load it. From the menu bar of the Trace Visualization window:
* The Trace File Selection Dialog window opens.
This window contains:
If the trace file you want to load is not in the current search path, you can specify a new search path. To do this:
* VT updates the list of directories and files accordingly.
To select a trace file for playback:
* The full path name of the trace file appears in the Trace File field.
* VT loads the trace file and closes the Trace File Selection Dialog window.
| Note: | You can also load a trace file without using the Trace File Selection Dialog
window. There are two ways to do this - from the Trace
Visualization window, or when starting a VT session.
|
The visualization tool relies on instrumentation in the communications library for matching and eventually visualizing communications events. That is, each point-to-point and collective communications event must be paired to the corresponding events. For example, a send must be paired to the matching receive, and all members of a broadcast must be linked together for visualization. Intermediate files from each node contain part of this information, and after the files are merged into the final trace file a post-processing phase is necessary to do this pairing and generate summary information. The post-processing rewrites parts of the trace records and permanently changes the file, so it is required only once and may be subsequently replayed any number of times. Any errors detected during the post-processing are recorded in the post-processing log file named $HOME/<trace file name>.pplog.
If this file cannot be opened for writing, the output will go to standard error (stderr). An example of the contents of this file follows:
VT Post-processing: Processing of trace file /tmp/sr.trc begins.

VT Post-processing: Program source file sr not found.

No source lines will be displayed.

VT Post-processing: Largest single message sent was 64 bytes from task 1

VT Post-processing: Largest cumulative messages sent was c8 bytes

between tasks 0 and 1

VT Post-processing: Total of 35 communications events processed

Trace file type: Post-Processed (5)

Trace file release level: 0203

Time of first trace event: 17:01:53.199213774

Time of last trace event: 17:01:53.676011400

@(#) IBM Visualization Tool trace file, Release :  0203

Number of processors used: 0004

Number of unmatched events in file: 00000000

Maximum single transfer: 00000064

Maximum cumulative transfers: 000000c8

VT Post-processing: Processing complete.
The log begins with the name of the trace file being processed. The next line indicates that the executable which produced this trace file could not be found in the current PATH. If available, post-processing will use the internal debug information in the executable (XCOFF) to print source code line numbers whenever an error is found. In this case, no post-processing errors are reported, so the absence of the executable is not a problem. However, you will not be able to use the Source Code display in VT. The next three lines are a summary of the message size information collected by post-processing. This includes:
This is the largest single message sent between any two processes. In this case it was 64 (hex) bytes sent from task 1 to task 0.
Each message sent between any two tasks is recorded in an array of <number_of_tasks> squared. The size of each message from one task to another is recorded in the row of the sending task and the column of the receiving task. All messages are counted, including point-to-point and collective communications. At the end of post-processing, this array is scanned to identify the largest cumulative amount of data exchanged between any two tasks (identified by the row and column of the array). This information is used by the Message Matrix display to visualize message size information.
AIX statistics records are ignored by post-processing. This is the number of trace records collected for all the communications events.
The remaining lines on the log file print out values from the trace header record (as described in VT_trc.h). This includes:
Following is an example of output with some error information:
VT Post-processing: Processing of trace file /tmp/sendrecv_rep.trc

begins

VT Post-processing: Program source file name is sendrecv_rep.c

VT Post-processing: Warning MPI Operation with non zero return code on

task 3 at time 10:54:39.543372800 (trace file offset 3ec)

From line 35 of sendrecv_rep.c

VT Post-processing: Warning Unmatched Point-to-Point Event on task 0

at time 10:54:40.582377000 (trace file offset 59a)

From line 17 of sendrecv_rep.c

VT Post-processing: Largest single message sent was 64 bytes from

task 1 to 0

(the rest of the summary lines are omitted)
In this example, post-processing was able to find the executable file; and it was compiled with -g so source lines could be displayed.
| Note: | The executable should be in the current PATH and if you plan to use the Source Code Display, you should also have access to the source code in the current working directory. |
There are 2 error messages displayed. The first message indicates that there was a non-zero return code from an MPI operation and the task on which it occurred. This return code may not be fatal and should be defined on the MPI Standard. The error message also calls out the time and the source code line number of the call to the routine. To better isolate this problem, load the trace file into VT and open the Source Code Display. Move to the time reported in the message by entering it in the time field, moving the slider on the time gauge or playing and stepping up to the event (all of these operations are described throughout this chapter). The Source Code Display should now be displaying the source code line under the colored bar for task 3. VT only captures the return code, and your program may or may not continue. If it was terminated this will be obvious with VT because there will be no more activity on that task. You will probably want to determine the exact meaning of the return code and update your source appropriately.
The second error message indicates that the post-processing was unable to match a point-to-point communications event. As mentioned earlier, instrumentation in the communications library provides data whereby the post-processing should be able to correlate all messages from their source to their destination. There are several reasons why this could have failed:
Tracing may have been explicitly turned off in the application with the VT_trc_stop() function, or may have been disabled because of some error condition (for example, MP_TEMPSIZE was exceeded). In this case, the communication may have completed successfully, but post-processing has no way of knowing this because there was no trace record captured.
The application program may have specified an invalid destination task or some other parameter error which, although not fatal, resulted in no message being sent.
At the end of the application program, the temporary trace files from all the nodes are merged into the final trace file on the home node. If an application program is terminated abnormally (for example, <Ctrl-c>) or if there is an error integrating the node trace files (for example, ran out of space), then one or more of the node trace files may be incomplete or missing. In this case, there is more than likely many error messages from the Parallel Environment indicating what went wrong.
When unmatched errors occur, first make sure that the poe job completed successfully (no core dumps, interrupted tasks, error messages, etc.). If this is the case, then follow the steps above to play the trace up to the time listed in the error message. Then, check the information in the Interprocessor Communications and Source Code displays to isolate the problem. If you are using a MPMD (Multiple Program - Multiple Data) program, you will need to read the next section "Using VT with MPMD applications" to specify which program will be displayed in the Source Code display.
There are three more possible error conditions that could be reported. They are:
One of the tasks that should have been involved with the collective communications was not found. This could occur for the same reasons as the unmatched point-to-point event (a terminated task or tracing off, for example). If your program produced the correct results, this may be a trace collection problem and the visualization will simply ignore that member of the group.
MPI allows pending communication events to be canceled by the user application. When the cancellation is successful, a flag is set in the trace record and this message is displayed when the record is processed. Use the Source Code and Interprocessor Communications displays to identify the operation that was canceled.
This is an error during the capture of group information for a collective communications event. The specific group definition is terminated at the last valid record processed. Any tasks that were omitted will not be visualized as part of the group. In most cases this will occur because of a failure in trace generation or integration and will be accompanied by other error messages from the Parallel Environment. Regenerate your trace file and start VT again.
Use the steps listed above to verify that the application and the Parallel Environment completed without errors, then use VT to isolate the specific area of failure.
MPMD applications use different application programs on each node. VT only supports one Source Code display and by default it uses the program information from task 0. During playback, nodes that are not running the same executable may erroneously update in the Source Code display. In order to better support MPMD programs, a new command line flag has been added to allow you to specify which task, and therefore which executable program and source code will be shown in the Source Code display.
To specify a specific task for the Source Code display, use the -mp_source flag on the VT command line followed by the task number. Specifying an invalid task will cause VT to default to task 0. For example, if you are running an MPMD application as follows:
  task     running

   0       server_program

   1       sub_server_program

   2       client_program

   3       client_program
and post-processing indicates an error on task 2 (in the client_program), you could display the source for client_program in the Source Code display by starting VT with -mp_source 2.
| Note: | Remember that in this case, only tasks 2 and 3 will update correctly in the Source Code display. |
Once you have loaded a trace file you can start playing back its trace records. Before starting playback, you should open the views appropriate to your needs as described in "Opening and Closing Views". To start playback:
* Playback begins.
As a trace file plays back:
Playback continues until VT reaches the end-of-range marker or you press the Stop Control Button.
| Note: | On the vt command, you can use the -go flag to specify that playback should start immediately. You can only use the -go flag, however, if you also specify the name of a configuration file using the -configfile or -cfile flags. See "Saving and Loading a VT Configuration File" for more information. |
For example, to start a VT session, load the sample trace file mytracefile and the configuration file myconfigfile, and start playback immediately:
The Reset control button returns playback to the start, or to an earlier spot in a trace file. Before you can return to an earlier position in a trace file, you must stop playback.
* Playback stops at its current position in the trace file.
To return playback to the start of a trace file:
* Playback returns to the start of the trace file. All views and the Application Time Display update accordingly.
By first adjusting the start-of-range marker in the Trace File time control, you can use the Reset control button to return to that marked spot rather than the start of the trace file. If you isolate an area of interest or concern within the trace file, you could do this to keep returning to the start of that area.
To return playback to an earlier spot in a trace file:
* Playback returns to the spot indicated by the start-of-range marker. All Views and the Application Time Display update accordingly.
When VT reaches the end of a trace file, playback stops. If you would like playback to continuously cycle through a trace file:
* When VT reaches the end of the trace file, it returns to the start of the trace file and resumes playback.
If you have isolated an area of interest or concern within a trace file, you might wish to cycle playback through just that area. You can do this by first adjusting the two range markers in the Trace File Time Control before pressing the Loop Control button.
If you wanted, for example, to cycle playback between the 40 and 60 percent marks on the Trace Visualization Time Control, you would:
* Playback cycles through just this portion of the trace file.
The Step Back Control Button and the Step Forward Control Button let you reverse or advance playback over the previous or next trace record for which there is an open view. This is called stepping, and is useful when you have isolated an area of interest or concern within a trace file. During normal playback, VT attempts to simulate actual time by advancing the views after reading each second of the trace file. This can be a drawback when one second of a trace file contains many trace records and when there are large gaps between trace records. When one second of the trace file contains many trace records, stepping lets you visualize each trace record individually to provide you with more detailed information. Stepping is also useful when your trace file contains large gaps between trace records. For example, say trace record generation was turned off and on within your program as described in "Generating Trace Files". If trace record generation was turned off for, say, five minutes of the program's run, VT does not automatically skip over that area of the trace file. During normal playback, you will have to wait five minutes before any of the views are updated. Stepping is then a convenient way of skipping to the next trace record. When you step, VT reads the previous or next trace record in the trace file. If none of your open views respond to that type of trace record, VT continues reading the trace file until it reaches a trace record for which there is an open view. You can interrupt this read by pressing the stop button.
Before you can step through a trace file, you must stop playback.
* Playback stops at its current position in the trace file.
To advance playback past the next trace record:
* Playback advances past the next trace record for which there is an open view, and stops. All views, as well as the Application Time Display and the Trace File Time Control update accordingly.
To reverse playback over the previous trace record:
| Note: | You may also step over multiple events by pressing and holding the Step Button. |
During normal playback, VT attempts to play the trace file at the same rate as it was collected. By shortening the interval between view advances, you can make a trace file play faster. Similarly, by lengthening the interval between view advances, you can make a trace file play slower. VT's fastest speed is 100 times faster than real time. Its slowest speed is 100 times slower than real time.
To control the speed of playback by changing the interval between view advances:
* VT changes the interval between view advances as indicated by the number at the bottom of the Replay Speed Control.
Notes:
Views have history buffers. These are buffers that store trace events after they are updated off the view. During playback, you can scroll the view windows back over these history buffers to see the earlier information.
To scroll back over history buffers:
* All the views scroll back accordingly. If you scroll past the start of a view's history buffer, it goes blank.
To resume playback:
* The views resume playing the current trace record information back from the point at which Stop was pressed.
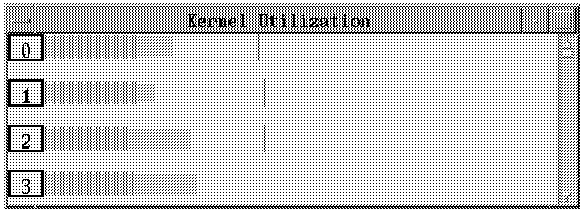
The streaming views visualize information for a range of time, and can be manipulated using the magnification control to present more or less detailed information. The Kernel Utilization (Graph) view (see Figure 38) is an example of a streaming view. It shows kernel utilization for all processors over a range of time. By increasing or decreasing the range of time represented, you can present more or less detail in the view.
For example, say you are playing a trace file and the Kernel Utilization (Graph) view shows a large magnitude difference between two pixels. This represents a sudden increase in kernel utilization. Say each pixel represents one second of time. To understand the sudden increase in kernel utilization, you need a more detailed representation of those two seconds. By decreasing the range of time represented in the view, you can increase the level of detail for those two seconds. Increasing the magnification shows you more detail by decreasing the time represented. Decreasing the magnification, similarly, shows you less detail.
To adjust magnification:
* The number at the bottom of the Magnification Control shows the current magnification setting, and the views update accordingly.
With the editable field of the Application Time Display, you can move to a new time within the trace file by specifying hours, minutes, seconds, and fractions of seconds (h:m:s.fractions). If the time is preceded by a plus or minus sign (+, -), the value taken is relevant to the current time. When typing in a number this way, the default value is seconds. Entering + 1 will move the time forward one second. On the Trace Visualization window:
* This activates the cursor and allows you to type in a value.
* The views are updated to the new time entered.
| Note: | If there is no event at the exact time specified, playback is positioned at the closest earlier event. |
Print allows you to capture images from the screen and format them to a PostScript file. The image can be printed directly or saved to a file for printing or viewing with a PostScript viewer. VT will optionally annotate the output with the following information:
The Print Options Dialog lets you choose the way you want to print your views. From the menu bar of the Trace Visualization window:
* The Set Print Options window opens. From this window, you can select the following with regard to PostScript output format:
* The Set Print Options window closes and VT sets the print options you chose.
To print all the displayed views:
* All the displayed views are selected for printing. This option captures each one of the views individually, and assigns a different name for each PostScript file.
To print one selected view:
* The cursor for window selection changes to a "hand" after the delay that you specified with the "Delay before grab" option.
* The window is selected for printing. This option creates the PostScript file named Vt.printRequest.ps in the specified directory.
| Note: | If the PostScript file already exists, it will be overwritten. |
Pressing the right mouse button cancels the print operation.
Printing the selected view in this way captures the entire window and Motif borders. You can also capture and print a rectangular area anywhere on the screen.
* This establishes one corner of the rectangle and allows you to drag a "rubberband" outline of the area.
* The cursor changes back to a "hand" and you can do one of three things:
VT provides help information by starting Netscape with specific search information which will place the user at the article of interest.
| Note: | To access VT online help, the ppe.pedocs file set must be installed first. Refer to IBM Parallel Environment for AIX: Installation for more information. |
You may get help for VT in one of three ways:
* The cursor is changed to a ?.
* The help information is displayed.
The context sensitive help is provided by invoking the following shell script:
/usr/lpp/ppe.vt/bin/invokehtml.sh -display host:screen tag_name
where -display host:screen displays the help on the same VT screen, and tag_name is the name tag used in the HTML file.
This shell script first checks the availability of the file /usr/lpp/ppe.pedocs/peopsuse2.html, and if Netscape is available. Please see the shell script for customization instructions.
| Note: | There may be a long delay when Netscape is first invoked. Any subsequent invocation will not experience the same delay. |
The default shell scripts can be overridden using the MP_VT_HELP_SHELL environment variable to point to your own shell script. This allows you to change the default browser or HTML file without involvement of the system administrator.
Performance monitoring enables you to monitor the operational status and activity of any of the processor nodes of your SP system or RS/6000 network cluster. You do not need a trace file for this, because VT does the monitoring in real time. Each of the processor nodes has a Statistics Collector daemon that, upon request, supplies VT with samplings of AIX kernel statistics at a configurable interval. It is these statistics that you visualize during performance monitoring. This section describes how to:
Nodes that you select for monitoring are specified to VT in one of three ways:
The default is for VT to contact the RM for the nodes it currently manages. In this mode, VT is aware of the parallel jobs the RM is controlling and can show allocation of jobs to nodes.
If the RM is not present, you should use the -norm option when starting VT to tell it not to try and connect with the RM. In this case, VT will start with the host list file you create, containing the list of nodes on which to run jobs, and will add to the list any other nodes on the LAN that are running the Statistics Collector daemon. Although VT can still monitor nodes, it does not know about parallel jobs or allocation of jobs to nodes.
| Note: | If you are running the Parallel Environment on an SP system with the High-Performance Communication adapter configured, ensure that the switch fault handler (fault_service_Worm_RTG) is running before using the performance monitoring function of the Visualization Tool. This function uses the digd daemon. The switch fault handler and the digd daemon are specified in /etc/inittab and are started automatically. If the digd daemon is used by the performance monitoring function before the switch handler is running, a switch channel check may occur which could cause the switch to crash. |
When you select File > Performance Monitor from the Trace Visualization window, the Performance Monitor window and the PM View Selector window open.
| Note: | The playback of trace files is disabled when using the Performance Monitor. |
Figure 31. Performance Monitor Window
View figure.
This window consists of:
| If the node appears in the matrix as a: | Its status is: |
|---|---|
| gray box | unavailable. You cannot select it for monitoring. |
| pink box | available. You can select it for monitoring. |
| green square within a pink box | job running. The processor node is currently running a job in the job list. |
| yellow box within a pink box | selected for monitoring. You have selected the processor node for monitoring. |
| yellow box within a green square within a pink box. | active and selected You have selected this active job for monitoring. |
The following steps demonstrate how to do performance monitoring on one or more processor nodes by leading you through the controls of the Performance Monitor window.
If you do not want to work through these steps because you are already
familiar with VT, but do need to refresh your memory regarding some specific
function of the Performance Monitor window, refer to the following
table.
| To: | Refer to: |
|---|---|
| Select individual processor nodes, or all the processor nodes associated with a particular job, for monitoring. | "Step 1: Select Processor Nodes for Monitoring". |
| Start monitoring the selected processor nodes. | "Step 2: Start Monitoring". |
| Change the interval between which VT updates the views with new AIX kernel statistics from the selected processor nodes. | "Step 3: Change Sampling Interval". |
Notes:
There are three ways to select processor nodes for monitoring. You can select them:
To select a processor node from the Node Matrix.
* VT selects the processor node for monitoring. To show that it is selected, the processor node appears as a yellow box within a pink box. If the node is also active, it appears as a yellow box within a green square within a pink box. VT also adds the node's identifier to the Selected Nodes Area, and highlights the node in the node list.
To select processor nodes from the Node List.
* VT highlights the processor node's entry in the node list, and adds that node's identifier to the Selected Nodes Area. In the Node Matrix, the node appears as a yellow box within a pink box. If the node is also active, it appears as a yellow box within a green square within a pink box.
If you are using an SP system, you can also select all the processor nodes on which a particular job is running.
* VT highlights the job's process identifier, colors all the node squares associated with the job as a yellow box within a pink box, and lists the nodes in the Selected Nodes Area.
| Note: | If you are monitoring an RS/6000 network cluster, you cannot select processor nodes using the job list. |
Before you can start monitoring the selected processor nodes, you must open views as described in "Opening and Closing Views". To start monitoring the performance of selected nodes:
* The Statistics Collector daemon(s) on the selected processor node(s) begin sending samplings of AIX kernel statistics to VT. All open views begin visualizing these statistics.
Notes:
As you monitor the selected processor nodes, VT advances the views at the specified interval with a new sampling of AIX kernel statistics from the Statistics Collector daemons. You can change the frequency at which VT advances the views by resetting the sampling interval. You should increase the sampling interval if you have many performance monitor views open, or if there is a significant network delay in communicating with one or more of the nodes. If you have already started monitoring the selected processor nodes, you must stop monitoring before you reset the sampling interval.
To reset the sampling interval:
* Sampling is restarted and VT advances the views according to the new interval setting.
When doing trace visualization or performance monitoring, views redisplay using new information from VT after set intervals. By default, this interval is 0.1 second and is called the time resolution. The actual appearance of the view - the colors it uses - is determined by its display spectrum. You can change the time resolution and display spectrum for each view.
| Note: | When running the Visualization Tool on an X-station, you may find that the color definitions will vary from that of an RS/6000 display. X-stations do not always have access to all possible colors. Refer to the documentation supplied with your X-station for more information on color definitions. |
To adjust a view's time resolution and select the display spectrum:
* A selection menu appears.
* The view's Time Resolution window opens.
* The view's Parameters window opens. This window lets you change the appearance of a view. All views let you change the display spectrum. Some views allow you to set other parameters as discussed in "View Descriptions".
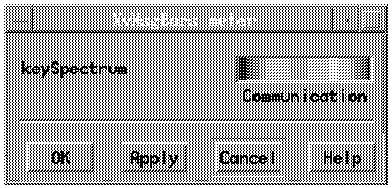
Figure 33. Parameters Window
 View figure.
The Parameters window lets you change the appearance of the view. To change to a new display spectrum:
* A different display spectrum appears in the key spectrum field. The name of the display spectrum appears below the field. You can continue clicking on this field to see each display spectrum for the view. You can also use the middle mouse button to display the available spectrums in reverse order. See the next section, "Adjusting View Colors", for advice on choosing the appropriate spectrum for this view.
* The Time Resolution window and Parameters window close. The view will now redisplay itself at its new set rate using its new display spectrum.
Notes:
* A selection menu appears.
VT allocates seven different spectrums for use by the different views. Some of the initial colors in each spectrum are determined by a set of X resources which can be found in the Xdefaults file, or in Appendix E. "Customizing Tool Resources". The seven different spectrums are
This spectrum is intended for use by the System Summary view. There is one color allocated to represent each of the possible kernel states: idle, user, kernel, wait and other.
This spectrum is intended for use by the Interprocessor Communication view. By setting appropriate resources, a unique color can be assigned for each possible communication event. However the number of unique events is quite large and allocating a unique color for each will most likely exceed the set of available colors. Additional resources are available which will assign a single color to all events in a particular group. For example, you can give all MPL events one color and all MPI events another color. If you don't need to worry about what MPL is doing, all its events can be colored black.
You can also assign one color to each group of message passing events. You can make point-to-point events one color and CCL events another color. Going one step further, you can make your send events a different color from your receive events, and color your blocking events differently from your nonblocking events. The default resource file shipped with VT specifies colors for these groups instead of colors for each unique event type.
For individual events, you can still assign separate colors by specifying the resource name of the event for which you want to define the color.
This spectrum is intended for use by the System views. There are 20 different colors allocated for identifying unique events or states in the views.
The allocation is done internally by varying the color intensity (hue, saturation and brightness) in each pass of a loop. Hue is initially 60 degrees (yellow). Each successive hue is 115 degrees away from the previous hue (modulo 360). Brightness will initially be 1.0 and will alternate between 1.0 and 0.75. Initially saturation will be 1.0 for the first 2 colors and 0.5 for the next two colors and then will repeat this pattern. This produces a set of colors where each entry is easily discernible from its neighbor, but may be similar to other entries.
This spectrum is intended for use by the System views. There are 10 different colors allocated for identifying unique events or states in the views. The allocation is done internally by varying the color intensities across a range starting with a deep blue and ending with an orange. This scheme produces a set of colors such that each entry in the spectrum has enough contrast to make it easily discernible from all other entries.
These spectrums are intended for use by the Message Status Matrix and Processor Utilization (3D) views. The color intensity is incremented from black to white (monochrome spectrum) or black to a user specified color (fade spectrum). The intensity of an event serves as index into the spectrum such that extreme events (such as a spike in processor utilization) will be easily discernible from less intense events.
Like the Monochrome and Fade spectrums, this spectrum is intended for use where the value associated with an event is reflected by the intensity of its color. 100 colors are allocated for this spectrum, with a user definable start and end color. The default start color is (cool) blue and the end is (hot) red.
VT could use a large number of colors for the various display spectrums used by the views. By default, VT attempts to use the default color map shared by all active X-Windows applications. Depending on the number of active X-Windows applications, there might not be enough available colors for VT. When this happens, VT displays a message indicating the spectrum(s) it cannot allocate, and uses black in place of the unallocated color(s). VT will still run, but in extreme cases some display spectrums may be unusable because of the missing color(s).
One way to avoid this problem is to have fewer competing X-Windows applications when you start VT. You can also instruct VT to create its own private copy of the color map using the -cmap flag on the vt command when starting VT. To do this:
If you have another X-Windows application running and VT is using its own color map, window colors may change as you move focus between applications. When VT is active, the colors in the other windows may change. When VT is not active, its colors may change.
A configuration file controls the windows that are displayed, where they appear on your screen, and what values they show. When you have a screen configuration you like, you can save it in a configuration file. Later you could load that configuration file to display the same screen configuration.
For example, say you are doing trace visualization of a program's run and have five or six views open. Based on the information you see visualized, you plan to modify the program so it runs more efficiently. When you have made the changes, you will rerun the program to generate a new trace file and then play it back using VT. You know you will want to use these same five or six views, so you decide to save the screen configuration. To do this:
* The Save Configuration dialog window opens.
* The screen configuration is saved as the file name you specified.
To later load this saved configuration:
* The Configuration File Selection Dialog window opens.
This window contains:
If the configuration file you want to load is not in the current search path, you can specify a new search path. To do this:
* VT updates the list of directories and files accordingly.
To load a configuration file:
* The full path name of the configuration file appears in the Selection field.
* VT loads the configuration file and closes the Configuration File Selection Dialog window.
This reference section describes each of the views you can open for trace visualization or performance monitoring. It is divided in the five view categories.
For those new to VT, a suggested initial selection of views is:
You can then select additional views as the need arises. Using the left mouse button on a view displays additional information regarding events where the cursor is positioned. Using the right mouse button allows you to customize individual views.
There are two types of views - instantaneous and streaming. Instantaneous views present information for a specific point in time, while streaming views represent a range of time. On the streaming views, a vertical line drawn towards the right of the view represents the current point of trace playback or, if you are doing online monitoring, the current point in time.
Because the duration of communication events can vary greatly, VT does the following to ensure that all communication events are reasonably displayed in streaming views regardless of their duration or the current level of magnification:
The four views in this category visualize communication events between processor nodes of your system, and information about your parallel program. The views in this category are for trace visualization only, and should not be opened once playback of the trace file has begun. They respond to the following types of trace records:
For more information on the trace records included in each type, refer to "Types of Trace Records".
This view visualizes message passing and collective communication events. The view uses a small circle to represent each processor node on which your program was run. Message passing events appear as an arc joining two of the circles. Nodes that are participating in collective communication are connected by straight lines. The color of the connected nodes depends on what particular communication call is being displayed. This is an instantaneous view.
Notes:
You may display additional data in this view. To do this:
* A window opens displaying the:
The window remains open only while you hold the mouse button down.
This view lets you toggle between an instantaneous and a cumulative presentation of the message passing information. An instantaneous presentation is the default - the arc representing the message passing event is visible only for the duration of the communication. With a cumulative presentation, the arcs remain visible past the completion of the communication. A cumulative presentation lets you see the overall communication pattern among the processor nodes.
If you want a cumulative presentation of the message passing information:
This view uses a bar chart to visualize the type and duration of communication events. Each bar represents a processor node on which your program was run, and the chart's horizontal axis represents a range of time. A label to the right of each bar shows the node number and the communication thread number within that node, and is colored based on the current state of that node. A current time line is drawn down the view's 90 percent mark. Each bar in the chart will be made up of a number of colored blocks. Each block represents a communication event involving the processor. The size of the block represents the event's duration, and its color indicates the type of event. For example, blocking sends are shown in one color, nonblocking sends in another, broadcasts in another, and so on. When messages are sent between processor nodes, a message line is drawn between the appropriate bars in the chart and the node labels light up. When nodes are involved in collective communication, a polygon is drawn between all participants in the collective communication events.
Lines are drawn when the communication is known to have completed. They are drawn from the start of the event which initiated the communication to the end of the event which completed it. Thus, lines are drawn from the start of blocking or nonblocking sends to the ends of blocking receives, waits and status events. Lines are only drawn when the wait or status for any nonblocking calls involved in the communication have completed. This is a streaming view.
| Note: | Generally tracing can be turned off with no impact to the matching events in interprocessor communication. |
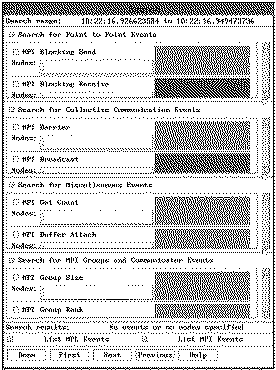
This view has a search feature that helps you to easily locate the communication events and processor nodes you are interested in.
* A selection menu appears.
* The Search window opens. You are now in search mode.
Figure 34. The Search window
 View figure.
The Search window is arranged as follows:
The Search window contains a separate area for each type of communication event. Each area contains a text entry field and a selection button. The color shown in each area corresponds to the color used for that type of communication event in the view.
| Note: | In the text field you specify the nodes to be searched in the following
way:
|
No events or no nodes specified
or the following
Searched to beginning/end (of range)

Event found at time
There are four buttons for locating occurrences of the specified pattern: First, Next, Previous, and Last.
The following is an example of how to use the search feature:
To see the first blocking send involving the two nodes:
* The first blocking send involving the two nodes is lined up under the Search line. In search mode, the processor labels are colored to represent what's under the search line.
To see the next blocking send involving the two nodes:
To see the previous blocking send involving the two nodes:
To see the last blocking send involving the two nodes:
To close the Search window and return to play mode.
The search feature can perform a number of searches simultaneously. For example, you could set up a search for blocking sends involving node 2 or 6 and a search for receives involving node 9, 10, or 11. Pressing First, Next, Previous, or Last shows you the first, next, previous or last event meeting any of the specified search requirements.
You may display additional data in this view. To do this:
* A window opens displaying the:
During regular play mode, the information displayed is for the communication event under the current time line. During search mode, the information displayed is for the communication event under the search line. The window remains open only while you hold the mouse button down.
As described in "Adjusting a View's Time Resolution and Colors", the appearance of a view - the colors it uses - is determined by its display spectrum. The Communication display spectrum is designed especially for use with this view. Each color in the spectrum is a resource you can customize using the .Xdefaults file. This enables you to specify the exact color used to represent each type of event in the view. For more information, see Appendix E. "Customizing Tool Resources".
This view uses a grid to visualize messages sent between processor nodes. Each processor node has both a row and a column on the table. The rows represent when processor nodes send a message, and the columns represent when processor nodes receive a message. The rectangle intersections on the grid represent the message path between the sending node (the row) and the receiving node (the column). As you play back your trace file, the message path rectangles light up from the time the message begins to be sent to the time the receive completes. The color of the rectangles indicates the size of the instantaneous or cumulative message. Smaller messages are colored from the left-hand side of the spectrum; larger messages, from the right-hand side. This is an instantaneous view.
You may display additional data in this view. To do this:
* A window opens displaying the:
The window remains open only while you hold the mouse button down.
This view lets you toggle between an instantaneous and a cumulative presentation of the message passing information. An instantaneous presentation is the default - the message path rectangles stay lit only for the duration of the message passing event. With a cumulative presentation, the message path rectangles remain lit past the completion of the event. A cumulative presentation lets you see the overall communication pattern among the processor nodes. If this display is started after trace playback has begun, the cumulative information will only be shown with respect to when the display was opened.
If you want a cumulative presentation of the message passing information:
* A selection menu appears.
This view shows you the C, C++ or Fortran source code of the program associated with the most recent trace event. A series of colored bars across the top of the display represent the different program tasks and the corresponding communication thread numbers. As you play back the trace file, the bars move through the code to show you each task's position in relation to the source. To be more specific, for each time a task entered into a communication function such as a blocking send, an environment initialization, or an application marker call, its bar moves to that line in the source code. When there are several source files for the executable, the view will switch to show the new source as soon as one program task goes into it.
In order to use this view, you must also have compiled your program with the -g flag, and the executable must be accessable from the current $PATH environment variable. The Source Code files must be in your current directory or in a special search path used by the view. "Adding and Deleting Paths to the Source" describes how to add directories to this source code search path. This is an instantaneous view.
The source code view only displays information for one executable, by default, the executable running on task 0. In the SPMD model, all tasks run the same executable, but for MPMD different tasks will run different executables. To make VT display program information for an executable running on a task other than task 0, you must specify that task with the comand line flag -mp_source.
For example, consider an MPMD program with executables named master and worker. Master runs on task 0 and worker runs on tasks 1 and 2. By default, the source code view will display the source code for master and track the execution of task 0 through that code. To track the execution of worker through its source, you would start VT with vt -mp_source 1.
You may display additional data in this view. To do this:
* A window opens displaying the:
This view has an automatic scrolling capability that automatically scrolls the view to include the most recent trace event. If this capability is off, you must manually scroll the view. To toggle the automatic scrolling capability on and off:
* A selection menu appears.
* The view's Parameters Window opens.
The view lets you toggle between instantaneous and cumulative presentation of the source code's relation to trace events. By default, the view shows an instantaneous presentation &ndash the colored bars representing program tasks move through the source to show each task's position. Each time the task enters into a communication function, its bar moves forward to the associated line in the source. Its bar colors that line only until the task enters into the next communication function. In a cumulative presentation, once a line of the source is colored by a task bar, it remains colored. In this way, each task leaves a trail through the source.
If you want a cumulative presentation of the Source Code view:
* A selection menu appears.
In order to display a source code file in this view, it must be in your current directory or in a special source code search path. When you start VT, you can indicate a search path to a program's source code using the -spath flag. See Table 12.
You can also modify your source code search path from the Source Code view window. To do this:
* The Select Source Files window opens.
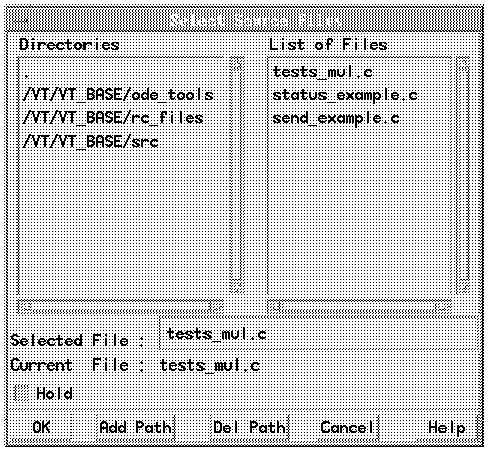
Figure 35. Select Source Files Window
 View figure. View figure. |
This window contains an area listing all the directories in your source code search path.
To add a new directory to the source code search path:
* VT highlights the directory's entry in the list to show that it is selected.
* The Add Path window opens.
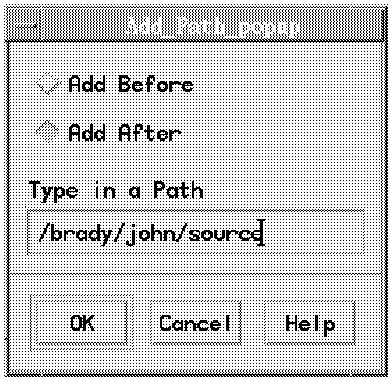 View figure. View figure. |
* The Add Path window closes. The directory search path you specified is added to the list of directories in your source code search path.
To delete a directory's entry from the source code search path:
* VT highlights the directory's entry in the list to show that it is selected.
* A pop-up window opens, asking if you are sure.
* The pop-up window closes, and VT deletes the selected directory from your source code search path.
To close the Select Source Files window:
You can select any source in your source code search path and have it displayed in the Source Code view. To do this:
* The Select Source Files window (see Figure 35) opens. The names of all the source code files in your source code search path are displayed in the List of Files area.
* The source code file name appears in the Selected File field.
* The Select Source Files window closes and the view displays the selected source file.
When there are several source files for the executable, the view will switch to show the next source as soon as one program task goes into it. If you want to stay with the current source file, and not have the view switch to others:
* The Select Source Files window opens.
* The Select Source Files window closes and the view now stays with the current source file.
The views in this category visualize information regarding the utilization of the processor nodes running a particular program. The views in this category are for trace visualization and performance monitoring, and they respond to AIX kernel statistics trace records. For more information on, and a listing of, the AIX kernel statistic trace records, see "Types of Trace Records".
This view uses a bar chart to visualize the amount of time the CPU spent executing the kernel function. Each node is represented as a bar on the chart. As you play back the trace file or monitor nodes online, the length of the bars change to show their relative value of kernel utilization. Each bar has both a solid and a hatched fill pattern. The solid fill pattern represents the instantaneous kernel utilization. The hatched fill pattern is the average kernel utilization. In addition, VT draws a vertical line to the right of each bar to show the highest level of kernel utilization so far reached by each node. This is an instantaneous view.
Figure 37. Kernel Utilization (Bar Chart)
 View figure.
You may display additional data in this view. To do this:
* A window opens displaying the:
The window remains open only while you hold the mouse button down.
By default, this view represents kernel utilization as a percentage of 100. You can adjust this so that the view represents kernel utilization as a percentage of some other value. For example, say you ran your program on four processor nodes - none of which ever exceeded 10 percent kernel utilization. You might want to adjust the view so that it represents kernel utilization as a percentage of 10 instead of 100. To do this:
* The view's Parameters window opens.
* The view calibrates to the new maximum value. The purpose of the Recalibrate button on the configuration pop-up window is to enable or disable the automatic recalibrate function.
This view uses a strip graph, or a group of strip graphs, to visualize the amount of time the CPU spent executing the kernel function. This view has two display modes - aggregate and individual. By default the view is in aggregate display mode - it uses a single strip graph. A line on this graph shows the average value of kernel utilization across all processor nodes. Individual display mode shows a separate strip graph for each processor node's kernel utilization. When in this mode, each graph contains two lines - one showing the individual processor node's kernel utilization and, for comparison, one showing the aggregate kernel utilization. To distinguish between the two, the area between the individual kernel utilization line and the graph's horizontal axis has a solid fill. This is a streaming view.
Figure 38. Kernel Utilization (Graph)
 View figure.
Figure 39. Statistics window.
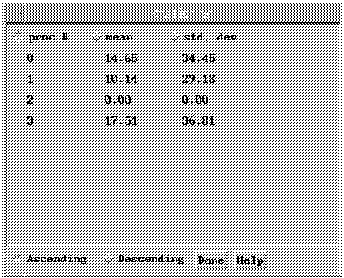 View figure.
You may display additional data in this view. To do this:
* A window opens displaying:
| If the cursor is on a line representing aggregate kernel utilization: | If the cursor is on a line representing an individual node's kernel utilization: |
|---|---|
|
|
The window remains open only while you hold the mouse button down.
This view has two display modes - aggregate and individual. By default the view is in aggregate display mode - it uses a single strip graph. To display a separate strip graph for each node:
* A selection menu appears.
You can open a Statistics Window containing an analysis of the information - the mean and the standard deviation - shown in the view. To open the Statistics Window:
* A selection menu appears.
* The Statistics Window opens, as shown in Figure 39.
The Statistics Window lists the mean and standard deviation for each processor node. The toggle buttons enable you to sort the individual views in ascending or descending order according to processor node ID, mean, and standard deviation. To close the Statistics Window:
This view uses a bar chart to visualize the percentage of time the processor node spent waiting for some resource to become available. Each node is represented as a bar on the chart. As you play back the trace file or monitor nodes online, the length of the bars change to show the relative percentage of processor wait time. Each bar has both a solid and a hatched fill pattern. The solid fill pattern represents the instantaneous wait time. The hatched fill pattern is the average wait time. In addition, VT draws a vertical line to the right of each bar to show the highest percentage of processor wait time so far reached by each node. This view is similar in appearance to the Kernel Utilization (Bar Chart) view shown in Figure 37. This is an instantaneous view.
You may display additional data in this view. To do this:
* A window opens displaying the:
The window remains open only while you hold the mouse button down.
By default, this view represents processor wait time as a percentage of 100. You can adjust this so that the view represents processor wait time as a percentage of some other value. Say you ran your program on four processor nodes, and the processor wait time did not exceed 10 percent on any of them. You might want to adjust the view so that it represents processor wait time as a percentage of 10 instead of 100. To do this:
* The view's Parameters window opens.
* The view calibrates to the new maximum value. The purpose of the Recalibrate button on the configuration pop-up window is to enable or disable the automatic recalibrate function.
This view uses a strip graph, or a group of strip graphs, to visualize the percentage of time the processor nodes spent waiting for some resource to become available. This view has two display modes - aggregate and individual. By default the view is in aggregate display mode - it uses a single strip graph. A line on this graph shows the average percent of wait time across all processor nodes. Individual display mode shows a separate strip graph for each processor node's wait time. When in this mode, each graph contains two lines - one showing the individual processor node's wait time and, for comparison, one showing the aggregate processor wait time. To distinguish between the two, the area between the individual kernel utilization line and the graph's horizontal axis has a solid fill. This view is similar in appearance to the Kernel Utilization (Graph) view shown in Figure 38. This is a streaming view.
You may display additional data in this view. To do this:
* A window opens displaying:
| If the cursor is on a line representing aggregate processor wait time: | If the cursor is on a line representing an individual node's wait time: |
|---|---|
|
|
The window remains open only while you hold the mouse button down.
This view has two display modes - aggregate and individual. By default the view is in aggregate display mode - it uses a single strip graph. To display a separate strip graph for each node:
* A selection menu appears.
You can open a Statistics Window containing an analysis of the information - the mean and the standard deviation - shown in the view. To open the Statistics Window:
* A selection menu appears.
* The Statistics Window opens. This window is shown on page ***.
This view uses a bar chart to visualize the percentage of time the processor nodes spent idle. Each node is represented as a bar on the chart. As you play back the trace file or monitor nodes online, the length of the bars change to show the relative percentage of processor idle time. Each bar has both a solid and a hatched fill pattern. The solid fill pattern represents the instantaneous idle time. The hatched fill pattern is the average idle time. In addition, VT draws a vertical line to the right of each bar to show the highest percentage of processor idle time so far reached by each node. This view is similar in appearance to the Kernel Utilization (Bar Chart) view shown in Figure 37. This is an instantaneous view.
You may display additional data in this view. To do this:
* A window opens displaying the:
The window remains open only while you hold the mouse button down.
By default, this view represents processor idle time as a percentage of 100. You can adjust this so that the view represents processor idle time as a percentage of some other value. Say you ran your program on four processor nodes, and the processor idle time did not exceed 10 percent on any of them. You might want to adjust the view so that it represents processor idle time as a percentage of 10 instead of 100. To do this:
* The view's Parameters window opens.
* The view calibrates to the new maximum value. The purpose of the Recalibrate button on the configuration pop-up window is to enable or disable the automatic recalibrate function.
This view uses a strip graph, or a group of strip graphs, to visualize the percentage of time processor nodes spent idle. This view has two display modes - aggregate and individual. By default the view is in aggregate display mode - it uses a single strip graph. A line on this graph shows the average percent of idle time across all processor nodes. Individual display mode shows a separate strip graph for each processor node's idle time. When in this mode, each graph contains two lines - one showing the individual processor node's idle time and, for comparison, one showing the aggregate processor idle time. To distinguish between the two, the area between the individual kernel utilization line and the graph's horizontal axis has a solid fill. This view is similar in appearance to the Kernel Utilization (Graph) view shown in Figure 38. This is a streaming view.
You may display additional data in this view. To do this:
* A window opens displaying:
| If the cursor is on a line representing aggregate processor idle time: | If the cursor is on a line representing an individual node's idle time: |
|---|---|
|
|
The window remains open only while you hold the mouse button down.
This view has two display modes - aggregate and individual. By default the view is in aggregate display mode - it uses a single strip graph. To display a separate strip graph for each node:
* A selection menu appears.
You can open a Statistics Window containing an analysis of the information - the mean and the standard deviation - shown in the view. To open the Statistics Window:
* A selection menu appears.
* The Statistics Window opens. This window is shown on page ***.
This view uses a bar chart to visualize the amount of time the CPU spent executing the user code. Each node is represented as a bar on the chart. As you play back the trace file or monitor nodes online, the length of the bars change to show their relative value of CPU utilization. Each bar has both a solid and a hatched fill pattern. The solid fill pattern represents the instantaneous CPU utilization. The hatched fill pattern is the average CPU utilization. In addition, VT draws a vertical line to the right of each bar to show the highest level of CPU utilization so far reached by each node. This view is similar in appearance to the Kernel Utilization (Bar Chart) view shown in Figure 37. This is an instantaneous view.
You may display additional data in this view. To do this:
* A window opens displaying the:
The window remains open only while you hold the mouse button down.
By default, this view represents processor utilization as a percentage of 100. You can adjust this so that the view represents processor utilization as a percentage of some other value. For example, say you ran your program on four processor nodes - none of which ever exceeded 10 percent utilization. You might want to adjust the view so that it represents processor utilization as a percentage of 10 instead of 100. To do this:
* The view's Parameters window opens.
* The view calibrates to the new maximum value The purpose of the Recalibrate button on the configuration pop-up window is to enable or disable the automatic recalibrate function.
This view uses a strip graph, or a group of strip graphs, to visualize CPU utilization for the processor nodes. This view has two display modes - aggregate and individual. By default the view is in aggregate display mode - it uses a single strip graph. A line on this graph shows the average value of CPU utilization across all processor nodes. Individual display mode shows a separate strip graph for each processor node's CPU utilization. When in this mode, each graph contains two lines - one showing the individual processor node's CPU utilization and, for comparison, one showing the aggregate CPU utilization. To distinguish between the two, the area between the individual CPU utilization line and the graph's horizontal axis has a solid fill. This view is similar in appearance to the Kernel Utilization (Graph) view shown on in Figure 38. This is a streaming view.
You may display additional data in this view. To do this:
* A window opens displaying:
| If the cursor is on a line representing aggregate CPU Utilization: | If the cursor is on a line representing an individual node's CPU utilization: |
|---|---|
|
|
The window remains open only while you hold the mouse button down.
This view has two display modes - aggregate and individual. By default the view is in aggregate display mode - it uses a single strip graph. To display a separate strip graph for each node:
* A selection menu appears.
You can open a Statistics Window containing an analysis of the information - the mean and the standard deviation - shown in the view. To open the Statistics Window:
* A selection menu appears.
* The Statistics Window opens. This window is shown on page ***.
This view is similar to the user utilization bar chart. It visualizes the amount of time the CPU spent executing the kernel code, as well as the user code. In this view, the processor nodes are laid out as bars in a two-dimensional grid and their CPU utilization values raise the bars up along the z-axis. As the bars rise up along the z-axis, they appear in different colors according to your display spectrum. This is an instantaneous view, and is for trace visualization only.
You may display additional data in this view. To do this:
* A window opens displaying the:
You can change the angle at which the view displays the 3-D Bar Chart. To do this:
* A selection menu appears.
* The view's Parameters window opens.
This view uses three overlapping polygons to show CPU utilization for each of the processor nodes, and the overall processor load balance. This is an instantaneous view.
The largest of the polygons represents 100 percent utilization for all of the processor nodes. Within this polygon, VT draws each processor node as a spoke starting at the polygon's center and extending out to the rim.
VT draws the second polygon inside the first. This polygon represents the instantaneous CPU utilization for each of the processor nodes. On each node's spoke, VT draws a point which represents the current CPU utilization for that node. VT then connects the points to form a polygon with a solid fill pattern. The more regular the polygon, the better your processor load balance.
The third polygon is similar to the second. It shows the average CPU utilization for that node, and has a hatched fill pattern.
You may display additional data in this view. To do this:
* A window opens displaying the:
The window remains open only while you hold the mouse button down.
The six views in this category visualize the number of times processes acquire information from, or send information to, the systems' hard disks. These views are for trace visualization and performance monitoring, and respond to AIX kernel statistic trace records. For more information on AIX kernel statistic trace records, refer to "Types of Trace Records".
This view uses a bar chart to visualize disk reads - the number of times processes acquire information from the systems' hard disks. This refers to reads of cached information rather than access to the actual physical device. Each node is represented by a bar on the chart. If you are using this view for trace visualization, these are the processor nodes that ran your program. If you are using this view for performance monitoring, these are the selected nodes. The length of the bars change to show the number of disk reads. Each bar has both a solid and a hatched fill pattern. The solid fill pattern represents the instantaneous number of disk reads. The hatched fill pattern is the average number of disk reads. In addition, VT draws a vertical line to the right of each bar to show the highest instantaneous number of disk reads so far reached for each processor node. This view is similar in appearance to the Kernel Utilization (Bar Chart) view shown in Figure 37. This is an instantaneous view.
You may display additional data in this view. To do this:
* A window opens displaying the:
The window remains open only while you hold the mouse button down.
By default, this view represents disk reads as a percentage of 100. You can adjust this so that the view represents disk reads as a percentage of some other value. For example, say the amount of disk reads never exceeds 10 percent. You might want to adjust the view so that it represents disk reads as a percentage of 10 instead of 100. To do this:
* The view's Parameters window opens.
* The view calibrates to the new maximum value. The purpose of the Recalibrate button on the configuration pop-up window is to enable or disable the automatic recalibrate function.
This view uses a strip graph, or a group of strip graphs, to visualize disk reads - the number of times processes acquire information from the systems' hard disks. This refers to reads of cached information rather than the actual physical device. If you are using this view for trace visualization, the processor nodes depicted are the ones that ran your program. If you are using this view for performance monitoring, these are the selected nodes.
This view has two display modes - aggregate and individual. By default, the view is in aggregate display mode - it uses a single strip graph to represent the average number of disk reads across all processor nodes. Individual display mode shows a separate graph for each processor node's disk reads. When in this mode, each graph contains two lines - one showing the individual processor node's disk reads, and, for comparison, one showing the aggregate number of disk reads. To distinguish between the two, the area between the individual disk read line and the graph's horizontal axis has a solid fill. This view is similar in appearance to the Kernel Utilization (Graph) view shown in Figure 38. This is a streaming view.
You may display additional data in this view. To do this:
* A window opens displaying:
| If the cursor is on a line representing aggregate disk reads: | If the cursor is on a line representing an individual node's disk reads: |
|---|---|
|
|
The window remains open only while you hold the mouse button down.
This view has two display modes - aggregate and individual. By default the view is in aggregate display mode - it uses a single strip graph. To display a separate strip graph for each node:
* A selection menu appears.
You can open a Statistics Window containing an analysis of the information - the mean and the standard deviation - shown in the view. To open the Statistics Window:
* A selection menu appears.
* The Statistics Window opens. This window is shown on page ***.
This view uses a bar chart to visualize disk transfers - the number of times the system transfers blocks of read/write data to and from the hard disks. Each node is represented by a bar on the chart. If you are using this view for trace visualization, these are the processor nodes that ran your program. If you are using this view for performance monitoring, these are the selected nodes. The length of the bars change to show the number of disk transfers. Each bar has both a solid and a hatched fill pattern. The solid fill pattern represents the instantaneous number of disk transfers. The hatched fill pattern is the average number of disk transfers. In addition, VT draws a vertical line to the right of each bar to show the highest instantaneous number of disk transfers so far reached for each processor node. This view is similar in appearance to the Kernel Utilization (Bar Chart) view shown in Figure 37. This is an instantaneous view.
You may display additional data in this view. To do this:
* A window opens displaying the:
The window remains open only while you hold the mouse button down.
By default, this view represents disk transfers as a percentage of 100. You can adjust this so that the view represents disk transfers as a percentage of some other value. For example say the amount of disk transfers never exceeds 10 percent. You might want to adjust the view so that it represents disk transfers as a percentage of 10 instead of 100. To do this:
* The view's Parameters window opens.
* The view calibrates to the new maximum value. The purpose of the Recalibrate button on the configuration pop-up window is to enable or disable the automatic recalibrate function.
This view uses a strip graph, or a group of strip graphs, to visualize disk transfers - the number of times the system transfers blocks of read/write data to and from the hard disks. If you are using this view for trace visualization, the processor nodes depicted are the ones that ran your program. If you are using this view for performance monitoring, they are the selected nodes.
This view has two display modes - aggregate and individual. By default, the view is in aggregate display mode - it uses a single strip graph to represent the average number of disk transfers across all processor nodes. Individual display mode shows a separate graph for each processor node's disk transfers. When in this mode, each graph contains two lines - one showing the individual processor node's disk transfers, and, for comparison, one showing the aggregate number of disk transfers. To distinguish between the two, the area between the individual disk transfers line and the graph's horizontal axis has a solid fill. This view is similar in appearance to the Kernel Utilization (Graph) view shown in Figure 38. This is a streaming view.
You may display additional data in this view. To do this:
* A window opens displaying:
| If the cursor is on a line representing aggregate disk transfers: | If the cursor is on a line representing an individual node's disk transfers: |
|---|---|
|
|
The window remains open only while you hold the mouse button down.
This view has two display modes - aggregate and individual. By default the view is in aggregate display mode - it uses a single strip graph. To display a separate strip graph for each node:
* A selection menu appears.
You can open a Statistics Window containing an analysis of the information - the mean and the standard deviation - shown in the view. To open the Statistics Window:
* A selection menu appears.
* The Statistics Window opens. This window is shown on page ***.
This view uses a bar chart to visualize disk writes - the number of times processes write information to disk. Each node is represented by a bar on the chart. If you are using this view for trace visualization, these are the processor nodes that ran your program. If you are using this view for performance monitoring, these are the selected nodes. The length of the bars change to show the number of disk writes. Each bar has both a solid and a hatched fill pattern. The solid fill pattern represents the instantaneous number of disk writes. The hatched fill pattern is the average number of disk writes. In addition, VT draws a vertical line to the right of each bar to show the highest instantaneous number of disk writes so far reached for each processor node. This view is similar in appearance to the Kernel Utilization (Bar Chart) view shown in Figure 37. This is an instantaneous view.
You may display additional data in this view. To do this:
* A window opens displaying the:
The window remains open only while you hold the mouse button down.
By default, this view represents the number of disk writes as a percentage of 100. You can adjust this so that the view represents disk writes as a percentage of some other value. For example, say the number of disk writes never exceeds 10 percent. You might want to adjust the view so that it represents disk writes as a percentage of 10 instead of 100. To do this:
* The view's Parameters window opens.
* The view calibrates to the new maximum value. The purpose of the Recalibrate button on the configuration pop-up window is to enable or disable the automatic recalibrate function.
This view uses a strip graph, or a group of strip graphs, to visualize disk writes - the number of times processes write information to disk. If you are using this view for trace visualization, the processor nodes it depicts are the ones that ran your program. If you are using this view for performance monitoring, they are the selected nodes.
This view has two display modes - aggregate and individual. By default, the view is in aggregate display mode - it uses a single strip graph to represent the average number of disk writes across all processor nodes. Individual display mode shows a separate graph for each processor node's disk writes. When in this mode, each graph contains two lines - one showing the individual processor node's disk writes, and, for comparison, one showing the aggregate number of disk writes. To distinguish between the two, the area between the individual disk writes line and the graph's horizontal axis has a solid fill. This view is similar in appearance to the Kernel Utilization (Graph) view shown in Figure 38. This is a streaming view.
You may display additional data in this view. To do this:
* A window opens displaying:
| If the cursor is on a line representing aggregate disk writes: | If the cursor is on a line representing an individual node's disk writes: |
|---|---|
|
|
The window remains open only while you hold the mouse button down.
This view has two display modes - aggregate and individual. By default the view is in aggregate display mode - it uses a single strip graph. To display a separate strip graph for each node:
* A selection menu appears.
You can open a Statistics Window containing an analysis of the information - the mean and the standard deviation - shown in the view. To open the Statistics Window:
* A selection menu appears.
* The Statistics Window opens. This window is shown on page ***.
The four views in this category visualize the number of TCP/IP packets sent or received. These views are for trace visualization and performance monitoring, and respond to AIX kernel statistic trace records. For more information on AIX kernel statistic trace records, refer to "Types of Trace Records".
This view uses a bar chart to visualize the number of TCP/IP packets received by processor nodes. Each node is represented by a bar on the chart. If you are using this view for trace visualization, these are the processor nodes that ran your program. If you are using this view for performance monitoring, these are the selected nodes. The length of the bars change to show the number of packets received. Each bar has both a solid and a hatched fill pattern. The solid fill pattern represents the instantaneous number of packets received. The hatched fill pattern is the average number of packets received. In addition, VT draws a vertical line to the right of each bar to show the highest instantaneous number of packets received so far reached by each processor node. This view is similar in appearance to the Kernel Utilization (Bar Chart) view shown in Figure 37. This is an instantaneous view.
You may display additional data in this view. To do this:
* A window opens displaying the:
The window remains open only while you hold the mouse button down.
By default, this view represents packets received as a percentage of 100. You can adjust this so that the view represents packets received as a percentage of some other value. For example, say the number of packets received never exceeds 10 percent. You might want to adjust the view so that it represents packets received as a percentage of 10 instead of 100. To do this:
* The view's Parameters window opens.
* The view calibrates to the new maximum value. The purpose of the Recalibrate button on the configuration pop-up window is to enable or disable the automatic recalibrate function.
This view uses a strip graph, or a group of strip graphs, to visualize the number of TCP/IP packets received by processor nodes. If you are using this view for trace visualization, the processor nodes it depicts are the ones that ran your program. If you are using this view for performance monitoring, these are the selected nodes.
This view has two display modes - aggregate and individual. By default, the view is in aggregate display mode - it uses a single strip graph to represent the average number of packets received across all processor nodes. Individual display mode shows a separate graph for each processor node's packets received. When in this mode, each graph contains two lines - one showing the individual processor node's packets received, and, for comparison, one showing the aggregate number of packets received. To distinguish between the two, the area between the individual packets received line and the graph's horizontal axis has a solid fill. This view is similar in appearance to the Kernel Utilization (Graph) view shown in Figure 38. This is a streaming view.
You may display additional data in this view. To do this:
* A window opens displaying:
| If the cursor is on a line representing aggregate packets received: | If the cursor is on a line representing an individual node's packets received: |
|---|---|
|
|
The window remains open only while you hold the mouse button down.
This view has two display modes - aggregate and individual. By default the view is in aggregate display mode - it uses a single strip graph. To display a separate strip graph for each node:
* A selection menu appears.
You can open a Statistics Window containing an analysis of the information - the mean and the standard deviation - shown in the view. To open the Statistics Window:
* A selection menu appears.
* The Statistics Window opens. This window is shown on page ***.
This view uses a bar chart to visualize the number of TCP/IP packets sent by processor nodes. Each node is represented as a bar on this chart. If you are using this view for trace visualization, these are the processor nodes that ran your program. If you are using this view for performance monitoring, these are the selected nodes. The length of the bars change to show the number of packets sent. Each bar has both a solid and a hatched fill pattern. The solid fill pattern represents the instantaneous number of packets sent. The hatched fill pattern is the average number of packets sent. In addition, VT draws a vertical line to the right of each bar to show the highest instantaneous number of packets sent so far by each processor node. This view is similar in appearance to the Kernel Utilization (Bar Chart) view shown in Figure 37. This is an instantaneous view.
You may display additional data in this view. To do this:
* A window opens displaying the:
The window remains open only while you hold the mouse button down.
By default, this view represents packets sent as a percentage of 100. You can adjust this so that the view represents packets sent as a percentage of some other value. For example, say the number of packets sent never exceeds 10 percent. You might want to adjust the view so that it represents packets sent as a percentage of 10 instead of 100. To do this:
* The view's Parameters window opens.
* The view calibrates to the new maximum value. The purpose of the Recalibrate button on the configuration pop-up window is to enable or disable the automatic recalibrate function.
This view uses a strip graph, or a group of strip graphs, to visualize the number of TCP/IP packets sent by processor nodes. If you are using this view for trace visualization, the processor nodes it depicts are the ones that ran your program. If you are using this view for performance monitoring, these are the selected nodes.
This view has two display modes - aggregate and individual. By default, the view is in aggregate display mode - it uses a single strip graph to represent the average number of packets sent across all processor nodes. Individual display mode shows a separate graph for each processor node's packets sent. When in this mode, each graph contains two lines - one showing the individual processor node's packets sent, and, for comparison, one showing the aggregate number of packets sent. To distinguish between the two, the area between the individual packets sent line and the graph's horizontal axis has a solid fill. This view is similar in appearance to the Kernel Utilization (Graph) view shown in Figure 38. This is a streaming view.
You may display additional data in this view. To do this:
* A window opens displaying:
| If the cursor is on a line representing aggregate packets sent: | If the cursor is on a line representing an individual node's packets sent: |
|---|---|
|
|
The window remains open only while you hold the mouse button down.
This view has two display modes - aggregate and individual. By default the view is in aggregate display mode - it uses a single strip graph. To display a separate strip graph for each node:
* A selection menu appears.
You can open a Statistics Window containing an analysis of the information - the mean and the standard deviation - shown in the view. To open the Statistics Window:
* A selection menu appears.
* The Statistics Window opens. This window is shown on page ***.
The seven views in this category visualize system activities and events. These views are for trace visualization and performance monitoring, and respond to AIX kernel statistic trace records. For more information on AIX kernel statistic trace records, refer to "Types of Trace Records".
This view uses a bar chart to visualize context switches - the number of times the processes are swapped in and out of active execution. Each node is represented as a bar on the chart. If you are using this view for trace visualization, these are the processor nodes that ran your program. If you are using this view for performance monitoring, these are the selected nodes. The length of the bars change to show the number of context switches. Each bar has both a solid and a hatched fill pattern. The solid fill pattern represents the instantaneous number of context switches. The hatched fill pattern is the average number of context switches. In addition, VT draws a vertical line to the right of each bar to show the highest instantaneous number of context switches so far reached for each processor node. This view is similar in appearance to the Kernel Utilization (Bar Chart) view shown in Figure 37. This is an instantaneous view.
You may display additional data in this view. To do this:
* A window opens displaying the:
The window remains open only while you hold the mouse button down.
By default, this view represents the number of context switches as a percentage of 100. You can adjust this so that the view represents context switches as a percentage of some other value. For example, say the number of context switches never exceeds 10 percent. You might want to adjust the view so that it represents context switches as a percentage of 10 instead of 100. To do this:
* The view's Parameters window opens.
* The view calibrates to the new maximum value. The purpose of the Recalibrate button on the configuration pop-up window is to enable or disable the automatic recalibrate function.
This view uses a strip graph, or a group of strip graphs, to visualize context switches - the number of times processes are swapped in and out of active execution. If you are using this view for trace visualization, the processor nodes depicted in this view are the ones that ran your program. If you are using this view for performance monitoring, these are the selected nodes.
This view has two display modes - aggregate and individual. By default, the view is in aggregate display mode - it uses a single strip graph to represent the average number of context switches across all processor nodes. Individual display mode shows a separate graph for each processor node's context switches. When in this mode, each graph contains two lines - one showing the individual processor node's context switches, and, for comparison, one showing the aggregate number of context switches. To distinguish between the two, the area between the line for the individual node and the graph's horizontal axis has a solid fill. This view is similar in appearance to the Kernel Utilization (Graph) view shown in Figure 38. This is a streaming view.
You may display additional data in this view. To do this:
* A window opens displaying:
| If the cursor is on a line representing aggregate context switches: | If the cursor is on a line representing an individual node's context switches: |
|---|---|
|
|
The window remains open only while you hold the mouse button down.
This view has two display modes - aggregate and individual. By default the view is in aggregate display mode - it uses a single strip graph. To display a separate strip graph for each node:
* A selection menu appears.
You can open a Statistics Window containing an analysis of the information - the mean and the standard deviation - shown in the view. To open the Statistics Window:
* A selection menu appears.
* The Statistics Window opens. This window is shown on page ***.
This view uses a bar chart to visualize page faults. Each node is represented as a bar on this chart. If you are using this view for trace visualization, these are the processor nodes that ran your program. If you are using this view for performance monitoring, these are the selected nodes. The length of the bars change to show the number of page faults. Each bar has both a solid and a hatched fill pattern. The solid fill pattern represents the instantaneous number of page faults. The hatched fill pattern is the average number of page faults. In addition, VT draws a vertical line to the right of each bar to show the highest instantaneous number of page faults so far by each processor node. This view is similar in appearance to the Kernel Utilization (Bar Chart) view shown in Figure 37. This is an instantaneous view.
You may display additional data in this view. To do this:
* A window opens displaying the:
The window remains open only while you hold the mouse button down.
By default, this view represents page faults as a percentage of 100. You can adjust this so that the view represents page faults as a percentage of some other value. For example, say the number of page faults never exceeds 10 percent. You might want to adjust the view so that it represents page faults as a percentage of 10 instead of 100. To do this:
* The view's Parameters window opens.
* The view calibrates to the new maximum value. The purpose of the Recalibrate button on the configuration pop-up window is to enable or disable the automatic recalibrate function.
This view uses a strip graph, or a group of strip graphs, to visualize page faults. If you are using this view for trace visualization, the processor nodes it depicts are the ones that ran your program. If you are using this view for performance monitoring, these are the selected nodes.
This view has two display modes - aggregate and individual. By default, the view is in aggregate display mode - it uses a single strip graph to represent the average number of page faults across all processor nodes. Individual display mode shows a separate graph for each processor node's page faults. When in this mode, each graph contains two lines - one showing the individual processor node's page faults, and, for comparison, one showing the aggregate number of page faults. To distinguish between the two, the area between the individual page faults line and the graph's horizontal axis has a solid fill. This view is similar in appearance to the Kernel Utilization (Graph) view shown in Figure 38. This is a streaming view.
You may display additional data in this view. To do this:
* A window opens displaying:
| If the cursor is on a line representing aggregate page faults: | If the cursor is on a line representing an individual node's page faults: |
|---|---|
|
|
The window remains open only while you hold the mouse button down.
This view has two display modes - aggregate and individual. By default the view is in aggregate display mode - it uses a single strip graph. To display a separate strip graph for each node:
* A selection menu appears.
You can open a Statistics Window containing an analysis of the information - the mean and the standard deviation - shown in the view. To open the Statistics Window:
* A selection menu appears.
* The Statistics Window opens. This window is shown on page ***.
This view uses a bar chart to visualize the number of times processor nodes invoke kernel subroutines. Each node is represented as a bar on this chart. If you are using this view for trace visualization, these are the processor nodes that ran your program. If you are using this view for performance monitoring, these are the selected nodes. The length of the bars change to show the number of system calls. Each bar has both a solid and a hatched fill pattern. The solid fill pattern represents the instantaneous number of system calls. The hatched fill pattern is the average number of system calls. In addition, VT draws a vertical line to the right of each bar to show the highest number of system calls so far reached by each processor node. This view is similar in appearance to the Kernel Utilization (Bar Chart) view shown in Figure 37. This is an instantaneous view.
You may display additional data in this view. To do this:
* A window opens displaying the:
The window remains open only while you hold the mouse button down.
By default, this view represents the number of system calls as a percentage of 100. You can adjust this so that the view represents system calls as a percentage of some other value. For example, say the number of system calls never exceeds 10 percent. You might want to adjust the view so that it represents system calls as a percentage of 10 instead of 100. To do this:
* The view's Parameters window opens.
* The view calibrates to the new maximum value. The purpose of the Recalibrate button on the configuration pop-up window is to enable or disable the automatic recalibrate function.
This view uses a strip graph, or a group of strip graphs, to visualize the number of times processor nodes invoke kernel subroutines. If you are using this view for trace visualization, the processor nodes it depicts are the ones that ran your program. If you are using this view for performance monitoring, these are the selected nodes.
This view has two display modes - aggregate and individual. By default, the view is in aggregate display mode - it uses a single strip graph to represent the average number of system calls across all processor nodes. Individual display mode shows a separate graph for each processor node's system calls. When in this mode, each graph contains two lines - one showing the individual processor node's system calls, and, for comparison, one showing the aggregate number of system calls. To distinguish between the two, the area between the individual system calls line and the graph's horizontal axis has a solid fill. This view is similar in appearance to the Kernel Utilization (Graph) view shown in Figure 38. This is a streaming view.
You may display additional data in this view. To do this:
* A window opens displaying:
| If the cursor is on a line representing aggregate system calls: | If the cursor is on a line representing an individual node's system calls: |
|---|---|
|
|
The window remains open only while you hold the mouse button down.
This view has two display modes - aggregate and individual. By default the view is in aggregate display mode - it uses a single strip graph. To display a separate strip graph for each node:
* A selection menu appears.
You can open a Statistics Window containing an analysis of the information - the mean and the standard deviation - shown in the view. To open the Statistics Window:
* A selection menu appears.
* The Statistics Window opens. This window is shown on page ***.
This view uses a series of pie charts to summarize system activity. Each pie chart represents a processor node, and is segmented to show the percentage of time the node spent:
If you are using this view for trace visualization, the processor nodes shown are the ones that ran your program. If you are using this view for performance monitoring, these are the selected nodes. This is an instantaneous view.
You may display additional data in this view. To do this:
* A window opens displaying the:
The view lets you toggle between instantaneous and cumulative presentation of system activity. By default, the pie charts summarize instantaneous system activity. A cumulative presentation shows overall system activity for each processor node.
If you want a cumulative system summary:
* A selection menu appears.
As described in "Adjusting a View's Time Resolution and Colors", the appearance of a view - the colors it uses - is determined by its display spectrum. The CPU Load display spectrum was designed specifically for use with this view. Each color in this spectrum is a resource you can customize using the .Xdefaults file. This enables you to specify the exact color used to represent the four system states in the view.
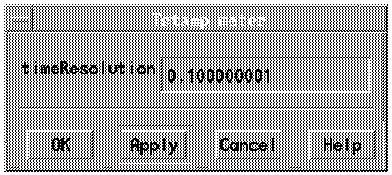 View figure.
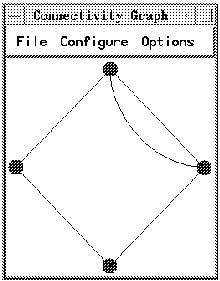 View figure.
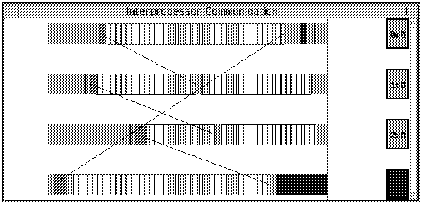 View figure.
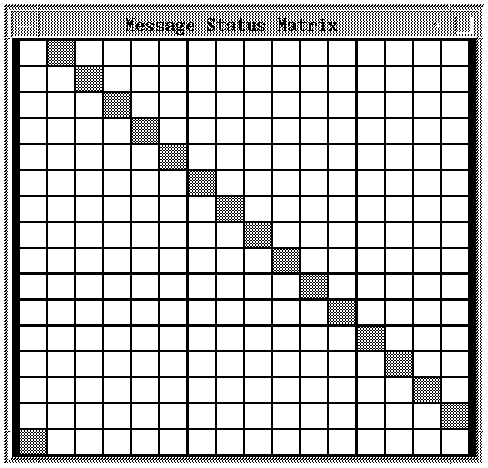 View figure.
 View figure.
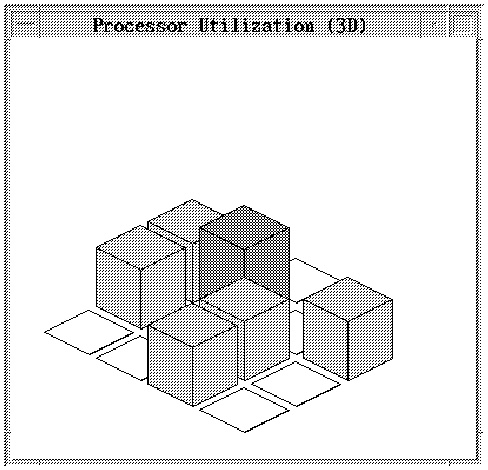 View figure.
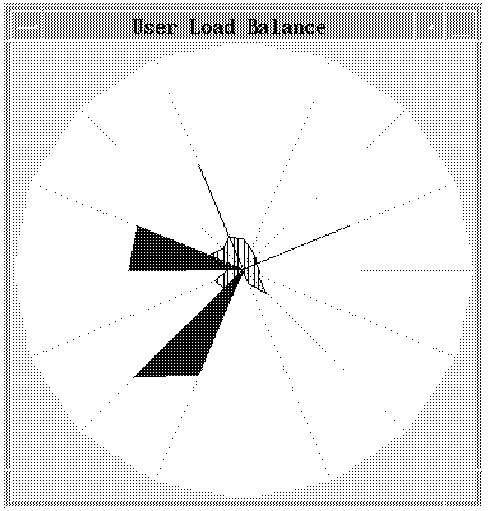 View figure.
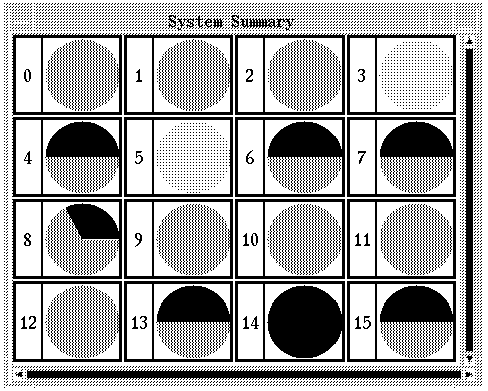 View figure.