 View figure.
This chapter describes the pdbx debugger. This debugger extends the dbx debugger's line-oriented interface and subcommands. Some of these subcommands, however, have been modified for use on parallel programs. The pdbx debugger is a POE application with some modifications on the home node to provide a user interface.
Before invoking a parallel program using pdbx for interactive debugging, you first need to compile the program and set up the execution environment. See IBM Parallel Environment for AIX: Operation and Use, Volume 1, Using the Parallel Operating Environment for more information on the following:
As you read these steps, keep in mind that pdbx accepts almost all the option flags that poe accepts, and responds to the same environment variables.
Also, throughout this book, keep in mind the following information.
The RS/6000 processors of your system are called processor nodes. A parallel program executes as a number of individual, but related, parallel tasks on a number of your system's processor nodes. The group of parallel tasks is called a partition. The processor nodes are connected on the same network, so the parallel tasks of your partition can communicate to exchange data or synchronize execution.
Table 1 outlines the pdbx subcommands described in this chapter. Complete syntax information for all these subcommands is also provided under the entry for the pdbx command in Appendix A. "Parallel Environment Tools Commands".
The debugger supports most of the familiar dbx subcommands, as well as some additional pdbx subcommands. In pdbx, command context refers to a setting that controls which task(s) receive the subcommands entered at the pdbx command prompt.
pdbx subcommands can either be context sensitive or context insensitive. The debugger directs context sensitive subcommands to just the tasks in the current command context. Command context has no bearing on context insensitive commands, which control overall debugger behavior, and are generally processed on the home node only. These include subcommands for setting help and other information, and ending a pdbx session.
You can set the command context on a single task or a group of tasks as
described in "Setting Command Context".
| Context Insensitive pdbx Subcommands |
| This subcommand: | Is used to: | For more information see: | ||
| alias [alias_name string] | Set or display aliases. | "Creating, Removing, and Listing Command Aliases" | ||
| attach <[all | task_list]> | Attach the debugger to some or all the tasks of a given poe job. | "Attach Mode" | ||
| detach | Detach pdbx from all tasks that were attached. This subcommand causes the debugger to exit but leaves the poe application running. | "Exiting pdbx" | ||
| dhelp [dbx_command] | Display a brief list of dbx commands or help information about them. | "Accessing Help for dbx Subcommands" | ||
| group <action> [group_name] [task_list] | Manipulate groups. The actions are add, change, delete, and list. To indicate a range of tasks, enter the first and last task numbers, separated by a colon or dash. To indicate individual tasks, enter the numbers, separated by a space or comma. | "Grouping Tasks" | ||
| help [subject] | Display a list of pdbx commands and topics or help information about them. | "Accessing Help for pdbx Subcommands" | ||
| on <[group | task]> [command] | Set the command context used to direct subsequent commands to a specific task or group of tasks. This subcommand can also be used to deviate from the command context for a single command without changing the current command context. | "Setting the Current Command Context" | ||
| quit | End a pdbx session. | "Exiting pdbx" | ||
| source <cmd_file> | Execute pdbx subcommands from a specified file.
| "Reading Subcommands From a Command File" | ||
| tasks [long] | Display information about all the tasks in the partition. | "Displaying Tasks and their States" | ||
| unalias alias_name | Remove a command alias specified by the alias subcommand. | "Creating, Removing, and Listing Command Aliases" |
| Context Sensitive pdbx Subcommands |
| This Subcommand: | Is used to: | For more information see: | ||
| delete <[event_list | * | all]> | Remove breakpoints and tracepoints set by the stop and trace subcommands. To indicate a range of events, enter the first and last event numbers, separated by a colon or a dash. To indicate individual events, enter the number(s), separated by a space or comma. | "Deleting pdbx Events" | ||
| dbx <dbx_command> | Issue a dbx subcommand directly to the dbx sessions
running on the remote nodes. This subcommand is not intended for casual
use. It must be used with caution, because it circumvents the
pdbx server which normally manages communication between the user
and the remote dbx sessions. It enables experienced
dbx users to communicate directly with remote dbx
sessions, but can cause problems as pdbx will have no knowledge of
the communication that transpired.
| the online PE manual page for pdbx. This manual page also appears in Appendix A. "Parallel Environment Tools Commands". | ||
| hook | Regain control over an unhooked task. | "Unhooking and Hooking Tasks" | ||
| list [line_number | line_number, line_number | procedure] | Display lines of the current source file, or of a procedure. | "Displaying Source" | ||
| load <program> [program_arguments] | Load a program on each node in the current context. This can only be issued once per task per pdbx session. pdbx will look for the program in the current directory unless a relative or absolute pathname is specified. | "Loading the Partition with the Load Subcommand" | ||
| print <[expression | procedure]> | Print the value of an expression, or run a procedure and print the return code of that procedure. | "Viewing Program Variables" | ||
| status [all] | Display a list of breakpoints and tracepoints set by the stop and trace subcommands in the current context. If "all" is specified, all events, regardless of context are shown. | "Checking Event Status" | ||
| stop | Set a breakpoint for tasks in the current context. Breakpoints are stopping places in your program that halt execution. | "Setting Breakpoints" | ||
| trace | Set a tracepoint for tasks in the current context. Tracepoints are places in your program that, when reached during execution, cause the debugger to print information about the state of the program. | "Setting Tracepoints" | ||
| unhook | Unhook a task or group of tasks. Unhooking allows the task(s) to run without intervention from the debugger. | "Unhooking and Hooking Tasks" | ||
| where | Display a list of active procedures and functions. | "Viewing Program Call Stacks" | ||
| <Ctrl-c> | Regain debugger control when some tasks in the current context are running. This causes a pdbx subset prompt to be displayed, which allows a subset of the pdbx function to be performed. | "Context Switch when Blocked" |
You can start the pdbx debugger in either normal mode or attach mode. In normal mode your program runs under the control of the debugger. In attach mode you attach to a program that is already running. Certain options and functions are only available in one of the two modes. Since pdbx is a source code debugger, some files need to be compiled with the -g option so that the compiler provides debug symbols, source line numbers, and data type information.
When the application is started using pdbx in normal mode, debugger control of the application is given to the user by default at the first executable source line within the main routine. This is function main in C code or the the routine defined by the program statement in Fortran. In Fortran, if there is no program statement, the program name defaults to main. If the file containing the main routine is not compiled with -g the debugger will exit. The environment variable MP_DEBUG_INITIAL_STOP can be set before starting the debugger to manually set an alternate file name and source line where the user initially receives debugger control of the application. Refer to the appendix on POE environment variables and command-line flags in IBM Parallel Environment for AIX: Operation and Use, Volume 1, Using the Parallel Operating Environment
The way you start the debugger in normal mode depends on whether the program(s) you are debugging follow the SPMD (Single Program Multiple Data) or MPMD (Multiple Program Multiple Data) model of parallel programming. In the SPMD model, the same program runs on each of the nodes in your partition. In the MPMD model, different programs can run on the nodes of your partition.
If you are debugging an SPMD program, you can enter its name on the pdbx command line. It will be loaded on all the nodes of your partition automatically. If you are debugging an MPMD program, you will load the tasks of your partition after the debugger is started. pdbx will look for the program in the current directory unless a relative or absolute pathname is specified.
* This starts pdbx. If you specified a program, it is loaded on each node of your partition and you see the message:
0031-504 Partition loaded ...
You will then see the pdbx prompt:
pdbx(all)
The prompt shows the command context all. For more information see "Setting Command Context".
* This starts pdbx in attach mode. See "Attach Mode" for more information.
* This writes the pdbx usage to STDERR. It includes pdbx command line syntax and a description of pdbx options.
The options you specify with the pdbx command can be program options, POE options, or pdbx options listed in Table 2. Program options are those that your application program will understand.
You can use the same command-line flags on the pdbx command as you use when invoking a parallel program using the poe command. For example, you can override the MP_PROCS variable by specifying the number of processes with the -procs flag. Or you could use the -hostfile flag to specify the name of a host list file. For more information on the POE command-line flags, see IBM Parallel Environment for AIX: Operation and Use, Volume 1, Using the Parallel Operating Environment
| Note: | poe uses the PATH environment variable to find the program, while pdbx does not. |
After pdbx initializes, the pdbx command prompt
displays to indicate that pdbx is ready for a command.
Table 2. Debugger Option Flags (pdbx)
| Use this flag: | To: | For example: |
|---|---|---|
| -a | Attach to a running poe job by specifying its process id. This must be executed from the node where the poe job was initiated. When using the debugger in attach mode there are some debugger command line arguments that should not be used. In general, any arguments that control how the partition is set up or specify application names and arguments should not be used. | To attach the pdbx debugger to an already running
poe job.
|
| -c |
Read pdbx startup commands from the specified commands_file. The commands stored in the specified file are executed before command input is accepted from the keyboard. If the -c flag is not used, the pdbx debug program attempts to read startup commands from the file .pdbxinit. To find this file, it first looks in the current directory, and then in the user's home directory. In a pdbx session, you can also read commands from a file using
the source subcommand. "Reading Subcommands From a Command File" describes how to use this subcommand in pdbx.
| To start the pdbx debugger and read startup commands from a
file called start.cmd:
|
| -d | Set the limit for the nesting of program blocks. The default nesting depth limit is 25. This flag is passed to dbx unmodified. | To specify a nesting depth limit:
|
| -F | This flag can be used to turn off lazy reading mode.
Turning lazy reading mode off forces the remote dbx sessions to
read all symbol table information at startup time. By default, lazy
reading mode is on.
Lazy reading mode is useful when debugging large executable files, or when paging space is low. With lazy reading mode on, only the required symbol table information is read upon initialization of the remote dbx sessions. Because all symbol table information is not read at dbx startup time when in lazy reading mode, local variable and related type information will not be initially available for functions defined in other files. The effect of this can be seen with the whereis command, where instances of the specified local variable may not be found until the other files containing these instances are somehow referenced. | To start the pdbx debugger and read all symbol table
information:
|
| -h | Write the pdbx usage to STDERR then exit. This includes pdbx command line syntax and a description of pdbx options. |
|
| -I
(upper case i) | Specify a directory to be searched for an executable's source files. This flag must be specified multiple times to set multiple paths. (Once pdbx is running, this list can be overridden on a group or single node basis with the use command.) | To add directory1 to the list of directories to be searched
when starting the pdbx debugger:
You can add as many directories as you like to the directory list in this way. For example, to add two directories:
|
| -x | Prevent the dbx command from stripping _ (trailing underscore ) characters from symbols originating in Fortran source code. This flag allows dbx to distinguish between symbols which are identical except for an underscore character, such as xxx and xxx_. | To prevent trailing underscores from being stripped from symbols in
Fortran source code:
|
These pdbx flags are closely tied to the flags supported by dbx. For more information on the option flags described in this table, refer to their use with dbx as described in IBM AIX Version 4 Commands Reference and IBM AIX Version 4 General Programming Concepts: Writing and Debugging Programs
For a listing of pdbx subcommands, you can also refer to its online manual page. This manual page also appears in Appendix A. "Parallel Environment Tools Commands".
The pdbx debugger provides an attach feature, which allows you to attach the debugger to a parallel application that is currently executing. This feature is typically used to debug large, long running, or apparently "hung" applications. The debugger attaches to any subset of tasks without restarting the executing parallel program.
Parallel applications run on the partition managed by poe. For attach mode, you must specify the appropriate process identifier (PID) of the poe job, so the debugger can attach to the correct application processes contained in that particular job. To get the PID of the poe job, enter the following command on the node where poe was started:
$ ps -ef | grep poe
You initiate attach mode by invoking pdbx with the -a flag and the PID of the appropriate poe process:
$ pdbx -a <poe PID>
For example, if the process id of the poe process is 12345 then the command would be:
$ pdbx -a 12345
After you invoke the debugger in attach mode, it displays a list of tasks you can choose. The paging tool used to display the menu will default to pg -e unless another pager is specified by the PAGER environment variable.
pdbx starts by showing a list of task numbers that comprise the parallel job. The debugger obtains this information by reading a configuration file created by poe when it begins a job step. At this point you must choose a subset of that list to attach the debugger. Once you make a selection and the attach debug session starts, you cannot make additions or deletions to the set of tasks attached to. It is possible to attach a different set of tasks by detaching the debugger and attaching again, then selecting a different set of tasks.
The debugger attaches to the specified tasks. The selected executables are stopped wherever their program counters happen to be, and are then under the control of the debugger. The other tasks in the original poe application continue to run. pdbx displays information about the attached tasks using the task numbering of the original poe application partition.
Figure 1 shows a sample pdbx Attach screen.
+--------------------------------------------------------------------------------+
|pdbx Version 2, Release 3 -- Mar 1 1997 15:33:03                                |
|                                                                                |
|                                                                                |
|                                                                                |
|ATTENTION: 0029-9049 The following environment variables have been              |
|                                                                                |
|ignored since they are not valid when starting the debugger                     |
|                                                                                |
|in attach mode -                                                                |
|                                                                                |
|  'MP_PROCS'.                                                                   |
|                                                                                |
|                                                                                |
|                                                                                |
|To begin debugging in attach mode, select a task or tasks to attach.            |
|                                                                                |
|                                                                                |
|                                                                                |
|Task       IP Addr                 Node                 PID     Program         |
|                                                                                |
|0        9.117.8.62           pe02.kgn.ibm.com         23870      ftoc          |
|                                                                                |
|1        9.117.8.63           pe03.kgn.ibm.com         14908      ftoc          |
|                                                                                |
|2        9.117.8.64           pe04.kgn.ibm.com         14400      ftoc          |
|                                                                                |
|3        9.117.8.65           pe05.kgn.ibm.com         13114      ftoc          |
|                                                                                |
|4        9.117.8.66           pe06.kgn.ibm.com         11330      ftoc          |
|                                                                                |
|5        9.117.8.67           pe07.kgn.ibm.com         19784      ftoc          |
|                                                                                |
|6        9.117.8.68           pe08.kgn.ibm.com         19524      ftoc          |
|                                                                                |
|7        9.117.8.69           pe09.kgn.ibm.com         22086      ftoc          |
|                                                                                |
|                                                                                |
|                                                                                |
|At the pdbx prompt enter the "attach" command followed by a                     |
|                                                                                |
|list of tasks or "all".  (ex. "attach 2 4 5-7" or "attach all")                 |
|                                                                                |
|You may also type "help" for more information or "quit" to exit                 |
|                                                                                |
|the debugger without attaching.                                                 |
|                                                                                |
|                                                                                |
|                                                                                |
|pdbx(none)                                                                      |
+--------------------------------------------------------------------------------+
The pdbx Attach screen contains a list of tasks and, for each task, the following information:
After initiating attach mode, you can select a set of tasks to attach to. At the command prompt:
It is also possible to use the quit or help command at this prompt. Any other command will produce an error message. The quit command will not kill the application at this point, since the debugger has not been attached as of yet.
| Note: | When debugging in attach mode, the load subcommand is not available. An error message is displayed if an attempt is made to use it. |
pdbx provides substantial information when debugging an executable compiled with the -g option. However, you may find it useful to attach to an application not compiled with -g. pdbx allows you to attach to an application not compiled with -g, however, the information provided is limited to a stack trace.
You can also attach pdbx to an application compiled with both the -g and optimization flags. However, the optimized code can cause some confusion when debugging. For example, when stepping through code, you may notice the line marker points to different source lines than you would expect. The optimization causes this re-mapping of instructions to line numbers.
You should not use certain command line arguments when debugging in attach mode. If you do, the debugger will not start, and you will receive a message saying the debugger will not start. In general, do not use any arguments that control how the debugger partition is set up or that specify application names and arguments. You do not need information about the application, since it is already running and the debugger uses the PID of the poe process to attach. Other information the debugger needs to set up its own partition, such as node names and PIDs, comes from the configuration file and the set of tasks you select. See Appendix B. "Command Line Flags for Normal or Attach Mode" for a list of command line flags showing which ones are valid in normal and in attach debugging mode.
The information in the appendix is also true for the corresponding environment variables, however pdbx ignores the invalid setting. The debugger displays a message containing a list of the variables it ignores, and continues.
For example, if you had MP_PROCS set, when the debugger starts in attach mode it ignores the setting. It displays a message saying it ignored MP_PROCS, and continues initializing the debug session.
Before you can debug a parallel program with the pdbx debugger, you need to load your partition. If you specified a program name on the pdbx command, it is already loaded on each task of your partition. If not, you need to load your partition using the load subcommand. pdbx will look for the program in the current directory unless a relative or absolute pathname is specified. The Partition Manager allocates the tasks of your partition when you enter the pdbx command. It does this either by connecting to the Resource Manager or by looking to your host list file. The number of tasks in the partition depends on the value of the MP_PROCS environment variable (or the value specified on the -procs flag) when you enter the pdbx command.
The following pdbx commands are available before the program is loaded on all tasks:
| To load the same executable on all tasks of the partition: | To load separate executables on the partition: | ||
|---|---|---|---|
|
|
With the tasks subcommand, you display information about all the tasks in the partition. Task state information is always displayed (see Table 3 for information on task states). If you specify "long" after the command, it also displays the name, ip address, and job manager number associated with the task.
Following is an example of output produced by the tasks and tasks long command.
pdbx(others) tasks

  0:D     1:D     2:U     3:U     4:R     5:D     6:D     7:R


pdbx(others) tasks long

  0:Debug ready   pe04.kgn.ibm.com                 9.117.8.68       -1

  1:Debug ready   pe03.kgn.ibm.com                 9.117.8.39       -1

  2:Unhooked      pe02.kgn.ibm.com                 9.117.11.56      -1

  3:Unhooked      augustus.kgn.ibm.com             9.117.7.77       -1

  4:Running       pe04.kgn.ibm.com                 9.117.8.68       -1

  5:Debug ready   pe03.kgn.ibm.com                 9.117.8.39       -1

  6:Debug ready   pe02.kgn.ibm.com                 9.117.11.56      -1

  7:Running       augustus.kgn.ibm.com             9.117.7.77       -1
You can set the context on a group of tasks by first using the context insensitive group subcommand to collect a number of tasks under a group name you choose. None of these tasks need to have been loaded for you to include them in a group. Later, you can set the context on all the tasks in the group by specifying its group name with the on subcommand.
For example, you could use the group subcommand to collect a number of tasks (tasks 0, 1, and 2) as a group named groupa. Then, to set the context on tasks 0, 1, and 2, you would:
* The debugger sets the command context on tasks 0, 1, and 2.
Another use of the group subcommand is to give a name to a task. For example, assume you have a typical master/worker program. Task 0 is the master task, controlling a number of worker tasks. You could create a group named master consisting of just task 0. Then, to set the context on the master task you would:
* The debugger sets the command context on task 0. Entering on master, therefore, is the same as entering on 0, but would be more meaningful and easier to remember.
The group subcommand has a number of actions. You can use it to:
Provide a group name that is no longer than 32 characters which starts with an alphabetic character, and is followed by any alphanumeric character combination.
To indicate a range of tasks, enter the first and last task numbers, separated by a colon or dash. To indicate individual tasks, enter the numbers, separated by a space or comma.
| Note: | Group names "all", "none", and "attached" are reserved group names. They are used by the debugger and cannot be used in the group add or group delete commands. However, the group "all" or "attached" can be renamed using the group change command, if it currently exists in the debugging session. |
To add a task to a new or already existing task group, use the add action of the group subcommand. The syntax is:
group add group_name task_list
If the specified group_name already exists, then the debugger
adds the tasks in task_list to that group. If the specified
group_name does not yet exist, the debugger creates it.
| The variable task_list can be: | For example, to add the following task(s) to groupa: | You would ENTER: | * The following message displays: |
|---|---|---|---|
| a single task | task 6 | group add groupa 6 |
1 task was added to group "groupa". |
| a collection of tasks | tasks 6, 8, and 10 | group add groupa 6 8 10 |
3 tasks were added to group "groupa". |
| a range of tasks | tasks 6 through 10 | group add groupa 6:10 |
5 tasks were added to group "groupa". |
| a range of tasks | tasks 6 through 10 | group add groupa 6-10 |
5 tasks were added to group "groupa". |
To delete tasks from a task group, use the delete action of the group subcommand. The syntax is:
group delete group_name [task_list]
| The variable task_list can be: | For example, to delete the following from groupa: | You would ENTER: | * The following message displays: |
|---|---|---|---|
| a single task | task 6 | group delete groupa 6 |
Task: 6 was successfully deleted from group "groupa". |
| a collection of tasks | task 6, 8, and 10 | group delete groupa 6 8 10 |
Task: 6 was successfully deleted from group "groupa". Task: 8 was successfully deleted from group "groupa". Task: 10 was successfully deleted from group "groupa". |
| a range of tasks | tasks 6 through 10 | group delete groupa 6:10 |
Task: 6 was successfully deleted from group "groupa". Task: 7 was successfully deleted from group "groupa". Task: 8 was successfully deleted from group "groupa". Task: 9 was successfully deleted from group "groupa". Task: 10 was successfully deleted from group "groupa". |
| a range of tasks | tasks 6 through 8 | group delete groupa 6-8 |
Task: 6 was successfully deleted from group "groupa". Task: 7 was successfully deleted from group "groupa". Task: 8 was successfully deleted from group "groupa". |
You can also use the delete action of the group subcommand to delete an entire task group. For example, to delete the task group groupa, you would:
* The debugger deletes the task group.
| Note: | The pre-defined task group all cannot be deleted. |
To change the name of an existing task group, use the change action of the group subcommand. The syntax is:
group change old_group_name new_group_name
For example, say you want to change the name of task group group1 to groupa. At the pdbx command prompt, you would:
* The following message displays:
Group "group1" has been renamed to "groupa".
To list task groups, their members, and task states use the list action of the group subcommand. The syntax is:
group list [group_name]
| You can use the list action to: | For example, if you ENTER: | * |
|---|---|---|
| list all the task groups. | group list | The debugger displays a list of all existing task groups and their
members. An example of such a list is shown below.
pdbx(0) group list

allTasks      0:R     1:D     2:D     3:U     4:U     5:D     6:D

              7:D     8:D     9:D    10:D    11:D

evenTasks     0:R     2:D     4:U     6:D     8:D    10:R

oddTasks      1:D     3:U     5:D     7:D     9:D    11:R

master        0:R

workers       1:D     2:D     3:U     4:U     5:D     6:D     7:D

              8:D     9:D    10:R    11:R
|
| list all the members of a single task group | group list oddTasks |
The debugger displays a list of all the members of task group oddTasks. 1:D 3:U 5:D 7:D 9:D 11:R |
When you list tasks, a single letter will follow each task number.
The following table represents the state of affairs on the remote
tasks. Common states are "debug ready", where pdbx
commands can be issued, and running, where the application has control and is
executing.
| This letter displayed after a task number: | Represents: | And indicates that: |
|---|---|---|
| N | Not loaded | the remote task has not yet been loaded with an executable. |
| S | Starting | the remote task is being loaded with an executable. |
| D | Debug ready | the remote task is stopped and debug commands can be issued. |
| R | Running | the remote task is in control and executing the program. |
| X | Exited | the remote task has completed execution. |
| U | Unhooked | the remote task is executing without debugger intervention. |
| E | Error | the remote task is in an unknown state. |
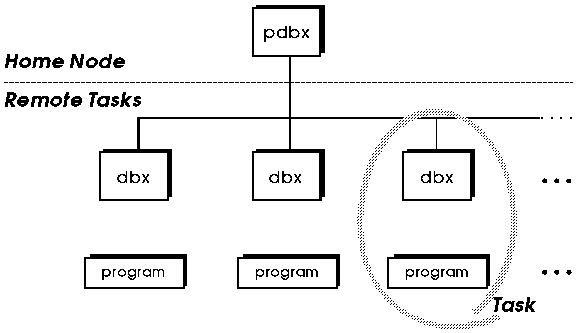
Figure 2 illustrates the relationship between the pdbx debugger, which runs on the home task, and the various dbx processes running on the remote tasks. When thinking about "task states", consider the perspective of the remote tasks which are each running a copy of dbx. pdbx attempts to coordinate activities in multiple dbx sessions. There are times when this is not possible, typically when one or more tasks have not yet stopped. In this case, from a remote task's dbx perspective, a dbx prompt has not yet been displayed, and your application is still running. Similarly, pdbx will not display a pdbx prompt until all the remote dbx sessions are "debug ready".
Figure 2. Relationship between home node (pdbx) and remote tasks (dbx processes)
View figure.
You can set the current command context on a specific task or group of tasks so that the debugger directs subsequent context sensitive subcommands to just that task or group. This section also shows how you can temporarily deviate from the current command context you set.
When you begin a pdbx session, the default command context is set on all tasks. The pdbx command prompt always indicates the current command context setting, so it initially reads:
pdbx(all)
You can use the on subcommand to set the current command context on one task or a group of tasks. The debugger then directs context sensitive subcommands to just the task(s) specified by group or task name.
You can use the on subcommand to set the current command context before you load your partition. The debugger will only direct context sensitive subcommands to the tasks in the current context. The syntax of the on subcommand is:
on {group_name | task_id}
For example, assume you have a parallel program divided into tasks numbered 0 through 4. To set the current command context on just task 1:
* The pdbx command prompt indicates the new setting of the current command context.
pdbx(1)
You can also use the on subcommand to set the current command context on all the tasks in a specified task group. The task group all - consisting of all tasks - is automatically defined for you and cannot be deleted. To set the command context back on all tasks, you would:
* The pdbx command prompt shows that the current command context has changed, and that the debugger will now direct context sensitive subcommands to all tasks in the partition.
pdbx(all)
When you switch context using on context_name, and the new context has at least one task in the "running" state, a message is displayed stating that at least one task is in the "running" state. No pdbx prompt is displayed until all tasks in this context are in the "debug ready" state.
When you switch to a context where all tasks are in the "debug ready" state, the pdbx prompt is displayed immediately, indicating pdbx is ready for a command.
At the pdbx subset prompt, on context_name causes one of the following to happen: either a pdbx prompt is displayed; or a message is displayed indicating the reason why the pdbx prompt will be displayed at a later time. This is generally because one of the tasks is in "running" state. See "Context Switch when Blocked" for more information.
There are times when it is convenient to deviate from the current command context for a single command. You can temporarily deviate from the command context by entering the on subcommand with, on the same line, a context sensitive subcommand. The pdbx prompt will be presented after all of the tasks in the temporary context have completed the command specified. It is possible, using <Ctrl-c> followed by the back or the on command, to issue further pdbx commands in the original context. The syntax is:
on {group_name | task_id} [subcommand]
For example, assume a task group named groupa contains tasks 3 through 5. The current command context is on this group. You want to set a breakpoint at line 99 of task 3 only, and then continue directing commands to all three members of groupa. One way to do this is to enter the three subcommands shown in the following example. This example shows the pdbx command prompt for additional illustration.
pdbx(groupa) on 3

pdbx(3) stop at 99

pdbx(3) on groupa

pdbx(groupa)
It is easier, however, to temporarily deviate from the current command context.
pdbx(groupa) on 3 stop at 99

pdbx(groupa)
The context sensitive stop subcommand is directed to task 3 only, but the current command context is unchanged. The next command entered at the pdbx command prompt is directed to all the tasks in the groupa task group.
At a pdbx prompt, you cannot use on context_name pdbx_command if any of the tasks in the specified context are running.
When a task is blocked (there is no pdbx prompt), you can press <Ctrl-c> to acquire control. This displays the pdbx subset prompt pdbx-subset([group | task]), and provides a subset of pdbx functionality including:
You can change the subset of tasks to which context sensitive commands are directed. Also, you can understand more about the current state of the application, and gain control of your application at any time, not just at user-defined breakpoints.
When a pdbx subset prompt is encountered, all input you type at the command line is intercepted by pdbx. All commands are interpreted and operated on by the home node. No data is passed to the remote nodes and standard input (STDIN) is not given to the application. Most commands in the pdbx subset produce information about the application and display the pdbx subset prompt. The exceptions are the halt, back, on, and quit commands. The halt, back, and on commands cause the pdbx prompt to be displayed when all of the tasks in the current context are in "debug ready" state.
The following example shows how the function works. A user is trying to understand the behavior of a program when tasks in the current context hang. This is a four task job with two groups defined called low and high. Low has tasks 0 and 1 while high has tasks 2 and 3. A breakpoint is set after a blocking read in task 2, and somewhere else in task 3. Group high is allowed to continue, and task 2 has a blocking read that will be satisfied by a write from task 0. Since task 0 is not executing, the job is effectively deadlocked and the pdbx prompt will not be displayed. The "effective deadlock" happens because the debugger controls some of the tasks that would otherwise be running. This could be called a debugger induced deadlock.
Using <Ctrl-c> allows the debugger to switch to task 0, then step past the write that satisfies the blocking read in task 2. A subsequent switch to group high shows task 2.
The following table shows some commands that are uniquely available at
the pdbx subset prompt, plus other pdbx commands that
can be used. Certain commands are not allowed. The available
commands keep the same command syntax as the pdbx subcommands (see "pdbx Subcommands").
| This subset command: | Is used to: | For more information see: | ||
|---|---|---|---|---|
| alias [alias_name string] | Set or display aliases. | "Creating, Removing, and Listing Command Aliases" | ||
| back | Return to a pdbx prompt. | "Returning to a pdbx Prompt" | ||
| group <action> [group_name] [task_list] | Manipulate groups. The actions are add, change, delete, and list. To indicate a range of tasks, enter the first and last task numbers, separated by a colon or dash. To indicate individual tasks, enter the numbers, separated by a space or comma. | "Grouping Tasks" | ||
| halt [all] | Interrupt all tasks in the current context that are running. If "all" is specified, all tasks, regardless of state, are interrupted. This command always returns to a pdbx prompt. | "Interrupting Tasks" | ||
| help [subject] | Display a list of pdbx commands and topics or help information about them. | "Accessing Help for pdbx Subcommands" | ||
| on <[group | task]> | Set the current context for later subcommands. This command always returns to a pdbx prompt. | "Setting Command Context" | ||
| source <cmd_file> | Execute subcommands stored in a file.
| "Reading Subcommands From a Command File" | ||
| status [all] | Display the trace and stop events within the current context. If "all" is specified, all events, regardless of context, are displayed. | "Checking Event Status" | ||
| tasks [long] | Display processes (tasks) and their states. | "Displaying Tasks and their States" | ||
| quit | Exit the pdbx program and kill the application. | "Exiting pdbx" | ||
| unalias alias_name | Remove a previously defined alias. | "Creating, Removing, and Listing Command Aliases" | ||
| <Ctrl-c> | Has no effect, except to display the following message:
Typing Ctrl-c from the pdbx subset prompt has no effect. Use the halt command to interrupt the application. Use the quit command to quit pdbx. Type help then enter to view brief help of the commands available. | "Context Switch when Blocked" |
The back command causes the pdbx prompt to be displayed, when all the tasks in the current context are in "debug ready" state. You can use the back command if you want the application to continue as it was before <Ctrl-c> was issued. Also, you can use it if during subset mode all of the nodes are checked into debug ready state, and you want to do normal pdbx processing. The back command is only valid in pdbx subset mode.
It is also possible to return to the pdbx prompt using the on and the halt commands.
Like the dbx debugger, pdbx lets you set breakpoints and tracepoints to control and monitor program execution. Breakpoints are stopping places in your program. They halt execution, enabling you to then examine the state of the program. Tracepoints are places in the program that, when reached during execution, cause the debugger to print information about the state of the program. An occurrence of either a breakpoint or a tracepoint is called an event.
If you are already familiar with breakpoints and tracepoints as they are used in dbx, be aware that they work somewhat differently in pdbx. The subcommands for setting, checking, and deleting them are similar to their counterparts in dbx, but have been modified for use on parallel programs. These differences stem from the fact that they can now be directed to any number of parallel tasks.
This section describes how to:
If you are already familiar with the dbx subcommands stop, trace, status, and delete, read the following as a discussion of how these subcommands are changed for pdbx.
The next few pages should act as an introduction to breakpoints and tracepoints if you are unfamiliar with dbx.
Refer to IBM AIX Version 4 Commands Reference and IBM AIX Version 4 General Programming Concepts: Writing and Debugging Programs for more information on subcommands.
The stop subcommand sets breakpoints for all tasks in the current context. When all tasks reach some breakpoint, execution stops and you can then examine the state of the program using other pdbx or dbx subcommands. These breakpoints can be different on each task.
The syntax of this context sensitive subcommand is:
stop if <condition>


stop at <source_line_number> [if <condition>]


stop in <procedure> [if <condition>]


stop <variable> [if <condition>]


stop <variable> at <source_line_number>
[if <condition>]


stop <variable> in <procedure> [if <condition>]
Specifying stop at <source_line_number> causes the breakpoint to be triggered each time that source line is reached.
Specifying stop in <procedure> causes the breakpoint to be triggered each time the program counter reaches the first executable source line in the procedure (function, subroutine).
Using the <variable> argument to stop causes the breakpoint to be triggered when the contents of the variable changes. This form of breakpoint can be very time consuming. For better results, when possible, further qualify these breakpoints with a source_line or procedure argument.
Specify the <condition> argument using the syntax described by "Specifying Expressions".
For example, to set a breakpoint at line 19 for all tasks in the current context, you would:
* The debugger displays a message reporting the event it has built. The message includes the current context, the event ID associated with your breakpoint, and an interpretation of your command. For example:
all:[0] stop at "ftoc.c":19
The message reports that a breakpoint was set for the tasks in the task group all, and that the event ID associated with the breakpoint is 0. Notice that the syntax of the interpretation is not exactly the same as the command entered.
Notes:
ERROR: 0029-2081 Cannot set breakpoint or tracepoint event in

                 different source files.
If this happens, you can either:
By using the halt command, you interrupt all tasks in the current context that are running. This allows the debugger to gain control of the application at whatever point the running tasks happen to be in the application. To a dbx user, this is the same as using <Ctrl-c>. This command works at the pdbx prompt and at the pdbx subset prompt. If you specify "all" with the halt command, all running tasks, regardless of context, are interrupted.
| Note: | At a pdbx prompt, the halt command never has any effect without "all" specified. This is because by definition, at a pdbx prompt, none of the tasks in the current context are in "running" state. |
The halt all command at the pdbx prompt affects tasks outside of the current context. Messages at the prompt show the task numbers that are and are not interrupted, but the pdbx prompt returns immediately because the state of the tasks in the current context is unchanged.
When using halt at the pdbx subset prompt, the pdbx prompt occurs when all tasks in the current context have returned to "debug ready" state. If some of the tasks in the current context are running, a message is presented.
The trace subcommand sets tracepoints for all tasks in the current context. When any task reaches a tracepoint, it causes the debugger to print information about the state of the program for that task.
The syntax of this context sensitive subcommand is:
trace [in <procedure>] [if <condition>]


trace <source_line_number> [if <condition>]


trace <procedure> [in <procedure>]
[if <condition>]


trace <variable> [in <procedure>]
[if <condition>]


trace <expression> at <source_line_number>
[if <condition>]
Specifying trace with no arguments causes trace information to be displayed for every source line in your program.
Specifying trace <source_line_number> causes the tracepoint to be triggered each time that source line is reached.
Specifying trace [in <procedure>] causes the tracepoint to be triggered each time your program executes a source line within the procedure (function, subroutine).
Using the <variable> argument to trace causes the tracepoint to be triggered when the contents of the variable changes. This form of tracepoint can be very time consuming. For better results, when possible, further qualify these tracepoints with a source_line_number or procedure argument.
Specify the <condition> argument using the syntax described by "Specifying Expressions".
The trace subcommand prints tracing information for a specified procedure, function, sourceline, expression, variable, or condition. For example, to set a tracepoint for the variable foo at line 21 for all tasks in the current context, you would:
* The debugger displays a message reporting the event it has built. The message includes the current context, the event ID associated with your tracepoint, and an interpretation of your command. For example:
all:[1] trace foo at "bar.c":21
This message reports that the tracepoint was set for the tasks in the task group all, and that the event ID associated with the tracepoint is 1. Notice that the syntax of the interpretation is not exactly the same as the command entered.
Notes:
ERROR: 0029-2081 Cannot set breakpoint or tracepoint event in

                 different source files.
If this happens, you can either:
When specifying a variable name as an argument on either the stop or trace subcommand, you should use fully-qualified names. This is because, when the stop or trace subcommand is issued, the tasks of your program could be in different functions, and the variable name may resolve differently depending on a task's position.
For example, consider the following SPMD code segment in myfile.c. It is running as two parallel tasks - task 0 and task 1. Task 0 is in func1 at line 4, while task 1 is in func2 at line 9.
1  int i;

2  func1()

3  {

4      i++;

5  }

6  func2()

7  {

8      int i;

9      i++;

10  }
To display the full qualification of a given variable, you use the which subcommand. For example, to display the full qualification of the variable i if the current context is all:
* The pdbx debugger displays the full qualification of the variable specified.
0:@myfile.i (from line 1 of previous example) 1:@myfile.func2.i (from line 8 of previous example)
Because the tasks are at different lines, issuing the following stop command would set a different breakpoint for each task:
stop if (i == 5)
The debugger would display a message reporting the event it has built.
all:[0] stop if (i == 5)
The i for task 0, however, would represent the global variable (@myfile.i) while the i for task 1 would represent the local variable i declared within func2 (@myfile.func2.i). To specify the global variable i without ambiguity on the stop subcommand, you would:
* The debugger reports the event it has built.
all:[0] stop if (@myfile.i == 5)
The delete subcommand removes events (breakpoints and tracepoints) of the specified pdbx event numbers. To indicate a range of events, enter the first and last event numbers, separated by a colon or dash. To indicate individual events, enter the numbers, separated by a space or comma. You can specify " * ", which deletes all events that were created in the current context. You can also specify "all", which deletes all events regardless of context. The syntax of this context sensitive subcommand is:
delete [event_list | * | all]
The event number is the one associated with the breakpoint or tracepoint. This number is displayed by the stop and trace subcommands when an event is built. Event numbers can also be displayed using the status subcommand. The output of the status command shows the creating context as the first token on the left before the colon.
Event numbers are unique to the context in which they were set, but not globally unique. Keep in mind that, in order to remove an event, the context must be on the appropriate task or task group, except when using the "all" keyword. For example, say the current context is on task 1 and the output of the status subcommand is:
1:[0] stop in celsius

all:[0] stop at "foo.c":19

all:[1] trace "foo.c":21
To delete all these events, you would do one of the following:
A list of pdbx events can be displayed using the status subcommand. You can specify "all" after this command to list all events (breakpoints and tracepoints) that have been set in all groups and tasks. This is valid at the pdbx prompt and the pdbx subset prompt.
The following shows examples of status, status all, and incorrect syntax with different breakpoints set on three different groups and two tasks.
pdbx(all) status

all:[0] stop at "test/vtsample.c":60


pdbx(all) status all

1:[0] stop in main

2:[0] stop in mpl_ring

all:[0] stop at "test/vtsample.c":60

evenTasks:[0] stop at "test/vtsample.c":58

oddTasks:[0] stop at "test/vtsample.c":56


pdbx(all) status woops

0029-2062 The correct syntax is either 'status' or 'status all'.
Because the status command (without "all" specified) is context sensitive, it will not display status for events outside the context.
The unhook subcommand lets you unhook a task so that it executes without intervention from the debugger. This subcommand is context sensitive and similar to the detach subcommand in dbx. The important difference is that you can regain control over a task that has been unhooked, while you cannot regain control over one that has been detached. To regain control over an unhooked task, use the hook subcommand. Detach is not supported in pdbx.
To better understand the hook and unhook subcommands, consider the following example. You are debugging a typical master/worker program containing many blocking sends and receives. You have created two task groups. One - named workers - contains all the worker tasks, and the other - named master - contains the master task. You would like to manipulate the master task and let the worker tasks process without debugger interaction. This would save you the bother of switching the command context back and forth between the two task groups.
Since the unhook subcommand is context sensitive, you must first set the context on the workers task group using the on subcommand. At the pdbx command prompt:
* The debugger sets the command context on the task group workers.
* The debugger unhooks the tasks in the task group workers.
The worker tasks are still indirectly affected by the debugger since they might, for example, have to wait on a blocking receive for a message from the master task. However, they do execute without any direct interaction from the debugger. If you later wish to reestablish control over the tasks in the workers task group, you would, assuming the context is on the workers task group:
* The debugger hooks any unhooked task in the current command context.
| Note: | The hook subcommand is actually an interrupt. When you interrupt a blocking receive, you cause the request to fail. If the program does not deal with an interrupted receive, then data loss may occur. |
The following section explains the where, print, and list subcommands for displaying and verifying data.
The where subcommand displays a list of active procedures and functions.
The syntax of this context sensitive subcommand is:
where
To view the stack trace, issue the where command. The following stack trace was encountered after halting task 1. You can see that the main routine at line 144 has issued an mpi_recv() call.
pdbx(1) where

read(??, ??, ??) at 0xd07b5ce0

readsocket() at 0xd07542f4

kickpipes() at 0xd0750e14

mpci_recv() at 0xd076032c

_mpi_recv() at 0xd0700e2c

MPI__Recv() at 0xd06ffab8

mpi__recv() at 0xd03c4474

main(), line 144 in "send1.f"
The print subcommand does either of the following:
The syntax of this context sensitive subcommand is:
print expression ...


print procedure ([parameters])
See "Specifying Expressions" for a description of valid expressions.
Following are some examples of printing portions of a two dimensional array of floats in a c program which is running on two nodes.
To display the type of array ff, enter:
pdbx(all) whatis ff

  0:float ff[10][10];

  1:float ff[10][10];
We can see the differences in the array values across the two nodes.
To show elements 4 through 7 of rows 2 and 3, enter:
pdbx(all) print ff[2..3][4..7]

  0:[2][4] = 30.0000076

  0:[2][5] = 42.0

  0:[2][6] = 0.0

  0:[2][7] = -3.52516241e+30

  0:[3][4] = -3.54361545e+30

  0:[3][5] = -3.60971468e+30

  0:[3][6] = 2.68063283e-09

  0:[3][7] = 4.65661287e-10

  0:

  1:[2][4] = -1.60068157e+10

  1:[2][5] = 0.0

  1:[2][6] = 0.0

  1:[2][7] = -3.52516241e+30

  1:[3][4] = -3.54361545e+30

  1:[3][5] = -3.60971468e+30

  1:[3][6] = 2.63675126e-09

  1:[3][7] = 1.1920929e-07

  1:
The same results as above could be achieved by entering:
print ff(2..3,4..7)
The array ff is being processed within a loop with loop counters i and j. The following demonstrates printing multiple variables and using program variables to specify the array elements.
pdbx(all) print "i is:", i, "\tj is:", j, "\n", ff[i][j..j+1]

  1:i is: 0     j is: 1

  1: [0][1] = -3.54331806e+30

  1:[0][2] = 4.40487202e-10

  1:

  0:i is: 2     j is: 6

  0: [2][6] = 0.0

  0:[2][7] = -3.52516241e+30

  0:
Following are some examples which display the elements of an array of structs:
The command whatis here is used to show that the type of the variable tree is an array size 4 of wood_attr_t's.
pdbx(0) whatis tree

  0:wood_attr_t tree[4];
Here the whatis command shows that wood_attr_t is a typedef for the listed structure.
pdbx(0) whatis wood_attr_t

  0:typedef struct {

  0:    int max_age;

  0:    int max_size;

  0:    int is_hard_wood;

  0:} wood_attr_t;
This whatis command shows that this_tree is a wood_attr_t ptr.
pdbx(0) whatis this_tree


  0:wood_attr_t *this_tree;
To display the elements of the first three entries in the tree array, enter:
pdbx(0) print tree[0..2]

  0:[0] = (max_age = 150, max_size = 120, is_hard_wood = 0)

  0:[1] = (max_age = 250, max_size = 150, is_hard_wood = 1)

  0:[2] = (max_age = 200, max_size = 125, is_hard_wood = 0)

  0:
To display the element max_size of entry 1 of the tree array, enter:
pdbx(0) p tree[1].max_size

  0:150
To display the entry that this_tree is pointing to, enter:
pdbx(0) p *this_tree

  0:(max_age = 200, max_size = 125, is_hard_wood = 0)
To display just the max_size of the entry that this_tree is pointing to, enter:
pdbx(0) p this_tree->max_size

  0:125
Following are some examples of displaying elements of a two dimensional array of reals in a Fortran program:
To take a look at the type of var43:
pdbx(all) whatis var43

 real*4  var43(4,3)
To display the entire array var43, enter:
pdbx(all) print var43

(1,1)   11.0

(2,1)   21.0

(3,1)   31.0

(4,1)   41.0

(1,2)   12.0

(2,2)   22.0

(3,2)   32.0

(4,2)   42.0

(1,3)   13.0

(2,3)   23.0

(3,3)   33.0

(4,3)   43.0
To display a portion of the array var43, enter:
pdbx(all)  print var43(1..2, 2..3)

(1,2) = 12.0

(2,2) = 22.0

(1,3) = 13.0

(2,3) = 23.0
Refer to IBM AIX Version 4 General Programming Concepts: Writing and Debugging Programs for more information on expression handling.
The list subcommand displays a specified number of lines of the source file. The number of lines displayed is specified in one of two ways:
| Tip: | Use on <task> list, or specify the ordered standard output option. |
In this case, the list subcommand displays lines starting a few lines before the beginning of the specified procedure and until the list window is filled.
The sourceline-expression parameter should consist of a valid line number followed by an optional + (plus sign), or - (minus sign), and an integer. In addition, a sourceline of $ (dollar sign) can be used to denote the current line number. A sourceline of @ (at sign) can be used to denote the next line number to be listed.
All lines from the first line number specified to the second line number specified, inclusive, are then displayed, provided these lines fit in the list window.
If the second source line is omitted, 10 lines are printed, beginning with the line number specified in the sourceline parameter.
If the list subcommand is used without parameters, the default number of lines is printed, beginning with the current source line. The default is 10.
To change the number of lines to list by default, set the special debug program variable, $listwindow, to the number of lines you want. Initially, $listwindow is set to 10.
The syntax of this context sensitive subcommand is:
list [procedure | sourceline-expression[, sourceline-expression]]
Some other features offered by pdbx include the following subcommands:
Also, this section includes information about how to specify expressions for the print, stop, and trace commands.
The help command with no arguments displays a list of pdbx commands and topics about which detailed information is available.
If you type "help" with one of the help commands or topics as the argument, information will be displayed about that subject.
The syntax of this context insensitive command is:
help [subject]
The dhelp command with no arguments displays a list of dbx commands about which detailed information is available.
If you type "dhelp" with an argument, information will be displayed about that command.
| Note: | The partition must be loaded before you can use this command, because it invokes the dbx help command. It is also required that a task be in "debug ready" state to process this command. After the program has finished execution, the dhelp command is no longer available. |
The syntax of this context insensitive command is:
dhelp [dbx_command]
The alias subcommand specifies a command alias. You could use it to reduce the amount of typing needed, or to create a name more easily remembered. The syntax of this context insensitive subcommand is:
alias [alias_name [alias_string]]
For example, assume that you have organized all tasks into two convenient groups - master and workers. During the execution of a program, you need to switch the command context back and forth between these two groups. You could save yourself some typing by creating one alias for on workers and one for on master. At the pdbx command prompt, you would:
Now to set the command context on the task group master, all you have to do is:
Likewise, you can now enter wor instead of on workers.
In addition to any aliases you create, there are a number of aliases supplied by pdbx when the partition is loaded. To display the list of all existing aliases, use the alias subcommand with no parameters. At the pdbx command prompt:
* The debugger displays a list of existing aliases. The example listing below shows all the default aliases provided by pdbx, as well as the two aliases - mas and wor - created in the previous example.
t                   where

j                   status

st                  stop

s                   step

x                   registers

q                   quit

p                   print

n                   next

m                   map

l                   list

h                   help

d                   delete

c                   cont

mas                 on master

wor                 on workers

th                  thread

mu                  mutex

cv                  condition

attr                attribute

active              tasks

threads             thread
Any aliases you create are not saved between pdbx sessions. You can also remove command aliases using the unalias subcommand. The syntax of this context insensitive subcommand is:
unalias alias_name
For example, to remove the alias mas defined above, you would:
| Note: | You can create, remove, and list command aliases as soon as you start the debugger. The partition does not need to be loaded. |
The source subcommand enables you to read a series of subcommands from a specified command file. The syntax of this context-insensitive subcommand is:
source command_file
The command_file should reside on the home node, and can contain any of the subcommands that are valid on the pdbx command line. For example, say you have a commands file named myalias which contains a number of command alias settings. To read its commands:
* The debugger reads the commands listed in myalias as if they had each been entered at the command line.
Notes:
Expressions are commonly used in the print command, and when specifying conditions for the stop or trace command.
You can specify conditions with a subset of C syntax, with some Fortran extensions. The following operators are valid:
Arithmetic Operators
Relational and Logical Operators
Bitwise Operators
Data Access and Size Operators
Miscellaneous Operators
The initial automatic breakpoint, which is set by default at function main, for pdbx can be redefined by the environment variable MP_DEBUG_INITIAL_STOP. See the manual page for the pdbx command in Appendix A. "Parallel Environment Tools Commands" for more information.
While pdbx recognizes function names, it is the combination of a function's name and its parameters, or the function name and the shared object it resides in, that uniquely identify it to pdbx. When encountering ambiguous functions, pdbx issues the Select menu, which lets the user choose the desired instance of the function.
The Select menu looks like this:
pdbx(all) stop in f1

1.ambig.f1(double)

2.ambig.f1(float)

3.ambig.f1(char)

4.ambig.f1(int)

Select one or more of [1 - 4]:
The whatis subcommand can be used to determine whether or not a function is ambiguous. If whatis returns more than one function definition for a given symbol, pdbx will consider it ambiguous.
There are a few restrictions for the pdbx select menu:
trace myfunc


print myfunc(parm1, parm2)
but complex expressions are not allowed when a function (myfunc) is ambiguous:
trace myvar-myfunc(parm1, parm2)


print myvar*myfunc(parm1)
It is possible to end the debug session at any time using either the quit subcommand, or the detach subcommand if debugging in attach mode.
To end a debug session in normal mode:
* This returns you to the shell prompt.
To end a debug session in attach mode, you can choose either quit or detach. Quitting causes the debugger and all the members of the original poe application partition to exit. Detaching causes only the debugger to exit and leaves all the tasks running.
* The debugger session ends, along with the poe application partition tasks.
* The debugger session ends. All tasks have been detached, but stay running.
| Note: | You can enter the quit and detach subcommands from either the pdbx prompt or pdbx subset prompt. |
Choosing detach causes pdbx to exit, and allows the program to which you had attached to continue execution if it hasn't already finished. If this program has finished execution, and is part of a series of job steps, then detaching allows the next job step to be executed.
If instead you want to exit the debugger and end the program, choose quit as described above.