 View figure.
This chapter provides some introductory information on the LoadLeveler graphical user interface (GUI). This section provides neither complete nor detailed instructions on using either the LoadLeveler GUI or any other graphical user interface. If this is the first time you are using a Motif-based GUI, you should refer to the appropriate Motif documentation for general GUI information.
This chapter also discusses how to customize your graphical user interface by modifying the Xloadl and Xloadl_so files and provides a discussion of the skel.cmd file.
Note that LoadLeveler provides an installation with two types of graphical user interfaces. One interface is for LoadLeveler users whose machines are interacting fully with LoadLeveler. The second interface is available to users whose machines are only participating on a limited basis. This second type of machine is called a submit-only machine.
To start the GUI, check your PATH variable to ensure that it is pointing to the LoadLeveler binaries. Also, check to see that your DISPLAY variable is set to your display. Then, type one of the following to start the GUI in the background:
In general, you can specify GUI options in any of the following ways:
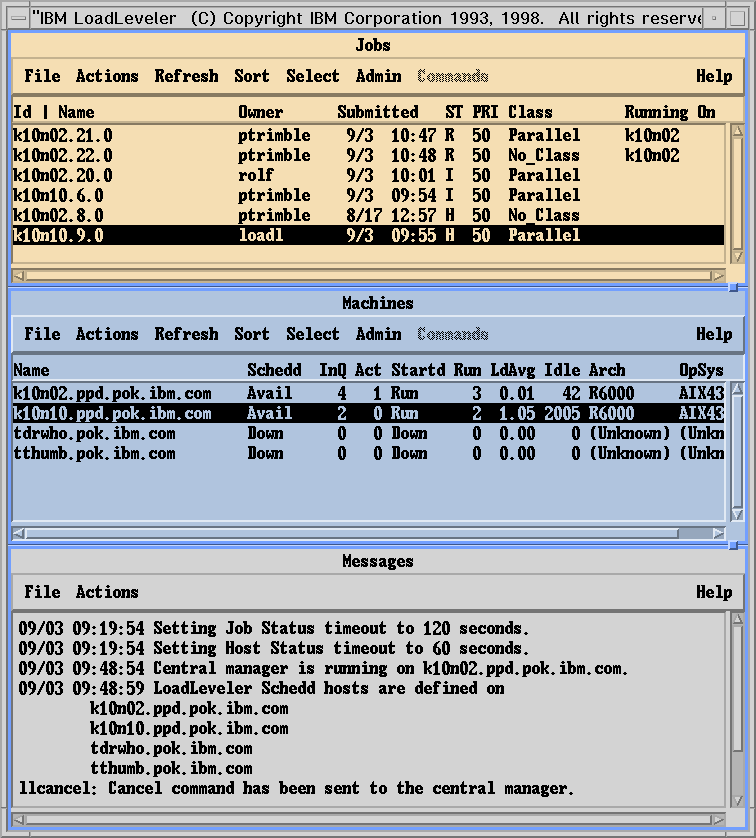
LoadLeveler's main window has three sub-windows, titled Jobs, Machines, and Messages, as shown in Figure 32. Each of these sub-windows has its own menu bar.
Figure 32. Main Window of the LoadLeveler GUI
View figure.
The menu bar on the Jobs window relates to actions you can perform on jobs. The menu bar on the Machines window relates to actions you can perform on machines. Similarly, the menu bar on the Messages window displays actions you can perform related to LoadLeveler generated messages.
When you select an item from a menu bar, a pull-down menu appears. You can select an item from the pull-down menu to carry out an action or to bring up another pull-down menu originating from the first one.
You can get help when using the GUI by pressing the Help key. This key is function key 1 (F1) on most keyboards. To receive help on specific parts of the LoadLeveler GUI, place the cursor over the area or field on which you want help and press F1. A help screen appears describing that area. You can also get help by using the Help pulldown menu and the Help push buttons available in pop-up windows.
Before you invoke the GUI, make sure your PATH statement includes the directory containing the LoadLeveler executable. Otherwise, some GUI functions may not work correctly.
LoadLeveler's GUI contains many items common to other GUIs. There are, however, some differences that you should be aware of. These differences are:
This chapter explains how to build and submit a job to LoadLeveler using the GUI. In addition, you will learn how to perform other job related tasks. You can accomplish these same tasks by using the LoadLeveler commands. For information on these commands, refer to "Command Reference".
This manual presents step-by-step instructions for performing tasks. For each step in a task, a user action and a system response to the action are included. User actions appear in uppercase boldface type, for example SELECT. The system response to an action follows a ##. For example:
An action is sometimes represented by itself. For example:
Other actions can require a selection or decision. Selection and decision actions are presented in tables.
Selection tables list all possible selections in the left column of the
table. The following is an example of a selection table:
| To | Do This |
|---|---|
| Submit a job | Refer to "Step 3: Submit a Job Command File" |
| Cancel a job | Refer to "Step 9: Cancel a Job" |
Decision tables present a question or series of questions before indicating
the action. The following is an example of a decision table:
| Did the job you submitted complete processing? |
| Yes | Submit another job. |
| No | Check the status of the job. |
Selections from a menu bar are indicated with an >. For example, if a menu bar included an option called Actions and Actions included an option called Cancel, the instructions would read:
The tasks described in this chapter are those that you, as a user might be interested in accomplishing and are presented in a typical step-by-step scenario. You do not have to follow the steps shown here and may perform certain tasks before others without any difficulty. Some tasks must be performed prior to others in order for succeeding tasks to work. For example, you cannot submit a job if you do not have a job command file that you built using either the GUI or an editor.
From the Jobs window:
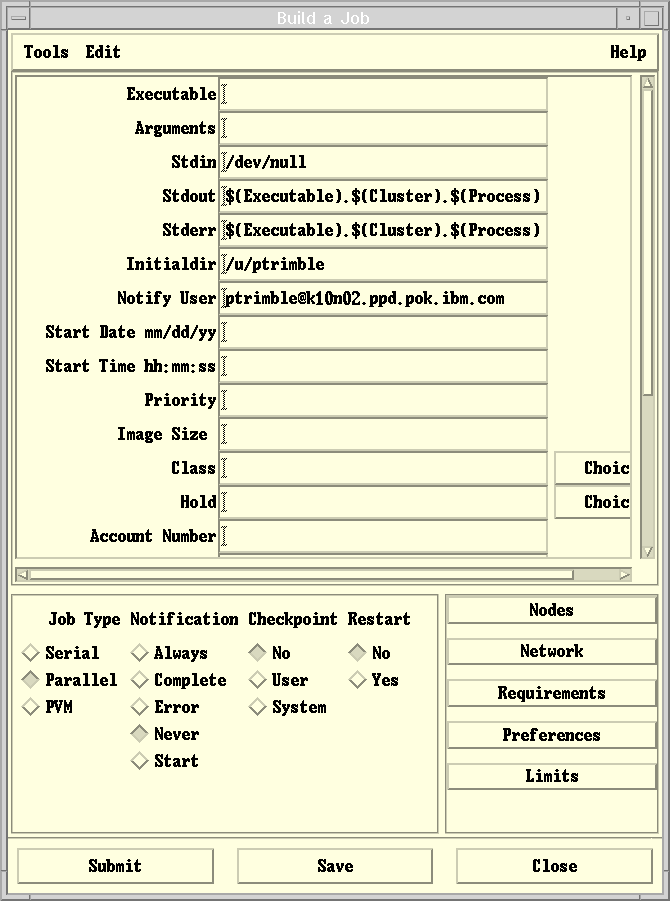
## The dialog box shown in Figure 33 appears:
Figure 33. LoadLeveler Build a Job Window
 View figure.
Complete those fields for which you want to override what is currently
specified in your skel.cmd defaults file. A sample
skel.cmd file is found in
/usr/LoadL/full/samples. You can update this file to define
defaults for your site, and then update the *skelfile resource in
Xloadl to point to your new skel.cmd file.
If you want a personal defaults file, copy skel.cmd to one
of your directories, edit the file, and update the *skelfile
resource in .Xdefaults.
| Field | Input | ||
|---|---|---|---|
| Executable | Name of the program to run. It must be an executable file.
Optional. If omitted, the command file is executed as if it were a shell script. | ||
| Arguments | Parameters to pass to the program.
Required only if the executable requires them. | ||
| Stdin | Filename to use as standard input (stdin) by the program.
Optional. The default is /dev/null. | ||
| Stdout | Filename to use as standard output (stdout) by the program.
Optional. The default is /dev/null. | ||
| Stderr | Filename to use as standard error (stderr) by the program.
Optional. The default is /dev/null. | ||
| Initialdir | Initial directory. LoadLeveler changes to this directory before
running the job.
Optional. The default is your current working directory. | ||
| Notify User | User id of person to notify regarding status of submitted job.
Optional. The default is your userid. | ||
| StartDate | Month, day, and year in the format mm/dd/yy. The job will not
start before this date.
Optional. The default is to run the job as soon as possible. | ||
| StartTime | Hour, minute, second in the format hh:mm:ss. The job
will not start before this time.
Optional. The default is to run the job as soon as possible. If you specify StartTime but not StartDate, the default StartDate is the current day. If you specify StartDate but not StartTime, the default StartTime is 00:00:00. This means that the job will start as soon as possible on the specified date. | ||
| Priority | Number between 0 and 100, inclusive.
Optional. The default is 50. This is the user priority. For more information on this priority, refer to "Setting and Changing the Priority of a Job". | ||
| Image size | Number in kilobytes that reflects the maximum size you expect your
program to grow to as it runs.
Optional. | ||
| Class | Class type. The job will only run on machines that support the
specified class type. Your system administrator defines the class
types.
Optional. You can press the Choices button to get a list of available classes. Press the Details button under the class list to verify your permissions. | ||
| Hold | Hold status of the submitted job. Permitted values are:
Optional. The default is a no-hold state. You can press the choice button to get a list of available hold types. | ||
| Account Number | Number associated with the job. For use with the llacctmrg and
llsummary commands for acquiring job accounting data.
Optional. Required only if the ACCT keyword is set to A_VALIDATE in the configuration file. | ||
| Environment | Specifies your initial environment variables when your job starts.
Separate environment specifications with semicolons.
Optional. | ||
| Shell | The name of the shell to use for the job.
Optional. If not specified, the shell used in the owner's password file entry is used. If none is specified, /bin/sh is used. | ||
| Group | The LoadLeveler group name to which the job belongs.
Optional. | ||
| Step Name | The name of this job step.
Optional. | ||
| Node Usage | How the node is used. Permitted values are:
Optional | ||
| Dependency | A Boolean expression defining the relationship between the job
steps.
Optional. | ||
| Comments | Comments associated with the job. These comments help to
distinguish one job from another job.
Optional. | ||
| |||
See "Job Command File Keywords" for information on the defaults associated with these keywords.
Your choices are:
Note that the job type you select affects the choices that are active on the Build A Job window.
Your choices are:
Your choices are:
Your choices are:
## The Nodes dialog box appears.
Complete those fields for which you want to specify node information for a
job type of parallel. Defaults are used for those fields that you leave
blank.
| Field | Input |
|---|---|
| Min # of Nodes | Minimum number of nodes required for running the parallel job.
Optional. The default is one. |
| Max # of Nodes | Maximum number of nodes required for running the parallel job.
Optional. The default is the minimum number of nodes. |
| Tasks per Node | The number of tasks of the parallel job you want to run per node.
For more information, see "tasks_per_node".
Optional. |
| Total Tasks | The total number of tasks of the parallel job you want to run on all
available nodes. For more information, see "total_tasks".
Optional. The default is one. |
## The Network dialog box appears.
Complete those fields for which you want to specify network
information.
| Field | Input |
|---|---|
| MPI/LAPI | Choose one, both, or none of these boxes to specify the MPI (Message
Passing Interface) protocol, the (LAPI Low-level Application Programming
Interface) protocol, both protocols, or neither protocol.
Optional. |
| Adapter/Network | Select an adapter name or a network type from the list.
Required for each protocol you select. |
| Adapter Usage | Specifies that the adapter is either shared or not shared.
Optional. The default is shared. |
| Communication Mode | Specifies the mode in which an SP switch adapter is used, and can be
either IP (internet Protocol) or US (User Space).
Optional. The default is IP. |
## The Requirements dialog box appears.
Complete those fields for which you want to specify requirements.
Defaults are used for those fields that you leave blank. LoadLeveler
dispatches your job only to one of those machines with resources that matches
the requirements you specify.
| Field | Input | ||
|---|---|---|---|
| Architecture* | Machine type. The job will not run on any other machine
type.
Optional. The default is the architecture of your current machine. | ||
| Operating System* | Operating system. The job will not run on any other operating
system.
Optional. The default is the operating system of your current machine. | ||
| Disk | Amount of disk space in the execute directory. The job will only
run on a machine with at least this much disk space.
Optional. The default is defined in your local configuration file. | ||
| Memory | Amount of memory. The job will only run on a machine with at least
this much memory.
Optional. The default is defined in your local configuration file. | ||
| Machine(s) | Machine name(s). The job will only run on the specified
machines.
Optional | ||
| Feature(s) | Features. The job will only run on machines with specified
features.
Optional | ||
| LoadLeveler Version | Specifies the version of LoadLeveler, in dotted decimal format, on the
machine where you want the job to run. For example:
2.1.0.0 specifies that your job will run on a machine
running LoadLeveler Version 2.1.0.0 or higher.
Optional | ||
| Pool | Specifies the number associated with the pool you want to use. All available pools listed in the administration file appear as choices. The default is to select nodes from any pool. | ||
| Requirement | Requirements. The job will only run if these requirements are
met.
| ||
| |||
|
*If you do not specify an architecture or operating system, LoadLeveler
assumes that your job can run only on your machine's architecture and
operating system. If your job is not a shell script that can be run
successfully on any platform, you should specify a required architecture and
operating system.
| |||
## The Preferences dialog box appears.
This dialog box is similar to the Requirements dialog box, with the exception of the Adapter choice, which is not supported as a Preference. Complete the fields for those parameters that you want to specify. These parameters are not binding. For any preferences that you specify, LoadLeveler attempts to find a machine that matches these preferences along with your requirements. If it cannot find the machine, LoadLeveler chooses the first machine that matches the requirements.
## The Limits dialog box appears.
Complete the fields for those limits that you want to impose upon your
job. If you type copy in any field, the limits in effect on
the submit machine are used. If you leave any field blank, the default
limits in effect for your userid on the machine that runs the job are
used.
| Field | Input |
|---|---|
| CPU Limit | Maximum amount of CPU time that the submitted job can use. Express
the amount as:
[hours:[minutes:][seconds][ .fraction] For example, 12:56:21 is 12 hours, 56 minutes, and 21 seconds. Optional |
| Data Limit | Maximum amount of the data segment that the submitted job can use.
Express the amount as:
integer[.fraction][units] where integer and fraction represent strings of up to eight digits. Optional |
| Core Limit | Maximum size of a core file.
Optional |
| RSS Limit | Maximum size of the resident set size. It is the largest amount of
physical memory a user's process can allocate.
Optional |
| File Limit | Maximum size of a file that is created.
Optional |
| Stack Limit | Maximum size of the stack.
Optional |
| Job CPU Limit | Maximum amount of CPU a single job step can use per processor.
Optional |
| Wall Clock Limit | Maximum amount of elapsed time for which a job can run.
Optional |
## The PVM dialog box appears.
Complete those fields for which you want to specify requirements.
Defaults are used for those fields that you leave blank.
| Field | Input |
|---|---|
| Min # of Processors | Minimum number of processors required for running the PVM job.
Optional. The default is one. |
| Max # of Processors | Maximum number of processors required for running the PVM job.
Optional. The default is one. |
| Parallel Path | The directory that defines where the PVM3 executables are located. |
| PVM | Specifies that an adapter is used for this PVM job. |
| Adapter/Network | Select an adapter name or a network type from the list.
Required. |
| Adapter Usage | Specifies that the adapter is either shared or not shared.
Optional. The default is shared. |
There are several ways that you can edit the job command file that you just built:
## The Submit a Job dialog box appears.
## Your job command file appears in a window. You can use any editor to edit the job command file. The default editor is specified in your .Xdefaults file.
If you have an icon manager, an icon may appear. An icon manager is a program that creates a graphic symbol, displayed on a screen, that you can point to with a device such as a mouse in order to select a particular function or application. Select this icon to view your job command file.
Using the Edit pulldown menu, you can modify the job command file.
Your choices appear in the following table:
| To | Select | ||
|---|---|---|---|
| Add a step to the job command file | Add a Step | ||
| Delete a step from the job command file | Delete a Step | ||
| Clear the fields in the Build a Job window | Clear Fields | ||
| Select defaults to use in the fields | Set Field Defaults | ||
| |||
Using the Tools pulldown menu, you can modify the job command
file. Your choices appear in the following table:
| To | Select |
|---|---|
| Name the job | Set Job Name |
| Open a window where you can enter a script file | Append Script |
| Fill in the fields using another file | Restore from File |
| View the job command file in a window | View Entire Job |
| Determine which step you are viewing | What is step # |
| Start a new job command file | Start a new job |
| To | Do This |
|---|---|
| Save the information you entered into a file which you can submit later |
|
| Submit the program immediately and discard the information you entered |
|
If you already submitted your job, go to "Step 4: Display, Refresh and Obtain Job Status". Otherwise, go to "Step 3: Submit a Job Command File".
After building a job command file, you can submit it to one or more machines for processing. In addition to scripts with LoadLeveler keywords, you can also submit scripts that contain NQS options. You cannot, however, in this release of LoadLeveler, combine NQS and LoadLeveler options.
To submit a job, from the Jobs window:
## The Submit a Job dialog box appears.
You can also use the filter field and the directories column to select the file or you can type in the file name in the text entry field.
## The job is submitted for processing.
You can now submit another job or you can press Close to exit the window.
Go to the next step.
When you submit a job, the status of the job is automatically displayed in the Jobs window. You can update or refresh this status using the Jobs window and selecting one of the following:
To change how often the amount of time should pass before the jobs window is automatically refreshed, use the Jobs window.
## A window appears.
Automatic refresh can be expensive in terms of network usage and CPU cycles. You should specify a refresh interval of 120 seconds or more for normal use.
## The window closes and the value you specified takes effect.
To receive detailed information on a job:
You can also get information in the following way:
Selecting this option is the same as typing llq -x -l command. You can also double click on the job in the Jobs window to get details on the job.
Note: Obtaining extended status or details on multiple jobs can be expensive in terms of network usage and CPU cycles.
You can also use the llq -s command to determine why a submitted job remains in the Idle or Deferred state.
For more information on these states, see llq - Query Job Status.
Go to the next step.
You can specify up to two sorting options for the Jobs window. The options you specify determine the order in which the jobs appear in the Jobs window.
From the Jobs window:
| Action | Select Sort > | Type of Sort |
|---|---|---|
| Sort jobs by the machine from which they were submitted | Sort by Submitting Machine > | [Primary|Secondary] |
| Sort by owner | Sort by Owner > | [Primary|Secondary] |
| Sort by the time the jobs were submitted | Sort by Submission Time > | [Primary|Secondary] |
| Sort by the state of the job | Sort by State > | [Primary|Secondary] |
| Sort jobs by their user priority (last job listed runs first) | Sort by Priority > | [Primary|Secondary] |
| Sort by the class of the job | Sort by Class > | [Primary|Secondary] |
| Sort by the group associated with the job | Sort by Group > | [Primary|Secondary] |
| Sort by the machine running the job | Sort by Running Machine > | [Primary|Secondary] |
| Sort by dispatch order | Sort by Dispatch Order > | [Primary|Secondary] |
| Not specify a sort | No Sort | [Primary|Secondary] |
Each sorting option contains a cascading window which allows you to select this option as either a Primary or Secondary sorting option. For example, suppose you select Sort by Owner as the primary sorting option and Sort by Class as the secondary sorting option. The Jobs window is sorted by owner and, within each owner, by class.
Go to the next step.
If your job has not yet begun to run and is still in the queue, you can change the priority of the job in relation to your other jobs in the queue that belong to the same class. This only affects the user priority of the job. For more information on this priority, refer to "Setting and Changing the Priority of a Job". Only the owner of a job or the LoadLeveler administrator can change the priority of a job.
From the Jobs window:
## A window appears.
## The window closes and the priority of your job changes.
Go to the next step.
Only the owner of a job or the LoadLeveler administrator can place a hold on a job.
From the Jobs window:
## The job is put on hold and its status changes in the Jobs window.
Go to the next step.
Only the owner of a job or the LoadLeveler administrator can release a hold on a job.
From the Jobs window:
## The job is released from hold and its status is updated in the Jobs window.
Go to the next step.
Only the owner of a job or the LoadLeveler administrator can cancel a job.
From the Jobs window:
## A warning dialog box appears prompting you to confirm your cancellation request. Once you confirm your request, LoadLeveler cancels the job and the job information disappears from the Jobs window.
Go to the next step.
The status of the machines is automatically displayed in the Machines window. You can update or refresh this status using the Machines window and selecting one of the following:
To specify an amount of time to pass before the Machines window is automatically refreshed, from the Machines window:
## A window appears.
Automatic refresh can be expensive in terms of network usage and CPU cycles. You should specify a refresh interval of 120 seconds or more for normal use.
## The window closes and the value you specified takes effect.
Go to the next step.
You can specify up to two sorting options for the Machines window. The options you specify determine the order in which machines appear in the window.
From the Machines window:
| Action | Select Sort > | Sort Type |
|---|---|---|
| Sort by machine name | Sort by Name > | [Primary|Secondary] |
| Sort by schedd state | Sort by Schedd > | [Primary|Secondary] |
| Sort by total number of jobs scheduled | Sort by InQ > | [Primary|Secondary] |
| Sort by number of running jobs scheduled by this machine | Sort by Act > | [Primary|Secondary] |
| Sort by startd state | Sort by Startd > | [Primary|Secondary] |
| Sort by the number of jobs running on this machine | Sort by Run > | [Primary|Secondary] |
| Sort by load average | Sort by LdAvg > | [Primary|Secondary] |
| Sort by keyboard idle time | Sort by Idle > | [Primary|Secondary] |
| Sort by hardware architecture | Sort by Arch > | [Primary|Secondary] |
| Sort by operating system type | Sort by OpSys > | [Primary|Secondary] |
| Not specify a sort | No Sort | [Primary|Secondary] |
Each sorting option contains a cascading window which allows you to select this option as either a Primary or Secondary sorting option. For example, suppose you select Sort by Arch as the primary sorting option and Sort by Name as the secondary sorting option. The Machines window is sorted by by hardware architecture, and within each architecture type, by machine name.
Go to the next step.
The LoadLeveler administrator designates one of the nodes in the LoadLeveler cluster as the central manager. When jobs are submitted at any node, the central manager is notified and decides where to schedule the jobs. In addition, it keeps track of the status of machines in the cluster and the jobs in the system by communicating with each node. LoadLeveler uses this information to make the scheduling decisions and to respond to queries.
To find the location of the central manager, from the Machines window:
## A message appears in the message window declaring on which machine the central manager is located.
Go to the next step.
Public scheduling machines are those machines that participate in the scheduling of LoadLeveler jobs on behalf of the submit-only machines.
To get a list of these machines in your cluster, use the Machines window:
## A message appears displaying the names of these machines.
Go to the next step.
Normally, only your jobs appear in the Jobs window. You can,
however, specify which jobs you want to appear by using the Select pull-down
menu on the Jobs window.
| To Display | Select Select > | ||
|---|---|---|---|
| All jobs in the queue | All | ||
| All jobs belonging to a specific user (or users) | By User
## A window appears prompting you to enter the user IDs whose jobs you want to view. | ||
| All jobs submitted to a specific machine (or machines) | By Machine
## A window appears prompting you to enter the machine names on which the jobs you want to view are running. | ||
| All jobs belonging to a specific group (or groups) | By Group
## A window appears prompting you to enter the LoadLeveler group names to which the jobs you want to view belong. | ||
| All jobs having a particular ID | By Job Id
A dialog box prompts you to enter the id of the job you want to appear. This ID appears in the left column of the Jobs window. Type in the ID and press OK. | ||
| |||
Go to the next step.
You can specify which machines will appear in the Machines window. The default is to view all of the machines in the LoadLeveler pool.
From the Machines window:
| To | Select Select > |
|---|---|
| View all of the machines | All |
| View machines by operating system | by OpSys
## A window appears prompting you to enter the operating system of those machines you want to view. |
| View machines by hardware architecture | by Arch
## A window appears prompting you to enter the hardware architecture of those machines you want to view. |
| View machines by state | by State
## A cascading pulldown menu appears prompting you to select the state of the machines that you want to view. |
Normally, all the messages that LoadLeveler generates appear in the Messages window. If you would also like to have these messages written to a file, use the Messages window.
## A window appears prompting you to enter a filename in which to log the messages.
## The window closes.
You can customize the GUI to suit your needs by overriding the default settings of the LoadLeveler resource variables. For example, you can set the color, initial size, and location of the main window.
This section tells you how to customize the GUI by modifying either (or both) of the following files:
If the system administrator has set up these resource files, the files are located in the /usr/lib/X11/app-defaults directory. Otherwise, the files are located in the lib directory of the LoadLeveler release directory. This is /usr/lpp/LoadL/full/lib and /usr/lpp/LoadL/so/lib, respectively. These files contain the default values for the graphical user interface. This section discusses the syntax of these files, and gives you an overview of some of the resources you can modify.
An administrator with root authority can make changes to the resources for the entire installation by editing the Xloadl file. Any user can make local changes by placing the resource names with their new values in the user's .Xdefaults file.
All of the windows and buttons that are part of the GUI have certain characteristics in common. For example, they all have a foreground and background color, as well as a size and a location. Each one of these characteristics is represented by a resource variable. For example, the foreground characteristic is represented by the resource variable foreground. In addition, every resource variable has a value associated with it. The values of the resource variable foreground are a range of colors.
Before customizing a window, you need to locate the resource variables
associated with the desired window. To do this, search for the window
identifier in your Xloadl file. The following table lists the windows
and their respective identifiers:
Table 10. Window Indentifiers in the Xloadl File
| Window | Identifier |
|---|---|
| Jobs | job_status |
| Machines | machine_status |
| Messages | message_area |
| Build a Job | builder |
| Submit a Job | submit |
| Requirements | requirements |
| Preferences | preferences |
| Limits | limits |
| Account Report Data | reporter |
| Nodes | nodes |
| Network | network |
| PVM | pvm |
| Script | script |
The following table lists the resource variables for all the windows and
the buttons along with a description of each resource variable. Use the
information in this table to modify your graphical user interface by changing
the values of desired resource variables. The values of these resource
variables depend upon Motif requirements.
| Resource Variable | Description |
|---|---|
| geometry | The location of the object |
| foreground | The foreground color of the object |
| background | The background color of the object |
| width | The width of the object |
| height | The height of the object |
| labelString | The text associated with the object |
You can add a pulldown menu to both the Jobs window and the Machines window.
To add a pulldown menu to the Jobs window, in the Xloadl file:
For more information, refer to the comments in the Xloadl file.
To add a pulldown menu to the Machines window, in the Xloadl file:
Suppose you want to create a new menu bar item containing a selection which executes the ping command against a machine you select on the Machines window.
Figure 34. Creating a New Pulldown Menu
*userJobPulldown: True *userJob.labelString: Commands *userJob.Option1: True *userJob.Option1_command: ping -c1 *userJob_Option1.labelString: ping *userJob_Option1_parameter: True *userJob_Option1_output: Window |
The Xloadl definitions shown in the Figure 34 create a menu bar item called "Commands". The first item in the Commands pulldown menu is called "ping". When you select this item, the command ping -c1 is executed, with the machine you selected on the Machines window passed to this command. Your output is displayed in an informational window.
For more information, refer to the comments in the Xloadl file.
You can control which fields are displayed and which fields are not displayed on the Jobs window and the Machine window by changing the Xloadl file. Look in the Xloadl file for "Resources for specifying lengths of fields displayed in the Jobs and Machines windows".
In most cases, you can remove a field from a window by setting its associated resource value to 0. To remove the Arch field from the Machines window, enter the following:
*mach_arch_len : 0
Note that the Job ID and Machine Name fields must always be displayed and therefore cannot be set to 0.
All fields have a minimum length value. If you specify a smaller value, the minimum is used.
Help panels have the same characteristics as all of the windows plus a
few unique ones:
| Resource Variable | Values | Description | ||
|---|---|---|---|---|
| help*work_area.width | Any integer* | The width of the help panel. | ||
| help*work_area.height | Any integer* | The height of the help panel. | ||
| help*scrollHorizontal | [true|false] The default is False. | Sets the scrolling option on or off. | ||
| help*wordWrap | [true|false] The default is True. | Sets word wrapping on or off. | ||
| ||||
The end user can perform many tasks more efficiently and faster using the graphical user interface (GUI) but there are certain tasks that end users cannot perform unless they have the proper authority. If you are defined as a LoadLeveler administrator in the LoadLeveler configuration file then you are immediately granted administrative authority and can perform the administrative tasks discussed in this section. To find out how to grant someone administrative authority, see "Step 1: Define LoadLeveler Administrators".
You can access LoadLeveler administrative commands using the Admin pulldown menu on both the Jobs window and the Machines window of the GUI. The Admin pulldown menu on the Jobs window corresponds to the command options available in the llhold, llfavoruser, and llfavorjob commands. The Admin pulldown menu on the Machines window corresponds to the command options available in the llctl command.
The main window of the GUI, as shown in Figure 32, has three sub-windows: one for job status with pull-down menus for job-related commands, one for machine status with pull-down menus for machine-related commands, and one for messages and logs. There are a variety of facilities available that allow you to sort and select the items displayed.
You access the administrative commands that act on jobs through the Admin pulldown menu in the Jobs window of the GUI.
You can perform the following tasks with this menu:
##The Order by User window appears.
##The Order by User window appears.
##The selected jobs are favored.
##Unfavors the jobs that you previously selected.
You access the administrative commands that act on machines using the Admin pulldown menu in the Machines window of the GUI.
Using the GUI pulldown menu, you can perform the tasks described in this section.
A cascading menu allows you to select either daemons, schedd, startd, or startd by class. If you select daemons, both machines will be drained. If you select schedd, only the schedd on the selected machine will be drained. If you select startd, only the startd on the selected machine will be drained. If you select startd by class, a window appears which allows you to select classes to be started.
A cascading menu allows you to select either daemons, schedd, startd, or startd by class. If you select daemons, both machines will be resumed. If you select schedd, only the schedd on the selected machine will be resumed. If you select startd, only the startd on the selected machine will be resumed. If you select startd by class, a window appears which allows you to select classes to be resumed.
A window appears prompting you to enter the name of the directory in which you want the collected data stored.
Note: If you want to receive an extended accounting report, select the extended cascading button.
A window appears prompting you to enter the following information:
The window closes and you return to the main window. The report appears in the Messages window if no output data file was specified.