 View figure.
This chapter describes how you monitor programs on the system. Included are instructions on how to use the Program Marker Array and System Status Array.
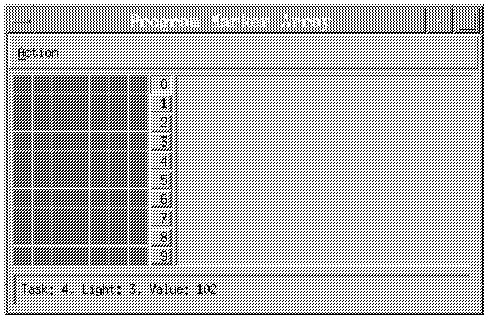
The Program Marker Array (shown in Figure 1) is an X-Windows run-time monitoring tool. This window consists of a number of small squares called lights that change color under program control. Each task in a parallel program has its own row of lights, and Parallel Utility Function calls from those tasks can change light colors. The calls can also send strings to the PM Array.
Figure 1. The Program Marker Array
View figure.
The ability to color lights on, and send strings to, the PM Array window enables a parallel program to provide you with immediate visual feedback as it executes. A program could begin by coloring lights red and then slowly move through the spectrum towards blue as it executes. If a program takes a long time to run, this would give you an indication that it was indeed progressing. Should the program not be progressing, the PM Array would indicate that as well. For example, lights "stuck" on a particular color could indicate that the program is stuck as well. The strings displayed could provide additional information on the program's progress. In addition, the Program Marker Array is distributed as source code, so you can customize the program as you see fit. The source code is located in the directory /usr/lpp/ppe.poe/samples/marker.
In order to use the PM Array to monitor program execution, you need to:
In order for the PM Array to display meaningful information at run time, you need to place calls to Parallel Utility Functions within your program. At run time, your program can then:
The syntax of these Parallel Utility Functions is shown in IBM Parallel Environment for AIX: MPI Programming and Subroutine Reference
Once you have inserted calls to the mpc_marker and mpc_nlights functions or the MP_MARKER and MP_NLIGHTS subroutines into your program, you can compile it. Since this is the same procedure you follow when regularly compiling a parallel program with POE, see page *** for more information. see "Step 1: Compile the Program" for more information.
When you open the PM Array window in the next step, the number of rows in the PM Array are set to the number of program tasks - the current setting of MP_PROCS. You can also specify the number of lights you want displayed per task row. To do this, set the environment variable MP_PMLIGHTS or specify the -pmlights command-line flag in "Step 5: Invoke the Program and Monitor its Execution". in "Step 5: Invoke the Program and Monitor its Execution".
For example, say you want five lights displayed per task in the PM
Array. You could:
| Set the MP_PMLIGHTS environment variable: | Use the -pmlights flag when invoking your executable: |
|---|---|
|
|
As with most POE command-line flags, the -pmlights flag temporarily overrides its associated environment variable.
Notes:
The pmarray command starts the PM Array program. You will probably want to use the & & operator so the program runs in the background and does not tie up the aixterm window.
* The PM Array window opens. The number of task rows displayed in the PM Array is equal to the current setting of MP_PROCS. The number of lights per task row is determined by the current setting of MP_PMLIGHTS. If, when you invoke your program in "Step 5: Invoke the Program and Monitor its Execution", you override either of the environment variables using its associated command-line flag, the PM Array redisplays with the new number of rows and/or lights.
| Note: | The PM Array connects to the Partition Manager using a socket assigned, by
default, to port 9999. If you get an error message indicating that the
port is in use, specify a different port by setting the MP_USRPORT
environment variable before entering the pmarray command.
For example, to specify port 9998:
|
Finally, you invoke your program. As the program runs, the Parallel Utility Function calls placed within it change the color of lights on the PM Array. With appropriate mouse clicks on this window, you can:
Each light on the PM Array is associated with a particular task, has a particular light number, and has a particular color value. You can display these details for each of the lights on the PM Array.
For example, say you have coded the PM Array subroutines into your program so that the lights slowly move during execution through the spectrum over color values 0 to 99. As the program runs, the lights start off black, and then turn brown, green, blue, and so on. By watching the lights as they change color, you get a general idea of the program's progress. For a more precise indication of the program's progress, you could display the actual color value number for a light. In this example, the closer this light's value is to 99, the closer execution is to being complete.
To display details of a light:
* The following information displays in the text area at the bottom of the PM Array window:
This information is not updated until you select another light.
You can display output strings sent by the tasks of your program in the output display area of the PM Array window. This is the area to the right of the PM Array, and the strings displayed there are the ones you specified on the mpc_marker or MP_MARKER subroutine calls. Only one task's strings are displayed in this area at a time. By default, output from task 0 is displayed. You can select the task and display its output instead by pressing its task push button. Each task has a push button. It is just to the right of the task's row on the PM Array, and is labeled with the task identifier. To select, for example, task 3:
* Output strings from task 3 are displayed in the output display area. Only one string is displayed at a time.
| Note: | If a task not currently selected has sent new output to the PM Array window, its task push button will appear yellow. |
The PM Array window remains open after your parallel program completes executing. You could then repeat "Step 5: Invoke the Program and Monitor its Execution" to monitor the same, or a different program's execution. To close the PM Array window when you are done monitoring:
| Note: | VT must be installed in order to use the System Status Array. See IBM Parallel Environment for AIX: Installation for more information on installing VT. |
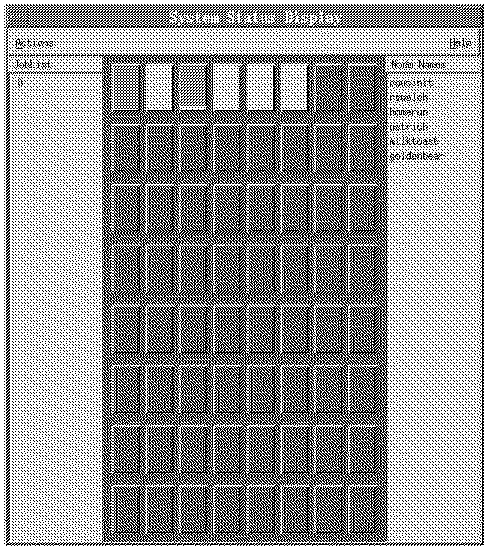
The System Status Array is an X-Windows monitoring tool that lets you quickly survey the utilization of processor nodes. This tool is particularly useful if you are not using a job management system, and so must manually schedule which nodes should be used to run a parallel program. The System Status Array lets you easily see the CPU utilization of each of your processor nodes. Using a host list file, you can then have your program run on those processor nodes you expect to be the least busy. The host list file can contain up to 255 nodes.
Figure 2. The System Status Array (actual array is 16 by 16 nodes)
 View figure.
Each square on the System Status Array represents a processor node of your SP system or cluster. The squares are colored pink and yellow to show the instantaneous percent of CPU utilization for each processor node. If a square were to appear all pink, it would be at 0 percent utilization. If a square were to appear all yellow, it would be at 100 percent utilization. The percent of the area colored yellow responds to the percent of CPU utilization. If a square appears gray, the node is unavailable for monitoring - either it does not have the Statistics Collector daemon (digd) running, or the System Status Array cannot communicate with it.
To the right of the Array is a node list which contains the name of each node in the Array. You use this list to identify the name of a node represented in the Array. The nodes are listed in order, left to right, starting with the top row of the Array. If you are using the resource manager on an SP system, the nodes are displayed in the pool order returned by the jm_status command. To use jm_status on a workstation that is external to the SP system, the ssp.clients fileset must be installed on the external node (see IBM Parallel Environment for AIX: Installation for more information). For more information on this command, see IBM Parallel System Support Programs for AIX: Command and Technical Reference If you are using an RS/6000 network cluster, or are using LoadLeveler on an SP system, the order of nodes displayed is determined by the order in which they are contacted.
Notes:
The poestat command starts the System Status Array, and opens its window. How you invoke this command differs depending on whether you are monitoring an SP system or an RS/6000 network cluster. The method the Array uses to find the processor nodes to monitor is also different. In either case, you will probably want to use the & operator so the program runs in the background and does not tie up the aixterm window.
| If you are monitoring an SP system: | If you are monitoring an RS/6000 network cluster: | ||
|---|---|---|---|
First make sure the environment variable SP_NAME is set to the
name of your control workstation. This environment variable identifies
the Resource Manager you are using. When running poestat
from a workstation that is external to an SP system, the
ssp.clients file set must be installed on the external node
(see IBM Parallel Environment for AIX: Installation for more information).
To start the Array:
|
|
Note that poestat allows you to specify a list of nodes to be monitored. You do this by setting the MP_HOSTFILE environment variable to MP_HOSTFILE=name_of_host_list_file. The default is host.list.
| Note: | For National Language Support, this X-Windows tool displays messages located
in an externalized message catalog. If you get an error saying that a
message catalog is not found, and want the default message catalog that we
provide:
For more information about the message catalog, see "National Language Support". |
When the System Status Array opens, all nodes display status. You can selectively stop and start displaying status for a single node or all nodes.
To toggle between displaying and not displaying status for a single node:
To toggle between displaying and not displaying status for all nodes:
To close the System Status Array window once you have finished monitoring: