 View figure.
The information in both the LoadL_config and the LoadL_config.local files is in the form of a statement. These statements are made up of keywords and values. There are three types of configuration file keywords:
Configuration file statements take one of the following formats:
keyword=value
keyword:value
Statements in the form keyword=value are used primarily to customize an environment. Statements in the form keyword:value are used by LoadLeveler to characterize the machine and are known as part of the machine description. Every machine in LoadLeveler has its own machine description which is read by the central manager when LoadLeveler is started.
To continue configuration file statements, use the back-slash character (\).
In the configuration file, comments must be on a separate line from keyword statements.
You can use the following types of constants and operators in the configuration file.
Constants may be represented as:
You can use the following C operators. The operators are listed in order of precedence. All of these operators are evaluated from left to right:
This section presents a step-by-step approach to configuring LoadLeveler. You do not have to perform the steps in the order that they appear here. Other keywords which are not specifically mentioned in any of these steps are discussed in Step 17: Specify Additional Configuration File Keywords.
Specify the following keyword:
LoadLeveler administrators on this list also receive mail describing problems that are encountered by the master daemon. When DCE is enabled, the LOADL_ADMIN list is used only as a mailing list. For more information, see Step 16: Configuring LoadLeveler to use DCE Security Services.
An administrator on a machine is granted administrative privileges on that machine. It does not grant him administrative privileges on other machines. To be an administrator on all machines in the LoadLeveler cluster either specify your user ID in the global configuration file with no entries in the local configuration file or specify your userid in every local configuration file that exists in the LoadLeveler cluster.
For example, to grant administrative authority to users bob and mary, enter the following in the configuration file:
LOADL_ADMIN = bob mary
You can use the following keywords to define the characteristics of the LoadLeveler cluster:
When set to true, every communication between LoadLeveler processes will verify that the sending process is running on a machine which is identified via a machine stanza in the administration file. The validation is done by capturing the address of the sending machine when the accept function call is issued to accept a connection. The gethostbyaddr function is called to translate the address to a name, and the name is matched with the list derived from the administration file.
This section discusses the types of schedulers that are available under LoadLeveler, and the keywords you use to define these schedulers.
See Keyword Considerations for Parallel Jobs for information on which keywords associated with parallel jobs are supported by the default scheduler.
For example: on a rack with 10 nodes, 8 of the nodes are being used by Job A. Job B has the highest priority in the queue, and requires 10 nodes. Job C has the next highest priority in the queue, and requires only two nodes. Job B has to wait for Job A to finish so that it can use the freed nodes. Because Job A is only using 8 of the 10 nodes, the Backfill scheduler can schedule Job C (which only needs the two available nodes) to run as long as it finishes before Job A finishes (and Job B starts). To determine whether or not Job C has time to run, the Backfill scheduler uses Job C's wall_clock_limit value to determine whether or not it will finish before Job A ends. If Job C has a wall_clock_limit of unlimited, it may not finish before Job B's start time, and it won't be dispatched.
The Backfill scheduler supports:
The above functions are not supported by the default LoadLeveler scheduler.
Note the following when using the Backfill scheduler:
See Keyword Considerations for Parallel Jobs for information on which keywords associated with parallel jobs are supported by the Backfill scheduler.
Use the following keywords to define your scheduler:
You can use the following keywords to define the characteristics of machines in the LoadLeveler cluster:
For example, to define a machine as a RISC System/6000, the keyword would look like:
ARCH = R6000
You can specify a default_class in the default user stanza of the administration file to set a default class. If you don't, jobs will be assigned the class called No_Class.
In order for a LoadLeveler job to run on a machine, the machine must have a vacancy for the class of that job. If the machine is configured for only one No_Class job and a LoadLeveler job is already running there, then no further LoadLeveler jobs are started on that machine until the current job completes.
You can have a maximum of 1024 characters in the class statement. You cannot use allclasses as a class name, since this is a reserved LoadLeveler keyword.
You can assign multiple classes to the same machine by specifying the classes in the LoadLeveler configuration file (called LoadL_config) or in the local configuration file (called LoadL_config.local). The classes, themselves, should be defined in the administration file. See Setting Up a Single Machine To Have Multiple Job Classes and Step 3: Specify Class Stanzas for more information on classes.
This example defines the default class:
Class = { "No_Class" }
This is the default. The machine will only run one LoadLeveler job at a time that has either defaulted to, or explicitly requested class No_Class. A LoadLeveler job with class CPU_bound, for example, would not be eligible to run here. Only one LoadLeveler job at a time will run on the machine.
This example specifies multiple classes:
Class = { "No_Class" "No_Class" }
The machine will only run jobs that have either defaulted to or explicitly requested class No_Class. A maximum of two LoadLeveler jobs are permitted to run simultaneously on the machine if the MAX_STARTERS keyword is not specified. See Step 5: Specify How Many Jobs a Machine Can Run for more information on MAX_STARTERS.
This example specifies multiple classes:
Class = { "No_Class" "Small" "Medium" "Large" }
The machine will only run a maximum of four LoadLeveler jobs that have either defaulted to, or explicitly requested No_Class, Small, Medium, or Large class. A LoadLeveler job with class IO_bound, for example, would not be eligible to run here.
This example specifies multiple classes:
Class = { "B" "B" "D" }
The machine will run only LoadLeveler jobs that have explicitly requested class B or D. Up to three LoadLeveler jobs may run simultaneously: two of class B and one of class D. A LoadLeveler job with class No_Class, for example, would not be eligible to run here.
You can specify unique characteristics for any machine using this keyword. When evaluating job submissions, LoadLeveler compares any required features specified in the job command file to those specified using this keyword. You can have a maximum of 1024 characters in the feature statement.
For example, if a machine has licenses for installed products ABC and XYZ, in the local configuration file you can enter the following:
Feature = {"abc" "xyz"}
When submitting a job that requires both of these products, you should enter the following in your job command file:
requirements = (Feature == "abc") && (Feature == "xyz")
In most cases, you will probably want to set this keyword to true. An example of why this keyword would be set to false is if you want to run the daemons on most of the machines in the cluster but some individual users with their own local configuration files do not want their machines to run the daemons. The individual users would modify their local configuration files and set this keyword to false. Because the global configuration file has the keyword set to true, their individual machines would still be able to participate in the LoadLeveler cluster.
Also, to define the machine as strictly a submit-only machine, set this keyword to false. For more information, see the submit-only keyword.
To define the machine as an executing machine only, set this keyword to false. For more information, see the submit-only keyword.
The LoadLeveler scheduler can schedule jobs based on the availability of consumable resources. You can use the following keywords to use Consumable Resources:
To specify how many jobs a machine can run, you need to take into consideration both the MAX_STARTERS keyword, which is described in this section, and the Class statement, which is mentioned here and described in more detail in Step 3: Define LoadLeveler Machine Characteristics
The syntax for MAX_STARTERS is:
For example, if the configuration file contains these statements:
Class = { "A" "B" "B" "C"}
MAX_STARTERS = 2
the machine can run a maximum of two LoadLeveler jobs simultaneously. The possible combinations of LoadLeveler jobs are:
If this keyword is specified in conjunction with a Class statement, the maximum number of jobs that can be run is equal to the lower of the two numbers. For example, if:
MAX_STARTERS = 2
Class = { "class_a" }
then the maximum number of job steps that can be run is one (the Class statement above defines one class).
If you specify MAX_STARTERS keyword without specifying a Class statement, by default one class still exists (called No_Class). Therefore, the maximum number of jobs that can be run when you do not specify a Class statement is one.
If this keyword is not defined in either the global configuration file or the local configuration file, the maximum number of jobs that the machine can run is equal to the number of classes in the Class statement.
Each job submitted to LoadLeveler is assigned a system priority number, based on the evaluation of the SYSPRIO keyword expression in the configuration file of the central manager. The LoadLeveler system priority number is assigned when the central manager adds the new job to the queue of jobs eligible for dispatch. Once assigned, the system priority number for a job is never changed (unless jobs for a user swap their SYSPRIO, or NEGOTIATOR_RECALCULATE_SYSPRIO_INTERVAL is not zero). Jobs assigned higher SYSPRIO numbers are considered for dispatch before jobs with lower numbers. See How Does a Job's Priority Affect Dispatching Order? for more information on job priorities.
You can use the following LoadLeveler variables to define the SYSPRIO expression:
This example creates a FIFO job queue based on submission time:
SYSPRIO : 0 - (QDate)
This example accounts for Class, User, and Group system priorities:
SYSPRIO : (ClassSysprio * 100) + (UserSysprio * 10) + (GroupSysprio * 1) - (QDate)
This example orders the queue based on the number of jobs a user is currently running. The user who has the fewest jobs running is first in the queue. You should set NEGOTIATOR_RECALCULATE_SYSPRIO_INTERVAL in conjunction with this SYSPRIO expression.
SYSPRIO : 0 - UserRunningJobs
Each executing machine is assigned a machine priority number, based on the evaluation of the MACHPRIO keyword expression in the configuration file of the central manager. The LoadLeveler machine priority number is updated every time the central manager updates its machine data. Machines assigned higher MACHPRIO numbers are considered to run jobs before machines with lower numbers. For example, a machine with a MACHPRIO of 10 is considered to run a job before a machine with a MACHPRIO of 5. Similarly, a machine with a MACHPRIO of -2 would be considered to run a job before a machine with a MACHPRIO of -3.
Note that the MACHPRIO keyword is valid only on the machine where the central manager is running. Using this keyword in a local configuration file has no effect.
When you use a MACHPRIO expression that is based on load average, the machine may be temporarily ordered later in the list immediately after a job is scheduled to that machine. This is because the negotiator adds a compensating factor to the startd machine's load average every time the negotiator assigns a job. For more information, see the NEGOTIATOR_INTERVAL keyword.
You can use the following LoadLeveler variables in the MACHPRIO expression:
This example orders machines by the Berkeley one-minute load average.
MACHPRIO : 0 - (LoadAvg)
Therefore, if LoadAvg equals .7, this example would read:
MACHPRIO : 0 - (.7)
The MACHPRIO would evaluate to -.7.
This example orders machines by the Berkeley one-minute load average normalized for machine speed:
MACHPRIO : 0 - (1000 * (LoadAvg / (Cpus * Speed)))
Therefore, if LoadAvg equals .7, Cpus equals 1, and Speed equals 2, this example would read:
MACHPRIO : 0 - (1000 * (.7 / (1 * 2)))
This example further evaluates to:
MACHPRIO : 0 - (350)
The MACHPRIO would evaluate to -350.
Notice that if the speed of the machine were increased to 3, the equation would read:
MACHPRIO : 0 - (1000 * (.7 / (1 * 3)))
The MACHPRIO would evaluate to approximately -233. Therefore, as the speed of the machine increases, the MACHPRIO also increases.
This example orders machines accounting for real memory and available swap space (remembering that Memory is in Mbytes and VirtualMemory is in Kbytes):
MACHPRIO : 0 - (10000 * (LoadAvg / (Cpus * Speed))) +
(10 * Memory) + (VirtualMemory / 1000)
This example sets a relative machine priority based on the value of the CUSTOM_METRIC keyword.
MACHPRIO : CustomMetric
To do this, you must specify a value for the CUSTOM_METRIC keyword or the CUSTOM_METRIC_COMMAND keyword in either the LoadL_config.local file of a machine or in the global LoadL_config file. To assign the same relative priority to all machines, specify the CUSTOM_METRIC keyword in the global configuration file. For example:
CUSTOM_METRIC = 5
You can override this value for an individual machine by specifying a different value in that machine's LoadL_config.local file.
This example gives master nodes the highest priority:
MACHPRIO : (MasterMachPriority * 10000)
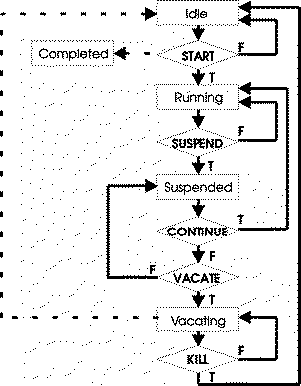
You can control running jobs by using five control functions as Boolean expressions in the configuration file. These functions are useful primarily for serial jobs. You define the expressions, using normal C conventions, with the following functions:
The expressions are evaluated for each job running on a machine using both the job and machine attributes. Some jobs running on a machine may be suspended while others are allowed to continue.
The START expression is evaluated twice; once to see if the machine can accept jobs to run and second to see if the specific job can be run on the machine. The other expressions are evaluated after the jobs have been dispatched and in some cases, already running.
When evaluating the START expression to determine if the machine can accept jobs, Class != { "Z" } evaluates to true only if Z is not in the class definition. This means that if two different classes are defined on a machine, Class != { "Z" } (where Z is one of the defined classes) always evaluates to false when specified in the START expression and, therefore, the machine will not be considered to start jobs.
When you use a START expression that is based on the CPU load average, the negotiator may evaluate the expression as F even though the load average indicates the machine is Idle. This is because the negotiator adds a compensating factor to the startd machine's load average every time the negotiator assigns a job. For more information, see the NEGOTIATOR_INTERVAL keyword.
Typically, machine load average, keyboard activity, time intervals, and job class are used within these various expressions to dynamically control job execution.
After LoadLeveler selects a job for execution, the job can be in any of several states. Figure 30 shows how the control expressions can affect the state a job is in. The rectangles represent job or daemon states, and the diamonds represent the control expressions.
Figure 30. How Control Expressions Affect Jobs
View figure.
Criteria used to determine when a LoadLeveler job will enter Start, Suspend, Continue, Vacate, and Kill states are defined in the LoadLeveler configuration files and may be different for each machine in the cluster. They may be modified to meet local requirements.
LoadLeveler provides accounting information on completed LoadLeveler jobs. For detailed information on this function, refer to Chapter 7, Gathering Job Accounting Data.
The following keywords allow you to control accounting functions:
For example:
ACCT = A_ON A_DETAIL
This example specifies that accounting should be turned on and that extended accounting data should be collected and that the -x flag of the llq command be enabled.
For example, the following section of the configuration file specifies that the accounting function is turned on. It also identifies the module used to perform account validation and the directory containing the global history files:
ACCT                = A_ON A_VALIDATE
ACCT_VALIDATION     = $(BIN)/llacctval
GLOBAL_HISTORY      = $(SPOOL)
In one of your machine stanzas specified in the administration file, you specified that the machine would serve as the central manager. It is possible for some problem to cause this central manager to become unusable such as network communication or software or hardware failures. In such cases, the other machines in the LoadLeveler cluster believe that the central manager machine is no longer operating. To remedy this situation, you can assign one or more alternate central managers in the machine stanza to take control.
The following machine stanza example defines the machine deep_blue as an alternate central manager:
#
deep_blue:  type=machine
central_manager = alt
If the primary central manager fails, the alternate central manager then becomes the central manager. The alternate central manager is chosen based upon the order in which its respective machine stanza appears in the administration file.
When an alternate becomes the central manager, jobs will not be lost, but it may take a few minutes for all of the machines in the cluster to check in with the new central manager. As a result, job status queries may be incorrect for a short time.
When you define alternate central managers, you should set the following keywords in the configuration file:
In the following example, the alternate central manager will wait for 30 intervals, where each interval is 45 seconds:
# Set a 45 second interval
CENTRAL_MANAGER_HEARTBEAT_INTERVAL = 45
# Set the number of intervals to wait
CENTRAL_MANAGER_TIMEOUT = 30
For more information on central manager backup, refer to What Happens if the Central Manager Isn't Operating?.
The configuration file provided with LoadLeveler specifies
default locations for all of the files and directories. You can modify
their locations using the following keywords. Keep in mind that the
LoadLeveler installation process installs files in these directories and these
files may be periodically cleaned up. Therefore, you should not keep
any files that do not belong to LoadLeveler in these directories.
| To specify the location of the: | Specify these keywords: |
|---|---|
| Administration File |
|
| Local Configuration File |
|
| Local Directory | The following subdirectories reside in the local directory. It is
possible that the local directory and LoadLeveler's home directory are
the same.
|
| Release Directory |
|
The LoadLeveler daemons and processes keep log files according to the specifications in the configuration file. A number of keywords are used to describe where LoadLeveler maintains the logs and how much information is recorded in each log. These keywords, shown in Table 13, are repeated in similar form to specify the pathname of the log file, its maximum length, and the debug flags to be used.
Controlling Debugging Output describes the events that can be reported through logging
controls.
Table 13. Log Control Statements
| Daemon/ Process | Log File (required)
(See note (PAT)) | Max Length (required)
(See note (MXL)) | Debug Control (required)
(See note (FLA)) |
|---|---|---|---|
| Master | MASTER_LOG = path | MAX_MASTER_LOG = bytes | MASTER_DEBUG = flags |
| Schedd | SCHEDD_LOG = path | MAX_SCHEDD_LOG = bytes | SCHEDD_DEBUG = flags |
| Startd | STARTD_LOG = path | MAX_STARTD_LOG = bytes | STARTD_DEBUG = flags |
| Starter | STARTER_LOG = path | MAX_STARTER_LOG = bytes | STARTER_DEBUG = flags |
| Negotiator | NEGOTIATOR_LOG = path | MAX_NEGOTIATOR_LOG = bytes | NEGOTIATOR_DEBUG = flags |
| Kbdd | KBDD_LOG = path | MAX_KBDD_LOG = bytes | KBDD_DEBUG = flags |
| GSmonitor | GSMONITOR_LOG = path | MAX_GSMONITOR_LOG = bytes | GSMONITOR_DEBUG = flags |
Notes:
You can also specify that the log file be started anew with every invocation of the daemon by setting the TRUNC statement to true as follows:
You can control the level of debugging output logged by LoadLeveler programs. The following flags are presented here for your information, though they are used primarily by IBM personnel for debugging purposes:
For example,
SCHEDD_DEBUG = D_CKPT D_XDR
causes the scheduler to log information about checkpointing user jobs and exchange xdr messages with other LoadLeveler daemons. These flags will primarily be of interest to LoadLeveler implementers and debuggers.
By default, LoadLeveler stores only the two most recent iterations of a daemon's log file (<daemon name>_Log, and <daemon name>_Log.old). Occasionally, for problem diagnosing, users will need to capture LoadLeveler logs over an extended period. Users can specify that all log files be saved to a particular directory by using the SAVELOGS keyword in a local or global configuration file. Be aware that LoadLeveler does not provide any way to manage and clean out all of those log files, so users must be sure to specify a directory in a file system with enough space to accomodate them. This file system should be separate from the one used for the LoadLeveler log, spool, and execute directories. The syntax is:
SAVELOGS = <directory>
where <directory> is the directory in which log files will be archived.
Each log file is represented by the name of the daemon that generated it, the exact time the file was generated, and the name of the machine on which the daemon is running. When you list the contents of the SAVELOGS directory, the list of log file names looks like this:
NegotiatorLogNov02.16:10:39c163n10.ppd.pok.ibm.com
NegotiatorLogNov02.16:10:42c163n10.ppd.pok.ibm.com
NegotiatorLogNov02.16:10:46c163n10.ppd.pok.ibm.com
NegotiatorLogNov02.16:10:48c163n10.ppd.pok.ibm.com
NegotiatorLogNov02.16:10:51c163n10.ppd.pok.ibm.com
NegotiatorLogNov02.16:10:53c163n10.ppd.pok.ibm.com
StarterLogNov02.16:09:19c163n10.ppd.pok.ibm.com
StarterLogNov02.16:09:51c163n10.ppd.pok.ibm.com
StarterLogNov02.16:10:30c163n10.ppd.pok.ibm.com
SchedLogNov02.16:09:05c163n10.ppd.pok.ibm.com
SchedLogNov02.16:09:26c163n10.ppd.pok.ibm.com
SchedLogNov02.16:09:47c163n10.ppd.pok.ibm.com
SchedLogNov02.16:10:12c163n10.ppd.pok.ibm.com
SchedLogNov02.16:10:37c163n10.ppd.pok.ibm.com
StartLogNov02.16:09:05c163n10.ppd.pok.ibm.com
StartLogNov02.16:09:26c163n10.ppd.pok.ibm.com
StartLogNov02.16:09:47c163n10.ppd.pok.ibm.com
StartLogNov02.16:10:12c163n10.ppd.pok.ibm.com
StartLogNov02.16:10:37c163n10.ppd.pok.ibm.com
A port number is an integer that specifies the port number to use to connect to the specified daemon. You can define these port numbers in the configuration file or the /etc/services file or you can accept the defaults. LoadLeveler first looks in the configuration file for these port numbers. If the port number is in the configuration file and is valid, this value is used. If it is an invalid value, the default value is used.
If LoadLeveler does not find the value in the configuration file, it looks in the /etc/services file. If the value is not found in this file, the default is used.
The configuration file keywords associated with port numbers are the following:
As stated earlier, if LoadLeveler does not find the value in the configuration file, it looks in the /etc/services file. If the value is not found in this file, the default is used. The first field on each line in the example that follows represents the name of a "service". In most cases, these services are also the names of daemons because few daemons need more than one udp and one tcp connection. There are two exceptions: LoadL_negotiator_collector is the service name for a second stream port that is used by the LoadL_negotiator daemon; LoadL_schedd_status is the service name for a second stream port used by the LoadL_schedd daemon.
LoadL_master               9616/tcp   # Master port number for stream port
LoadL_negotiator           9614/tcp   # Negotiator port number
LoadL_negotiator_collector 9612/tcp   # Second negotiator stream port
LoadL_schedd               9605/tcp   # Schedd port number for stream port
LoadL_schedd_status        9606/tcp   # Schedd stream port for job status data
LoadL_startd               9611/tcp   # Startd port number for stream port
LoadL_master               9617/udp   # Master port number for dgram port
LoadL_startd               9615/udp   # Startd port number for dgram port
This section tells you how to set up checkpointing for jobs. For more information on the job command file keywords mentioned here, see Job Command File Keywords. To enable checkpointing for parallel jobs, you must use the APIs provided with the Parallel Environment (PE) program. For information on parallel checkpointing, see IBM Parallel Environment for AIX: Operation and Use, Volume 1.
Checkpointing is a method of periodically saving the state of a job so that if the job does not complete it can be restarted from the saved state. You can checkpoint both serial and parallel jobs.
You can specify the following types of checkpointing:
At checkpoint time, a checkpoint file is created, by default, on the executing machine and stored on the scheduling machine. You can control where the file is created and stored by using the CHKPT_FILE and CHKPT_DIR environment variables, which are described in Set the Appropriate Environment Variables. The checkpoint file contains the program's data segment, stack, heap, register contents, signal state and the states of the open files at the time of the checkpoint. The checkpoint file is often much larger in size than the executable.
When a job is vacated, the most recent checkpoint file taken before the job was vacated is used to restart the job when it is scheduled to run on a new machine. Note that a vacating job may be killed by LoadLeveler if the job takes too long to write its checkpoint file. This occurs only when a job is vacated by the executing machine after the job's VACATE expression evaluates to TRUE. See Step 8: Manage a Job's Status Using Control Expressions for more information on the VACATE and KILL expressions.
If the executing machine fails, then when the machine restarts LoadLeveler reschedules the job, which restores its state from the most recent checkpoint file. LoadLeveler waits for the original executing machine to restart before scheduling the job to run on another machine in order to ensure that only one copy of the job will run.
Review the following guidelines before you submit a checkpointing job:
This section discusses the CHKPT_STATE, CHKPT_FILE, and CHKPT_DIR environment variables.
The CHKPT_STATE environment variable allows you to enable and disable checkpointing. CHKPT_STATE can be set to the following:
If you set checkpoint=no in your job command file, no checkpoints are taken, regardless of the value of the CHKPT_STATE environment variable. See checkpoint for more information.
The CHKPT_FILE and CHKPT_DIR environment variables help you manage your checkpoint files. For parallel jobs, you must specify at least one of these variables in order to designate the location of the checkpoint file. For serial jobs, if you do not specify either of these variables, LoadLeveler manages your checkpoint files. LoadLeveler stores the checkpoint file in its working directories and deletes the file as soon as the job terminates (that is, when the job exits the LoadLeveler system.) If your job terminates abnormally, there is no checkpoint file from which LoadLeveler can restart the job. When you resubmit the job, it will start running from the beginning.
To avoid this problem, use CHKPT_FILE and CHKPT_DIR to control where your checkpoint file is stored. CHKPT_DIR specifies the directory where it is stored, and CHKPT_FILE specifies the checkpoint file name. (You can use just CHKPT_FILE provided you specify a full path name. Also, you can use just CHKPT_DIR; in this case the checkpoint file is copied to the directory you specify with a file name of executable.chkpt.) You can use these variables to have your checkpoint file written to a the file system of your choice. This allows you to resubmit your job and have it restart from the last checkpoint file, since the file will not be erased if your job is terminated. If your job completes normally, the checkpoint library deletes all checkpoint files associated with the job.
Note that two or more job steps running at the same time cannot both write to the same checkpoint file, since the file will be corrupted.
See How to Checkpoint a Job for more information.
If you plan to migrate jobs (restart jobs on a different node or set of nodes), you should understand the difference between writing checkpoint files to a local file system (such as JFS) versus a global file system (such as AFS or GPFS). The CHKPT_DIR and CHKPT_FILE environment variables allow you to write to either type of file system. If you are using a local file system, you must first move the checkpoint file(s) to the target node(s) before resubmitting the job. Then you must ensure that the job runs on those specific nodes. If you are using a global file system, the checkpointing may take longer, but there is no additional work required to migrate the job.
A checkpoint file requires a significant amount of disk space. Your job may fail if the directory where the checkpoint file is written does not have adequate space. For serial jobs, the directory must be able to contain two checkpoint files. For parallel jobs, the directory must be able to contain 2*n checkpoint files, where n is the number of tasks. You can make an accurate size estimate only after you've run your job and noticed the size of the checkpoint file that is created. LoadLeveler attempts to reserve enough disk space for the checkpoint file when the job is started. However, only you can ensure that enough space is available.
To make sure that your job is not prevented from writing a checkpoint file due to system limits, assign your job to a job class that has its file creation limit set to the maximum (unlimited). In the administration file, set up a class stanza for checkpointing jobs with the following entry:
file_limit = unlimited,unlimited
This statement specifies that there is no limit on the maximum size of a file that your program can create.
For some processes, it is impossible to obtain or recreate the state of the process. For this reason, you should only checkpoint programs whose states are simple to checkpoint and recreate. A program that is long-running, computation-intensive, and does not fork any processes is an example of a job well suited for checkpointing.
In order to prevent unpredictable results from occurring, checkpointing jobs should not use the following system services:
Another limitation of checkpointing jobs is file I/O. Since individual write calls are not traced, the file recovery scheme requires that all I/O operations, when repeated, must yield the same result. A job that opens all files as read only can be checkpointed. A job that writes to a file and then reads the data back may also be checkpointed. An example of I/O that could cause unpredictable results is reading, writing, and then reading again the same area of a file.
A checkpointed serial job must be restarted on a machine with the same processor and the same operating system level, including service fixes, as the machine on which the checkpoint was taken.
A checkpointed parallel job must be restarted on a machine with the same processor, the same operating system level, including service fixes, and the same SP switch adapter(s) as the machine on which the checkpoint was taken.
Compile your program with one of the following supported compilers:
All serial checkpointing programs must be linked with the LoadLeveler libraries libchkrst.a and chkrst_wrap.o. To ensure your checkpointing jobs are linked correctly, compile your programs using the compile scripts found in the bin subdirectory of the LoadLeveler release directory. These compile scripts are as follows:
In all these scripts, be sure to substitute all occurrences of "RELEASEDIR" with the location of the LoadLeveler release directory.
C Syntax
crxlc executable [args] source_file
Where:
Some examples are:
   crxlc myprog myprog.c
   crxlc myprog -qlanglvl=extended myprog.c
C++ Syntax
crxlC executable [args] source_file
Where:
Some examples are:
   crxlC myprog myprog.C
   crxlC myprog -qlanglvl=extended myprog.C
FORTRAN Syntax
crxlf executable [args] source_file
Where:
Some examples are:
   crxlf myprog myprog.f
   crxlf myprog -qintlog -qfullpath myprog.f
There are several ways to checkpoint a job. To determine which type
of checkpointing is appropriate for your situation, refer to the following
table:
| To specify that: | Do this: |
|---|---|
| Your serial job determines when the checkpoint occurs | Add the following option to your job command file:
checkpoint = user_initiated You can also select this option on the Build a Job window of the GUI. User initiated checkpointing is available to FORTRAN, C, and C++ programs which call the ckpt serial checkpointing API. See Serial Checkpointing API for more information. |
| LoadLeveler automatically checkpoints your serial job. | Add the following option to your job command file:
checkpoint = system_initiated You can also select this option on the Build a Job window of the GUI. For this type of checkpointing to work, system administrators must set two keywords in the configuration file to specify how often LoadLeveler would take a checkpoint of the job. These two keywords are:
You can set these keyword values globally in the global configuration file so that all machines in the cluster have the same value, or you can specify a different value for each machine by modifying the local configuration files. To enable both user initiated and system initiated checkpointing for a job, specify checkpoint=system_initiated in your job command file, and code the ckpt API call in your program. System initiated checkpointing is not available to parallel jobs. |
| LoadLeveler restarts your executable from an existing checkpoint file when you submit the job. | Pass the CHKPT_STATE environment variable using the LoadLeveler environment keyword in your job command file. For more information, see environment. You must also set the CHKPT_DIR and/or CHKPT_FILE environment variables. |
| Your job not be checkpointed | Add the following option to your job command file:
checkpoint = no You can also select this option on the Build a Job window of the GUI. This option is the default. |
When a job terminates, it's orphaned processes may continue to consume or hold resources, thereby degrading system performance, or causing jobs to hang or fail. Process tracking allows LoadLeveler to cancel any processes (throughout the entire cluster), left behind when a job terminates. Using process tracking is optional. There are two keywords used in specifying process tracking:
When LoadLeveler is configured to exploit DCE security, it uses PSSP and DCE security services to:
You can skip this section if you do not plan to use these security features or if you plan to continue to use only the limited support for DCE available in LoadLeveler 2.1. Please consult Usage Notes for additional information.
When LoadLeveler is configured to exploit DCE security, most of its interactions with DCE are through the PSSP security services API. For this reason, it is important that you configure PSSP security services before you configure LoadLeveler for DCE. For more information on PSSP security services, please refer to: RS/6000 SP Planning Volume 2, Control Workstation and Software Environment (GA22-7281-05), Parallel System Support Programs for AIX Installation and Migration Guide Version 3 Release 2 (GA22-7347-02), and Parallel System Support Programs for AIX Administration Guide Version 3 Release 2 (SA22-7348-02).
DCE maintains a registry of all DCE principals which have been authorized to login to the DCE cell. In order for LoadLeveler daemons to login to DCE, DCE accounts must be set up, and DCE key files must be created for these daemons. In LoadLeveler 2.2 each LoadLeveler daemon on each node is associated with a different DCE principal. The DCE principal of the Schedd daemon running on node A is distinct from the DCE principal of the Schedd daemon running on node B. Since it is possible for up to seven LoadLeveler daemons to run on any particular node (Master, Negotiator, Schedd, Startd, Kbdd, Starter, and GSmonitor), the number of DCE principal accounts and key files that must be created could reach as high as 7x(number of nodes). Since it is not always possible to know in advance on which node a particular daemon will run, a conservative approach would be to create accounts and key files for all seven daemons on all nodes in a given LoadLeveler cluster. However, it is only necessary to create accounts and keyfiles for DCE principals which will actually be instantiated and run in the cluster.
These are the steps used for configuring LoadLeveler for DCE. We recommend that you use SMIT and the lldcegrpmaint command to perform this task. The manual steps are also described in Manual Configuration, and may be useful should you need to create a highly customized LoadLeveler environment. Some of the names used in this section are the default names as defined in the file /usr/lpp/ssp/config/spsec_defaults and can be overridden with appropriate specifications in the file /spdata/sys1/spsec/spsec_overrides. Also, the term "LoadLeveler node" is used to refer to a node on an SP system that will be part of a LoadLeveler cluster.
DCE_ENABLEMENT = TRUE
DCE_ADMIN_GROUP = LoadL-admin
DCE_SERVICES_GROUP = LoadL-services
DCE_ENABLEMENT must be set to TRUE to activate the DCE security features of LoadLeveler version 2.2. The LoadL-admin group should be populated with DCE principals of users who are to be given LoadLeveler administrative priviledges. For more information on populating the LoadL-admin group, see 9. The LoadL-services group should be populated with the DCE principals of all the LoadLeveler daemons that will be running in the current cluster. You can use the lldcegrpmaint command to automate this process. For more information on populating the LoadL-services group, see step 8. Note that these daemons are already members of the spsec-services group. If there is more than one DCE-enabled LoadLeveler cluster within the same DCE cell, then it is important that the name assigned to DCE_SERVICES_GROUP for each cluster be distinct; this will avoid any potential operational conflict.
dce_host_name = DCE hostnameExecute either "SDRGetObjects Node dcehostname," or "llextSDR" to obtain a listing of DCE hostnames of nodes on an SP system.
lldcegrpmaint config_pathname admin_pathnamewhere config_pathname is the pathname of the LoadLeveler global configuration file and admin_pathname is the pathname of the LoadLeveler administration file. The lldcegrpmaint command will:
For more information about the lldcegrpmaint command, see lldcegrpmaint - LoadLeveler DCE group Maintenance Utility.
dcecp -c group add LoadL-admin -member loadl
Here is an example of the steps you must take to configure LoadLeveler for DCE.
In this example, the LoadLeveler cluster consists of 3 nodes of an SP system which belong to the same DCE cell. Their hostnames and DCE hostnames are the same: c163n01.pok.ibm.com, c163n02.pok.ibm.com, and c163n03.pok.ibm.com. Assume that the basic PSSP security setup steps have been performed, and that the DCE group spsec-services and the DCE organization spsec-services have been created.
dcecp -c cdsli /.:/subsys
This command lists the contents of the /.:/subsys directory in DCE. LoadLeveler's product name within DCE is LoadL, so its product directory is /.:/subsys/LoadL. If this directory already exists, then continue to the next step. If it does not exist, issue to following command to create it:
dcecp -c directory create /.:/subsys/LoadL
product_name/dce_host_name/dce_daemon_name
where:
SERVICE:LoadL/Master:kw:root:system
The relevant portion of this record is Master; this is the DCE daemon name of LoadL_master. The DCE daemon names of other daemons can be identified in a similar manner.
For the c163n01.pok.ibm.com node, the following commands will create the desired principal names:
dcecp -c principal create LoadL/c163n01.pok.ibm.com/Master
dcecp -c principal create LoadL/c163n01.pok.ibm.com/Negotiator
dcecp -c principal create LoadL/c163n01.pok.ibm.com/Schedd
dcecp -c principal create LoadL/c163n01.pok.ibm.com/Kbdd
dcecp -c principal create LoadL/c163n01.pok.ibm.com/Startd
dcecp -c principal create LoadL/c163n01.pok.ibm.com/Starter
dcecp -c principal create LoadL/c163n01.pok.ibm.com/GSmonitor
These commands must then be repeated for each node in the LoadLeveler cluster, replacing the dce_host_name with the DCE hostname of each respective node.
dcecp -c group add spsec-services -member LoadL/c163n01.pok.ibm.com/Master
This operation must be repeated for all of the other LoadLeveler daemons on c163n01, and the complete set of operations must be repeated for all of the nodes in the LoadLeveler cluster.
dcecp -c organization add spsec-services -member LoadL/c163n01.pok.ibm.com/Master
This operation must be repeated for all of the other LoadLeveler daemons on c163n01, and the complete set of operations must be repeated for all of the nodes in the LoadLeveler cluster.
dcecp  <Enter>
dcecp> account create LoadL/c163n01.pok.ibm.com/Master \
       -group spsec-services -organization spsec-services \
       -password  service-password -mypwd  cell_admin's-password
dcecp> quit
The service-password passed to DCE in this command can be any valid DCE password. Please take note of it since you will need it when you create the key file for this daemon in step 8. The continuation character "\" is not supported by dcecp, but appears in the example merely for clarity. This operation must be repeated for the other LoadLeveler daemons on c163n01, and the complete set of operations must be repeated for all of the nodes in the LoadLeveler cluster.
mkdir -p /spdata/sys1/keyfiles/LoadL/dce_host_name
You must login to the appropriate node to perform this operation. This operation must be repeated for every node in the LoadLeveler cluster.
NOTE: The directory /spdata/sys1/keyfiles should already exist on each node in the cluster which has been installed with a level of PSSP software that supports DCE Security exploitation. If this directory does not exist, then the node cannot support DCE Security and LoadLeveler 2.2 in DCE mode will not run on it. If this configuration seems to be in error, contact your system administrator to determine which nodes in the cluster should support DCE Security.
 dcecp  <Enter>
 dcecp> keytab create LoadL/c163n01.pok.ibm.com/Master \
        -storage /spdata/sys1/keyfiles/LoadL/c163n01.pok.ibm.com/Master \
        -data { LoadL/c163n01.pok.ibm.com/Master plain 1 service-password }
 dcecp> quit
You must login to node c163n01 to perform this operation. DCE must be able to locate the key file locally, otherwise the daemon's login to DCE on startup will fail. The principal name passed to DCE in the preceeding example is the same principal name defined in step 3. The AIX path passed with the "-storage" flag should point to the same directory created in step 7. The principal name passed with the "-data" flag should match the principal name used at the beginning of the command. The password used in the service-password field must be the same as the service password defined when this principal's account was created in step 6.
This operation must be repeated for all of the other LoadLeveler daemons on node c163n01, and the complete set of operations must be repeated for all of the nodes in the LoadLeveler cluster.
dcecp -c group create LoadL-admin
dcecp -c group add LoadL-admin -member loadl
dcecp -c group add LoadL-services -member LoadL/c163n01.pok.ibm.com/Master
This operation must be repeated for all of the other LoadLeveler daemons on node c163n01, and the complete set of operations must be repeated for all of the nodes in the LoadLeveler cluster.
In LoadLeveler 2.2, this limited form of support for DCE is still available. If the DCE_ENABLEMENT keyword is not defined, then the DCE_AUTHENTICATION_PAIR keyword can still be used to activate this legacy feature. If this level of DCE support meets your requirements, then you can ignore the setup steps in this section. However, setting the DCE_ENABLEMENT configuration keyword to TRUE activates a more comprehensive level of support for DCE . In this case, LoadLeveler will use the PSSP security services API to perform mutual authentication of all appropriate transactions in addition to using llgetdce and llsetdce (or the pair of programs specified by DCE_AUTHENTICATION_PAIR) to obtain the opaque credentials object and to authenticate to DCE before starting the job. Unless you want to specify a pair of programs other than the default llgetdce and llsetdce binaries, the use of the DCE_AUTHENTICATION_PAIR keyword in the configuration file is optional when "DCE_ENABLEMENT = TRUE".
This section describes keywords that were not mentioned in the previous configuration steps. Unless your installation has special requirements for any of these keywords, you can use them with their default settings.
| Note: | For the keywords listed below which have a number as the value on the right side of the equal sign, that number must be a numerical value and cannot be an arithmetic expression. |
For more information, see Handling an AFS Token.
You must specify this keyword in order to enable DCE authentication. To use LoadLeveler's default DCE authentication method, specify:
DCE_AUTHENTICATION_PAIR = $(BIN)/llgetdce, $(BIN)/llsetdce
To use your own DCE authentication method, substitute your own programs into the keyword definition. For more information on DCE security credentials, see Handling DCE Security Credentials.
You can use this keyword to base the order in which jobs are run on the current number of running, queued, or total jobs for a user or a group. For more information, see Step 6: Prioritize the Queue Maintained by the Negotiator.
This type of variable, which is generally created and defined by the user, can be named using any combination of letters and numbers. A user-defined variable is set equal to values, where the value defines conditions, names files, or sets numeric values. For example, you can create a variable named MY_MACHINE and set it equal to the name of your machine named iron as follows:
MY_MACHINE = iron.ore.met.com
You can then identify the keyword using a dollar sign ($) and parentheses. For example, the literal $(MY_MACHINE) following the definition in the previous example results in the automatic substitution of iron.ore.met.com in place of $(MY_MACHINE).
User-defined definitions may contain references, enclosed in parentheses, to previously defined keywords. Therefore:
  A = xxx
  C = $(A)
is a valid expression and the resulting value of C is xxx. Note that C is actually bound to A, not to its value, so that
  A = xxx
  C = $(A)
  A = yyy
is also legal and the resulting value of C is yyy.
The sample configuration file shipped with the product defines and uses some "user-defined" variables.
The LoadLeveler product includes variables that you can use in the configuration file. LoadLeveler variables are evaluated by the LoadLeveler daemons at various stages. They do not require you to use any special characters (such as a parenthesis or a dollar sign) to identify them.
LoadLeveler provides the following variables that you can use in your configuration file statements.
variable : $(value)
You can use the following time variables in the START, SUSPEND, CONTINUE, VACATE, and KILL expressions. If you use these variables in the START expression and you are operating across multiple time zones, unexpected results may occur. This is because the negotiator daemon evaluates the START expressions and this evaluation is done in the time zone in which the negotiator resides. Your executing machine also evaluates the START expression and if your executing machine is in a different time zone, the results you may receive may be inconsistent. To prevent this inconsistency from occurring, ensure that both your negotiator daemon and your executing machine are in the same time zone.
START: (tm_mon == 9) && (tm_hour < 8) && (tm_hour > 17) && (tm_isdst = 1)
tm_year == 100
tm4_year == 2010
denotes the year 2010.