Administrator's Guide
After you have set up DRM, you perform a few routine
operations to stay prepared for a possible disaster. The following list
is an overview of these daily tasks in the order in which they are typically
done. Many of these tasks can be scheduled to occur automatically (see Chapter 15. "Automating Server Operations" for details).
- Back up client data.
- Back up the database and storage pools. See "Backing up the Primary Storage Pools and the Database" for details.
- Move the new backup tapes offsite and update the database with their
locations. See "Sending Server Backup Volumes Offsite" for details.
- Return expired or reclaimed backup tapes onsite and update the database
with their locations. See "Moving Reclaimed or Expired Volumes Back Onsite" for details.
- Generate a new disaster recovery plan. See "Creating the ADSM Server Disaster Recovery Plan" for details.
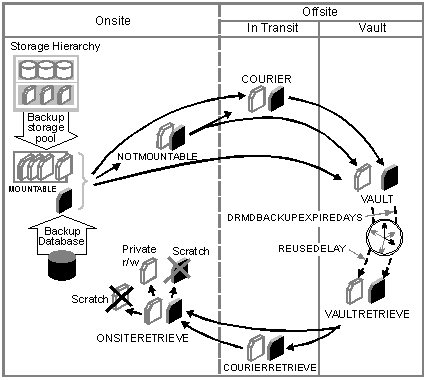
The following diagram is an overview of the recovery media life
cycle:
Figure 65. Recovery Media Life Cycle
| Task
| Required Privilege Class
|
| Manually sending backup volumes offsite and back onsite
| Unrestricted storage or operator
|
Update the location of the volumes with the MOVE DRMEDIA command and track
their locations with the QUERY DRMEDIA command.
Offsite recovery media management does not process virtual volumes.
To display all virtual copy storage pool and database backup volumes that have
their backup objects on the remote target server issue the following
command:
query drmedia * wherestate=remote
Backup volume location information is included in the disaster recovery
plan. In the event of a disaster that destroys the ADSM server, the
disaster recovery plan can provide a list of offsite volumes required at the
recovery site.
DRM uses the following states for volumes that are sent offsite. The
location of a volume is known at each state.
- MOUNTABLE
- The volume contains valid data, and ADSM can access it.
- NOTMOUNTABLE
- The volume contains valid data and is onsite, but ADSM cannot access
it.
- COURIER
- The volume contains valid data and is in transit to the vault.
- VAULT
- The volume contains valid data and is at the vault.
After you have created the backup copies of your primary storage pools and
database, you can send your backup media offsite.
To send server backup media offsite, you must mark the volumes as
unavailable to ADSM and give the volumes to the courier. Use the
following commands to identify the backup volumes written to by the ADSM
server backup database and backup storage pool commands, and move these
volumes offsite.
- Identify the copy storage pool and database backup volumes to
be moved offsite:
query drmedia * wherestate=mountable
ADSM displays information similar to the following:
+--------------------------------------------------------------------------------+
|Volume Name      State             Last Update          Automated               |
|                                   Date/Time            LibName                 |
|---------------  ----------------  -------------------  -----------------       |
| TPBK05          Mountable         01/01/1997 12:00:31  LIBRARY                 |
| TPBK99          Mountable         01/01/1997 12:00:32  LIBRARY                 |
| TPBK06          Mountable         01/01/1997 12:01:03  LIBRARY                 |
+--------------------------------------------------------------------------------+
- Indicate the movement of volumes whose current state is
MOUNTABLE by issuing the following command:
move drmedia * wherestate=mountable
This command automatically completes the following process for each volume
with a current state of MOUNTABLE:
- For a volume in an automated library, check the volume out of the
library.
- Update the volume state to NOTMOUNTABLE
- Update the volume location according to the SET
DRMNOTMOUNTABLENAME. If the SET command has not yet been issued, the
default location is NOTMOUNTABLE. For more information, refer to the
SET DRMNOTMOUNTABLENAME command.
- For a copy storage pool volume, update the access mode to
unavailable.
Notes:
- During checkout processing SCSI libraries request operator
intervention. To bypass these requests and eject the cartridges from
the library, first issue the following command:
move drmedia * wherestate=mountable remove=no
Next, access a list of the volumes by issuing the following command:
query drmedia wherestate=notmountable
From this list identify and remove the cartridges (volumes) from the
library.
- For the 349X library type, if the number of cartridges to be checked out
of the library is greater than the number of slots in the I/O station, you can
define a high capacity area in your library. Then use the following
command to eject the cartridges to the high capacity area, rather than to the
I/O station:
move drmedia * wherestate=mountable remove=bulk
- Send the volumes to the offsite vault. Issue the
following command to have ADSM select volumes in the NOTMOUNTABLE state and
update the state to COURIER.
move drmedia * wherestate=notmountable
This command does the following for all volumes in the NOTMOUNTABLE
state:
- Updates the volume state to COURIER.
- Updates the volume location according to the SET DRMCOURIERNAME. If
the SET command has not yet been issued, the default location is
COURIER. For more information, see "Courier Name".
- When the vault location confirms receipt of the volumes, issue the MOVE
DRMEDIA command with the WHERESTATE=COURIER parameter. For
example:
move drmedia * wherestate=courier
This command automatically completes the following process for all volumes
with a current state of COURIER:
- Updates the volume state to VAULT.
- Updates the volume location according to the SET DRMVAULTNAME
command. If the SET command has not yet been issued, the default
location is VAULT. For more information, see "Vault Name".
- To display a list of volumes that contain valid data at the vault, issue
the following command:
query drmedia wherestate=vault
ADSM displays information similar to the following:
+--------------------------------------------------------------------------------+
|Volume Name       State           Last Update          Automated                |
|                                  Date/Time            LibName                  |
|----------------- --------------  -------------------  -----------------        |
|TAPE0P            Vault           01/05/1997 10:53:20                           |
|TAPE1P            Vault           01/05/1997 10:53:20                           |
|DBT02             Vault           01/05/1997 10:53:20                           |
|TAPE3S            Vault           01/05/1997 10:53:20                           |
+--------------------------------------------------------------------------------+
- If you do not want to step through all the states, you can use TOSTATE
parameter on the MOVE DRMEDIA command to specify the destination state.
For example, to transition the volumes from NOTMOUNTABLE state to VAULT state,
issue the following command:
move drmedia * wherestate=notmountable tostate=vault
This command automatically completes the following process for all volumes
with a current state of NOTMOUNTABLE:
- Updates the volumes' state to VAULT.
- Updates the volumes' location according to the SET DRMVAULTNAME
command. If the SET command has not yet been issued, the default
location is VAULT.
See "Disaster Recovery Preparation" for an example that demonstrates sending server backup volumes offsite using
MOVE DRMEDIA and QUERY DRMEDIA commands.
DRM uses the following states for backup volumes that are reclaimed or no
longer contain valid data and are to be moved back onsite.
- VAULTRETRIEVE
- The volumes no longer contain valid data and are to be returned to the
site. For more information on reclamation of offsite copy storage pool
volumes, see "Reclamation of Offsite Volumes". For information on expiration of database backup volumes, see step 1 below.
- COURIERRETRIEVE
- The volumes no longer contain valid data and are in the process of being
returned by the courier.
- ONSITERETRIEVE
- The volumes no longer contain valid data and have been moved back to the
onsite location. The volume records of ADSM database backup and scratch
copy storage pool volumes are deleted from the ADSM database. For
private copy storage pool volumes, the access mode is updated to
READWRITE.
Use the following procedure to expire the nonvirtual database backup
volumes and return the volumes back onsite for reuse or disposal.
- Specify the number of days before a database backup series is
expired. To ensure that the database can be returned to an earlier
level and database references to files in the copy storage pool are still
valid, specify the same value for the REUSEDELAY parameter in your copy
storage pool definition.
A database backup volume is considered eligible for expiration if all of
the following conditions are true:
- The last volume of the series has exceeded the expiration value specified
with SET DRMDBBACKUPEXPIREDAYS. The expiration value specifies the
number of days that must elapse since the volume was used by database
backup.
- The volume's state is VAULT.
- The volume is not part of the most recent series. (DRM will not
expire the most recent database backup series.)
The following example sets the number of days to 30.
set drmdbbackupexpiredays 30
| Note: | The database backup volumes that are virtual volumes are removed during
expiration processing. This processing is initiated either by issuing
the EXPIRE INVENTORY command or automatically through the EXPINTERVAL option
setting specified in the server options file.
|
- When a backup volume is reclaimed and the ADSM status for a copy storage
pool volume is EMPTY or the database backup series is EXPIRED, the volume
should be moved back onsite for reuse or disposal. To determine which
volumes to retrieve, issue the following command:
query drmedia * wherestate=vaultretrieve
- After you request the reclaimed volumes be moved back onsite, and the
vault location acknowledges that the volumes have been given to the courier,
issue the following command:
move drmedia * wherestate=vaultretrieve
This command automatically completes the following process for all volumes
with a current state of VAULTRETRIEVE:
- The state of the volume is changed to COURIERRETRIEVE.
- The location of the volume is updated according to what is specified in
the SET DRMCOURIERNAME command. For more information, see "Courier Name".
- When the courier delivers the volumes, issue the following command to
acknowledge that the courier has returned the volumes onsite:
move drmedia * wherestate=courierretrieve
This command automatically completes the following process for all volumes
with a current state of COURIERRETRIEVE:
- The volumes are now onsite and can be reused or disposed.
- The database backup volumes are deleted from the volume history
table.
- For scratch copy storage pool volumes, the record in the ADSM database is
deleted. For private copy storage pool volumes, the access is updated
to read/write.
- If you do not want to step through all the states, you can use the TOSTATE
parameter on the MOVE DRMEDIA command to specify the destination state.
For example, to transition the volumes from VAULTRETRIEVE state to
ONSITERETRIEVE state, issue the following command:
move drmedia * wherestate=vaultretrieve tostate=onsiteretrieve
This command automatically completes the following process for all volumes
with a current state of VAULTRETRIEVE:
- The volumes are now onsite and can be reused or disposed.
- The database backup volumes are deleted from the volume history
table.
- For scratch copy storage pool volumes, the record in the ADSM database is
deleted. For private copy storage pool volumes, the access is updated
to read/write.
For an example scenario that demonstrates moving volumes back onsite, see "Disaster Recovery Preparation".
[ Top of Page | Previous Page | Next Page | Table of Contents | Index ]